How to speed up BlueStacks for faster Android emulation
BlueStacks is at the forefront when it comes to Android emulators on PC. It’s been around for a long time, and users aren’t looking for alternatives soon. This popularity is down to BlueStacks’ performance.
With BlueStacks installed on your computer, you can run Android apps and games at speeds six to eight times quicker than on high-end Android smartphones. However, due to some factors, BlueStacks can get incredibly slow and unusable.
Speed up BlueStacks for faster Android emulation
BlueStacks running slowly can result from the third-party apps, computer settings, or settings from BlueStacks itself. Here are the troubleshooting steps we’ll explore to fix this issue:
- Update your graphics card driver.
- Allocate more RAM and CPU cores to BlueStacks.
- Update BlueStacks.
- Reduce your BlueStacks resolution and DPI.
- Disable antivirus programs.
- Shut down background apps and services.
I recommend that you follow these troubleshooting steps in the order we’ve presented. In the section below, you’ll find the exact steps to follow in carrying out the above processes.
1] Update your graphics card driver
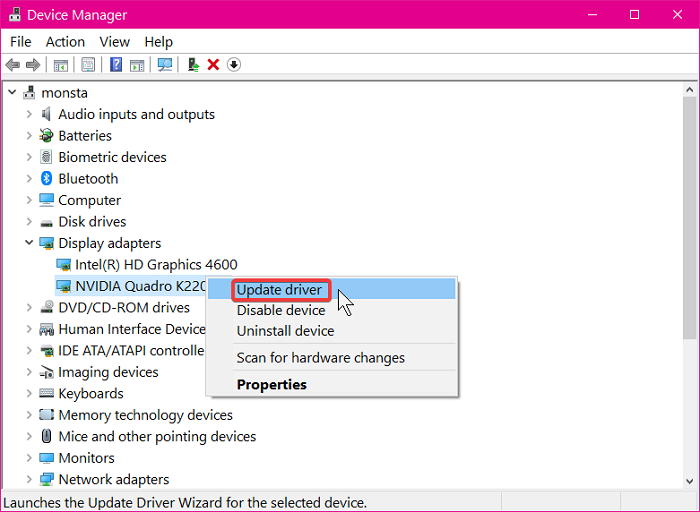
If you notice that apps and games on your BlueStacks are getting slow, your graphics card driver should be a prime suspect. Newer editions of graphic card drivers come with performance improvements that optimize your gaming and graphics in general.
Although your graphics card driver should update together with Windows updates, the system might’ve skipped it. Make sure that your graphics card driver is up to date. If not, update it.
Go to the graphics card manufacturer’s website and download the latest version of the driver. If you’re not sure of what graphics card you use, read this guide. After downloading the driver, press the Windows key + R combination and enter devmgmt.msc in the Run box.
Click on the OK button. Expand the Display adapters item and right-click on your graphics adapter driver here. Select Update driver from the context menu.
Select the Browse my computer for driver software option from the next window and locate the driver you just downloaded. Hit the Next button to continue.
Follow the on-screen steps to complete the driver update and restart your computer after this. If you have more than one graphics card, you have to follow the above steps for each of their drivers.
2] Allocate more RAM and CPU cores to BlueStacks
Launch the BlueStacks emulator application and select the Gear icon from the right-hand corner of your screen to access the Settings menu.
On the new Preferences window, navigate to the Engine tab. Go to the Performance area and click on the dropdown—select Custom from the dropdown menu.
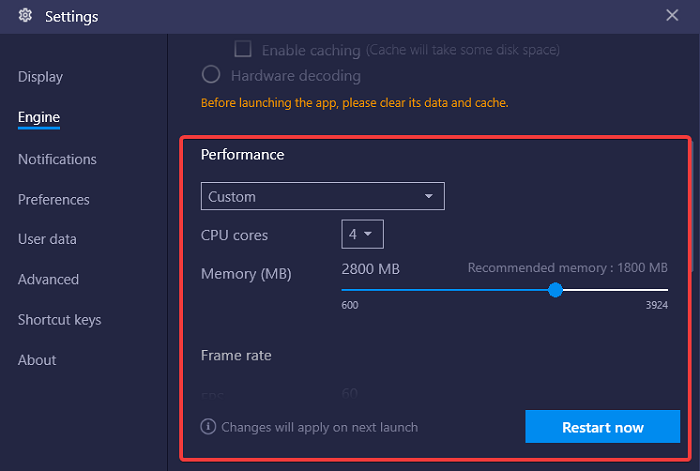
To increase the number of CPU cores, BlueStack uses, select the dropdown menu beside CPU cores, and select a higher number than what’s there presently. For the RAM allocation increase, click and drag the slider next to Memory (MB) towards the right. Click the Restart button to save your settings and restart BlueStacks.
3] Update BlueStacks
For the same reason why you update your graphics card driver, updating BlueStacks can work. BlueStacks informs you of available updates whenever you launch the application. If you don’t get this warning, visit the BlueStacks website and click Download BlueStacks to get it onto your machine.
After downloading the BlueStacks update, you now need to update the application. If your current BlueStacks version is 3.52.66.1905 or above, you’re in luck! You can update your edition without losing data, such as in-app purchases or game data.
However, if your BlueStacks version is lower than 3.7.44.1625, you will lose all your app data during the updating process because BlueStacks doesn’t let you update directly.
4] Reduce your BlueStacks resolution and DPI
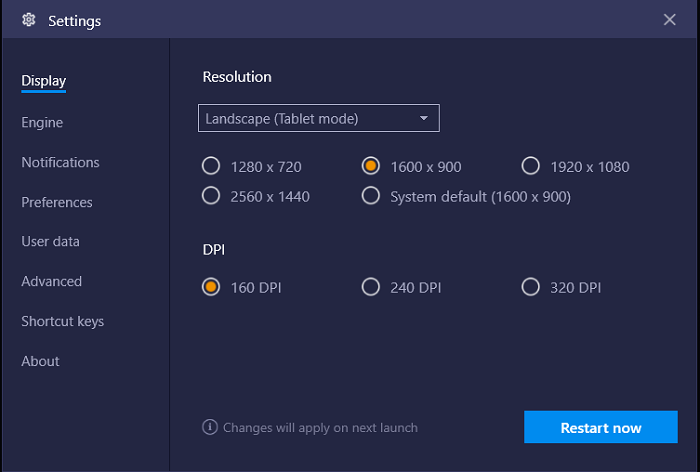
BlueStacks’ display settings can affect your Android apps and gameplay when using them on Windows. Generally, the higher the resolution and DPI, the slower the performance, especially on low or mid-range computers.
You may want to trade off some of the resolution and DPI for smooth app usage and gameplay. Launch BlueStacks and click on the gear icon to open Settings. In the BlueStacks settings window, go to the Display tab.
Go to the DPI area and select a lower option, such as 160 DPI. Do the same for the display resolution. Choose one lower than the current resolution, which may be set to System default. Hit the Restart now button to save and close the options.
5] Disable antivirus programs
The presence and activities of antivirus programs may impact BlueStack’s speed and performance. If you’ve attempted all of the options explained above and still have no luck, your active antivirus may be causing the slowness.
To determine if your antivirus program is why BlueStacks’ slowness, disable it and retry using BlueStakcs. You can disable most antiviruses by right-clicking on your icon on the taskbar and selecting the Disable option. If you can’t find it on your taskbar, open the antivirus and click the Disable option on the primary window.
6] Shut down background apps and services
BlueStacks and the apps and games you run on it are resource-demanding. Therefore, if you run it with other resource-hungry applications, BlueStacks’ performance levels will drop. Thankfully, the Task Manager shows us the running apps and the memory they use.
You can launch Task Manager by pressing the CTRK + SHIFT + ESC key combination. In the Processes tab, right-click on the third-party app and hit the End task option.
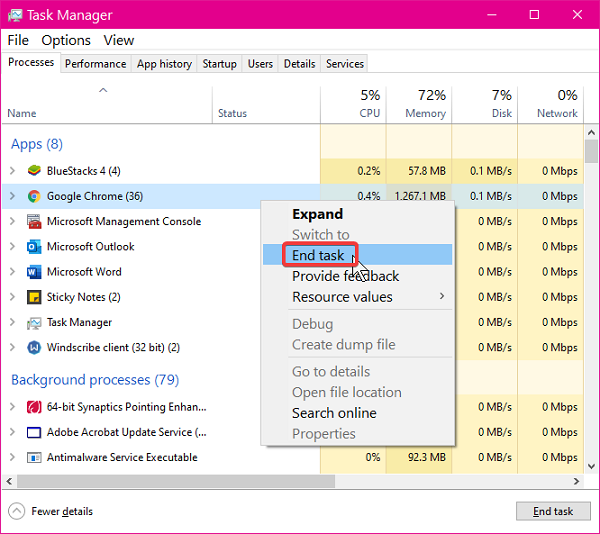
Just as apps can take a toll on BlueStacks performance, so can running services. Press the Windows + R shortcut and enter msconfig in the Run dialog box.
Go to the Services tab of the new window that opens. Here, mark the Hide all Microsoft services checkbox below.
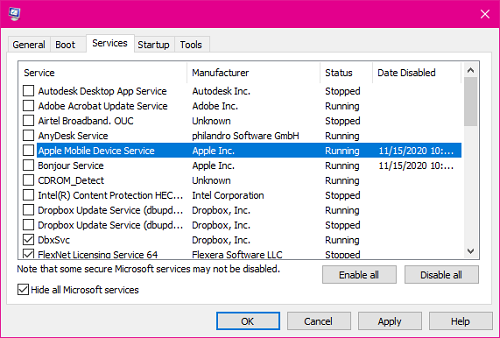
After hiding all Microsoft services, click on the Disable all button. Finally, click on the Apply and OK buttons to save your settings. Restart your machine when you complete the process.
Let us know id this helped you.


