How to allow Chrome to access the Network in your Firewall
Google Chrome is one of the most popular web browsers today. But several users have complained of errors and bugs interrupting their browsing experience. Being a dedicated Chrome user, you may have come across several errors. The error message “Allow Chrome to access the network in your firewall or antivirus settings” is one of them. Along with it, you may see a DNS_PROBE_FINISHED_NO_INTERNET message. Even though this error is fairly common, you need not panic about it. In this guide, we will explain the possible causes and their solutions.

Reason behind Chrome’s Network Access glitch
The increasingly online world has exposed us to innumerable vulnerabilities. So, to protect your e-footprint from the attacks of viruses, malware, online spam, etc. the system is protected by a firewall, defender, etc. Furthermore, you may have installed an antivirus program or anti-malware software to build a protective layer against these infectious components.
But, despite these measures, sometimes, the antivirus or anti-malware program breaks Chrome to access the Internet. Clearly, this is because they have found some threats while monitoring your online activity.
Possible causes
Several factors can cause this issue; It could be network-related but there are other issues too which could be contributing to the back-end. The most common causes of this error are:
- Windows Firewall blocking your Chrome browser
- Windows Defender blocking your Chrome browser
- Antivirus software blocking Chrome browser
In most cases, a simple change in settings of the program help in fixing this issue and allow Chrome to access the network in your firewall successively.
Allow Chrome to access the Network in your Firewall
This error is very common and can pop-up on your browser screen almost anytime. But applying one of the solutions mentioned below, you can definitely fix it:
- Adding an exception for Chrome in the Windows Firewall
- Adding exclusions for Chrome in Windows Defender
- Adding exclusions in third party antivirus firewall
- Reset Chrome to default
Let us look at these fixes in more detail.
1] Add an exception for Chrome in the Windows Firewall
A firewall is software or hardware that checks information coming from the Internet or a network, and then either blocks it or allows it to pass through to your computer, depending on your firewall settings. A firewall can help prevent hackers or malicious software from gaining access to your Windows 10/8/7 computer through a network or the Internet. A firewall can also help stop your computer from sending malicious software to other computers.
Now, it is not very common for Windows Firewall to block some accesses to the internet that can include Chrome. Here is how you can add Chrome to the Windows Firewall exception list:
1] Open Windows ‘Search’ by pressing ‘Win + S’ keys
2] Type ‘Firewall’ in the dialogue box now hit on ‘Windows Defender Firewall’

3] On the Firewall settings, click on ‘Allow an app or feature through Windows Defender Firewall’
4] You will now see all the installed applications listed along with their status i.e., whether they are blocked or allowed to communicate through the Windows Defender Firewall.
5] Locate ‘Google Chrome’ in the list and make sure that both the fields i.e., ‘Private’ and ‘Public’ are checked.
You can now go back to Chrome and see if the issue persists.
Please note – If you are having problems adding the exception, try to disable your Firewall temporarily. You will have to navigate back to the main page and click on “Turn Windows Defender Firewall on or off”. From here you can disable Firewall for both Private and Public networks. But, disable Firewall at your own risk as it can expose you to online vulnerabilities.
2] Add exclusions for Chrome in Windows Defender
Windows Defender is an in-built anti-malware component in Windows. To add exclusions for Chrome in the Windows Defender, follow these steps:
1] Click on ‘Start’ and go to ‘Settings’.
2] Hit on the ‘Update and Security’ option.
3] From the left panel go to ‘Windows Security’
4] Now click on ‘Firewall & Network Protection’
5] On the ‘Virus & threat protection’ settings scroll down to ‘Virus & threat protection settings’ and hit ‘Manage settings’
6] Now scroll down and locate ‘Exclusions’
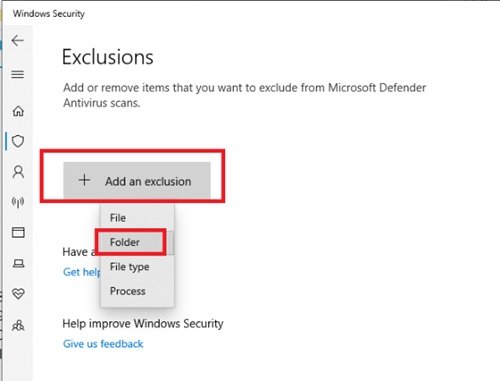
7] Hit on the ‘Add or remove exclusions’ option

8] Next, hit the ‘Add an exclusion’ button and select ‘Folder’.

9] Now, navigate to this location: C:Program Files (x86)Google
10] Select the ‘Google Chrome’ and click on ‘Select Folder’.

11] Click ‘OK’ to save the changes.
Done! Now go back and check if this solution resolved your problem.
3] Add exclusions in third party antivirus firewall
Adding exclusions in third party antivirus varies depending on the software you are using. For instance, you use Kaspersky Internet Security, you can resolve this issue by following these steps:
1] Launch your Kaspersky Internet Security from the hidden menu on the taskbar.
2] Select Kaspersky Internet Security ‘Settings’.

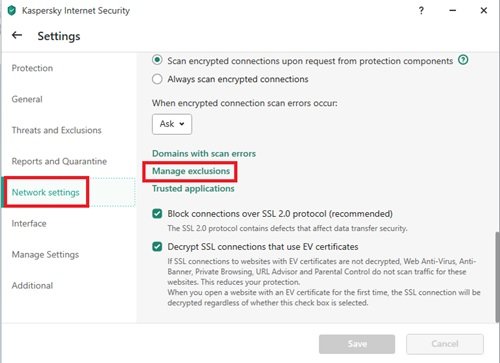
3] Click on ‘Network Settings’ and hit ‘Manage Exclusions’ from the right-side options.

4] Type in the URL of the website the antivirus blocked.
5] Next, select ‘Add’ to include the URL.

Done. Now open Google Chrome and try to access the same website blocked by Chrome earlier and check for any improvements.
4] Reset Chrome to default

Sometimes saved bookmarks and cookies on Chrome turn corrupt that could result in this error. In such a case resetting Chrome to its default state helps, follow these steps:
1] Open Chrome and click on the three dots arranged vertically at the top right corner.
2] Click on ‘Settings’ from the option.
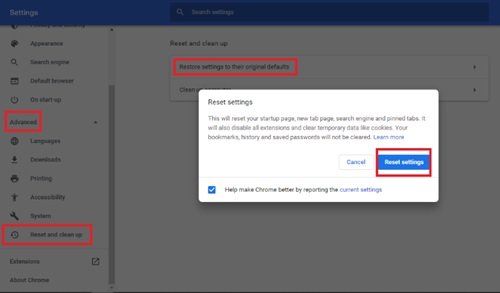
3] In the Settings window, navigate and click on ‘Advanced’ to see the options.
4] Click on the option ‘Reset and clean up’
5] From the options, click on ‘Restore settings to their original default’ and confirm your action by clicking on ‘reset settings’.
By resetting Chrome all your saved bookmarks, cookies, saved passwords, and history will be erased. Hence, you should take note of your important passwords and settings.
We hope that our solutions would have helped you solve this issue. If you have any other queries or suggestions, please do share them with us in the comments section below.


