How to change default Webcam in Windows 10 computer
[ad_1]
If your laptop’s internal webcam no longer works or has been replaced by a better-quality external webcam, you can configure your computer to use any of the camera devices for a particular application. In this post, we will show you the quick way on how to easily change the default Webcam in Windows 10. A webcam can be a useful tool for connecting to customers or employees or family and friends via video conferencing software such as Teams, Skype, Zoom, or Google.

Change default Webcam
Many modern laptops have an integrated webcam that you can use to record videos or participate in video chats – but for PC users who want to take advantage of advanced features such as panning, automatic tracking, and better video resolution, an external webcam is the best choice.
To add a second webcam to your laptop is relatively quite simple, but to use the secondary camera with chat and video recording and for the webcam to work with many software applications on your Windows 10 computer, you’ll need to disable the laptop’s built-in webcam and then set the secondary (external) webcam as the primary device.
To change the default webcam in Windows 10, do the following:
- Power-on your Windows 10 PC.
- Connect to the PC, the external webcam via USB or Bluetooth.
- Press Windows key + R to invoke the Run dialog.
- In the Run dialog box, type
controland hit Enter to open Control Panel. - From the top right corner of the window, set the View by option to Large icons or Small icons.
- Select Devices and Printers.
- Identify the secondary/external webcam.
- Right-click on the available device.
- Click Set this device as default.
Disable the inbuilt camera
Now you need to disable the other camera.

To disable the other cameras, do the following:
- Press Windows key + R to invoke the Run dialog.
- In the Run dialog box, type
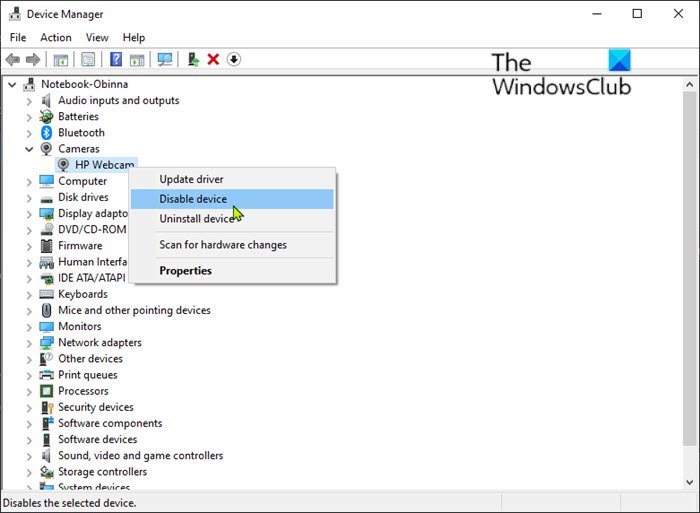
devmgmt.mscand hit Enter to open Device Manager. - Once you’re inside Device Manager, scroll down through the list of installed devices and expand the Camera section.
- Right-click the internal webcam entry and select Disable device. Repeat the process for any other camera you have installed on your system.
Once the other cameras are disabled, Windows will default to the camera you want to use every time you are prompted to do so.
That’s it!
Related post: How to use GoPro as a Webcam on a Windows computer.


