How to to create Local Administrator Account in Windows 10
Sometimes, you may want to add a new administrator account in Windows 10 to get administrative privileges or troubleshoot some issues. In this post, we will show you the 3 ways to create a Local Administrator Account in Windows 10.
Create Local Administrator Account in Windows 10
We can create a local administrator account in Windows 10 in 3 quick and easy ways. We’ll explore this topic under the methods outlined below in this section:
- Via Command Prompt
- Via the Settings app
- Via Local Users and Groups console
Let’s take a look at the description of the step-by-step process in relation to each of the methods.
1] Create Local Administrator account via Command Prompt
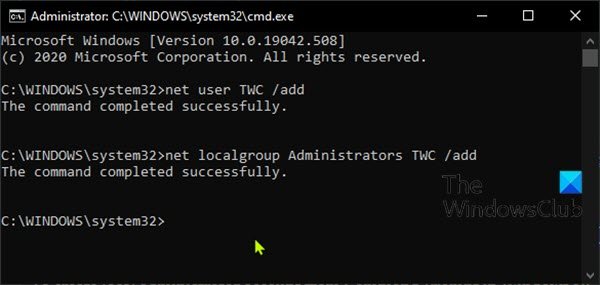
To create local administrator account from Command Prompt in Windows 10, do the following:
- Press Windows key + R to invoke the Run dialog.
- In the Run dialog box, type
cmdand then press CTRL + SHIFT + ENTER to open Command Prompt in elevated mode. - In the command prompt window, type the command below and hit Enter. Substitute the
UserNameplacholder in the command with the actual name of your new local account.
net user UserName /add
- Next, still in the command prompt, run the command below to add the new account to the Administrator group.
net localgroup Administrators UserName /add
You’ve now successfully created a new local administrator account in Windows 10 using the CMD prompt.
TIP: You can also create a Local Administrator Account using utilman.exe.
2] Create Local Administrator account via Settings app
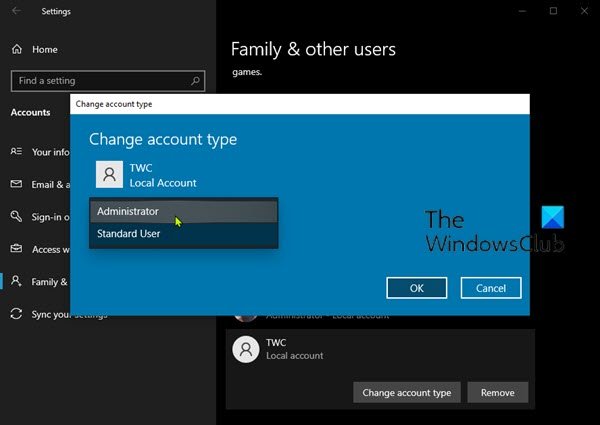
To create Local Administrator account from Settings app, do the following:
- Press the Windows key + I to open Settings.
- Tap or click Accounts.
- Click Family & other users on the left pane.
- Click Add someone else to this PC on the right pane.
- Click the I don’t have this person’s sign-in information link on Microsoft account window that opens.
- On the next page, click the Add a user without a Microsoft account link.
- Now enter a user name for your new local account.
- Specify a password if you like.
- Click Next.
Once you click Next, you will be redirected back to the Accounts screen and there, you can now see the new local account you just created. By default, the newly created account is a standard account. So, we will have to make it an administrator account – to do that, click on the account name and then click Change account type button.
- Under Account type, select Administrator.
- Click OK.
You’ve now successfully created a new local administrator account in Windows 10 via the Settings app.
TIP: This post will help you if you cannot create new User Account.
3] Create Local Administrator account via Local Users and Groups console
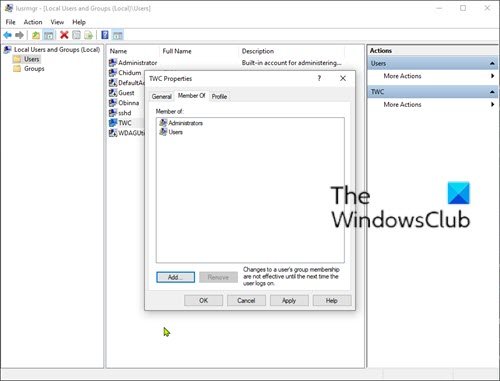
To create Local Administrator account from Local Users and Groups console, do the following:
- Press Windows key + R to invoke the Run dialog.
- In the Run dialog box, type
lusrmgr.mscand hit Enter to open Local Users and Groups. - Right-click on the Users folder on the left pane.
- Select New User from the menu.
- Enter a user name for the new user.
- Uncheck User must change password at next logon.
- Check Password never expires option.
- Click Create.
- Click Close.
Now you can see the new user from the user’s list. By default, the newly created user is a standard account. To change the standard user to administrator, double-click on the new user to change its properties.
- When the user’s Properties dialog opens, select the Member Of tab.
- Click the Add button.
- When the Select Groups dialog opens, type Administrators in the object names box.
- Click OK.
- Click Apply.
You’ve now successfully created a new local administrator account in Windows 10 via the Local Users and Groups console.
Related post: How to create Hidden Administrator User Account in Windows 10.


