Clicking sound or popping noise from microphone on PC
The clicking sound or popping noise from a microphone on a Windows PC is frustrating because it interrupts the video or screen recording. Due to this issue, users cannot use the microphone on video or audio calls in different apps. If you experience such an issue on your system, use the fixes provided in this article.
Clicking sound or popping noise from microphone on PC
Use the following suggestions if you hear the clicking sound or popping noise from a microphone on your Windows PC.
- Check the cable
- Adjust your microphone volume
- Disable Audio Enhancements
- Run the Audio Problems Troubleshooter
- Select a different Sample Rate
- Reinstall your microphone driver
- Install another version of your microphone driver
- Electromagnetic Interference.
Below, we have explained all these fixes in detail.
1] Check the cable
If you use a wired microphone, ensure its cable is not damaged. Check its cable properly. If the microphone is the USB microphone, connect it to another USB port and see if the problem persists.
2] Adjust your microphone volume
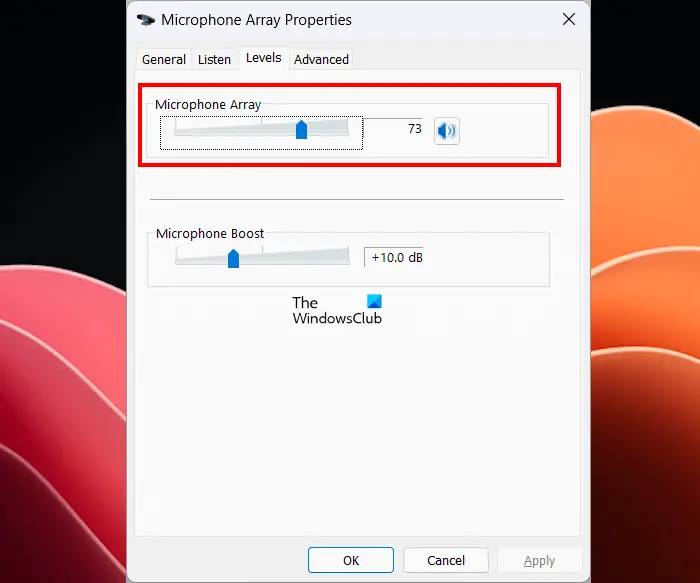
If your microphone volume is too high, it can cause the microphone sound to be distorted. This can be the case with you. We suggest you lower your microphone volume and see if it helps. The following steps will help you with that:
- Open the Control Panel.
- Type Sound in the Control Panel search box.
- Click Sound in the search results.
- The Sound properties window will appear. Go to the Recording tab.
- Select your microphone and click Properties.
- Go to the Levels tab and move the Microphone Array slider to the left.
Now, check if the issue occurs.
3] Disable Audio Enhancements
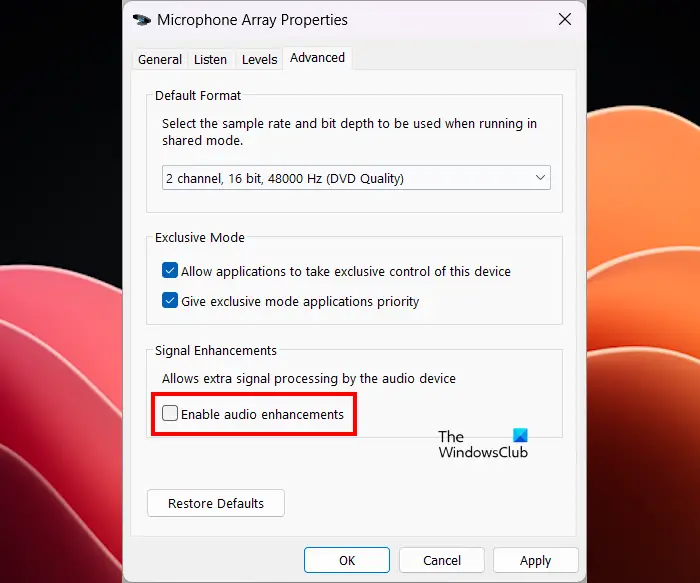
You can also try to disable audio enhancements for your microphone. The following steps will guide you on this:
- Open the Sound properties window via the Control Panel.
- Select your microphone under the Recording tab.
- Select Properties.
- Select the Advanced tab and uncheck the Enable audio enhancements checkbox.
- Click Apply and then click OK to save the settings.
4] Run the Audio Problems Troubleshooter
The Audio Problems Troubleshooter is an automated tool that fixes the audio issues for both input and output audio devices on a Windows computer. We suggest you run this troubleshooter and see if it helps.
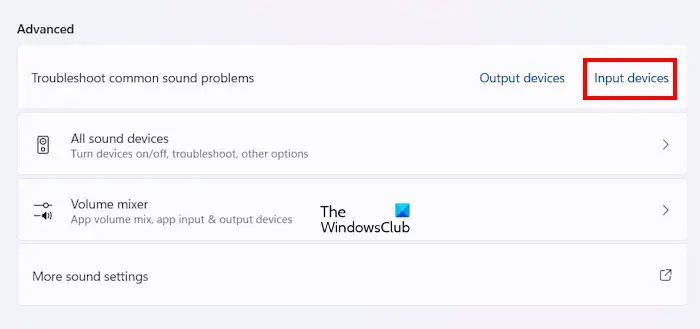
Follow the steps provided below:
- Open Windows 11 Settings.
- Go to System > Sound.
- Scroll down to the Advanced section.
- Click on the Input devices link next to the Troubleshoot common sound problems option.
The above steps will launch the Audio Problems Troubleshooter in the Get Hep app. Now, follow the on-screen instructions to run the automated diagnostics test.
5] Select a different Sample Rate
Select a different Sample Rate for your microphone and see if it works. The steps to do this are as follows:
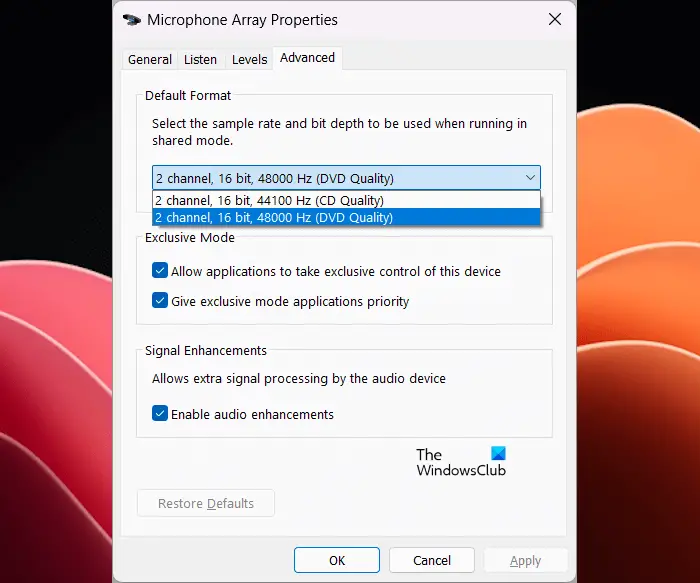
- Open the Sound properties window via the Control Panel.
- Open your microphone properties under the Recording tab.
- Go to the Advanced tab.
- Select a different Channel or Sample Rate in the drop-down.
- Click Apply and then click OK to save the changes.
Now, check if the issue is fixed.
6] Reinstall your microphone driver
One possible cause of this problem is the corrupted microphone driver. Update or reinstall your microphone driver. Go through the following instructions:

- Open the Device Manager.
- Expand the Audio inputs and outputs branch.
- Right-click on your microphone driver and select Uninstall device.
- Restart your computer or perform a scan for hardware changes to reinstall the microphone driver.
7] Install another version of your microphone driver
If you still hear the clicking sound or popping noise from the microphone, installing another version of its driver can help. Before you proceed, we recommend you create a System Restore Point, so you can restore your system if a problem persists.
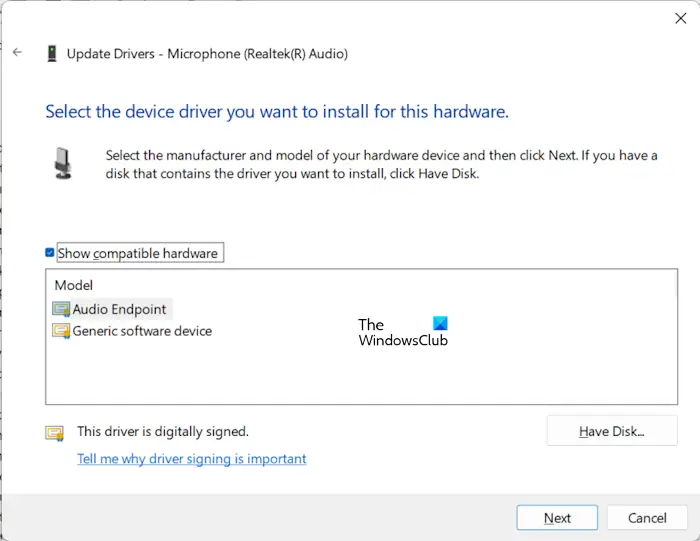
The following instructions will guide you on this:
- Open the Device Manager.
- Expand the Audio inputs and outputs branch.
- Right-click on your microphone driver and select Update driver.
- Select Browse my computer for drivers.
- Now, select Let me pick from a list of available drivers on my computer.
- Make sure that the Show compatible hardware checkbox is selected.
- Select a driver from the list.
- Click Next and follow the on-screen instructions to install the selected driver.
If this does not work, install another compatible driver by following the above steps.
8] Electromagnetic Interference
One possible cause of this issue is electromagnetic interference. To check this, isolate your microphone by keeping it away from the sources of electromagnetic fields, such as electronic devices, power cables carrying current, etc.
Why is my mic making a popping noise?
There can be many reasons why your mic is making a popping noise. If the microphone volume is high, it can cause the mic to distort which results in the popping sound. Other causes of this issue include corrupted drivers, electromagnetic interference, etc. The problem may also be with your microphone.
Why does my PC sound like it’s clicking?
If your PC is making crackling, static, or popping sounds, the problem may be with your audio driver. Incorrect power management settings for the processor can also cause this issue. You can try changing the sound format and see if it helps.
Read next: USB microphone not working on Windows.


