How to use Copilot in Visual Studio using extension?
This post explains how to use Copilot in Visual Studio using extension. GitHub Copilot, an AI coding assistant that offers autocomplete-style suggestions to help you code faster, is now available for Visual Studio. Using Copilot, you can solve common programming problems more efficiently and deliver better products and services.

If you’re a student, teacher, or maintainer of popular open-source projects, you can use GitHub Copilot for free. If you’re not a student, teacher, or maintainer of popular open-source projects, you may try GitHub Copilot for free with a one-time 30-day trial. Once the trial period expires, you’ll need an active subscription to either GitHub Copilot for Individuals or GitHub Copilot for Business to continue using the tool.
How does Copilot work in VS Code?
Copilot is natively integrated into Visual Studio Code. It offers inline code suggestions as you write or iterate on your code, analyzes the context of your code and offers relevant completions, explanations, or snippets following your coding style, and allows you to start chat conversations to generate or refactor source code. It also helps you understand existing code by generating descriptions of code functionality and purpose in natural language.
How do I use GitHub Copilot extension in VS Code?
To use GitHub Copilot, you need to first install the GitHub Copilot extension in Visual Studio. After installing the extension, you can start typing the code and Copilot will offer real-time code-completion suggestions to you, allowing you to automate repetitive tasks and focus on higher-value work. GitHub Copilot works best with JavaScript, TypeScript, Python, Ruby, Go, C# and C++.
How to use Copilot in Visual Studio using extension?
To use Copilot in Visual Studio using an extension, you need to take the following steps:
- Verify Visual Studio compatibility
- Install the GitHub Copilot extension
- Authorize Copilot to access your Visual Studio
- Write code to access Copilot suggestions
Let us see this in detail.
1] Verify Visual Studio compatibility

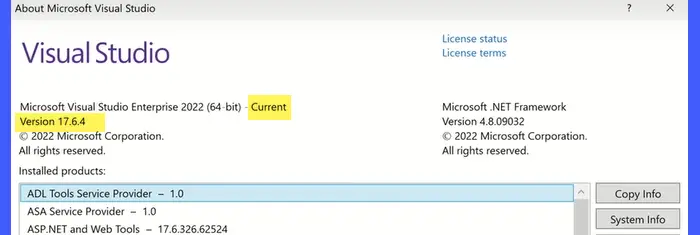
GitHub Copilot is only compatible with Visual Studio 2022 17.6 or later. So before you can install the extension, you need to make sure you have the right VS version installed on your machine.
To check this, click the Help menu at the top of the Visual Studio window and select About Microsoft Visual Studio. Look at ‘Current Version‘ in the top-left corner of the window that appears. If it says ‘17.6’ or later, you’re good to go.
2] Install the GitHub Copilot extension

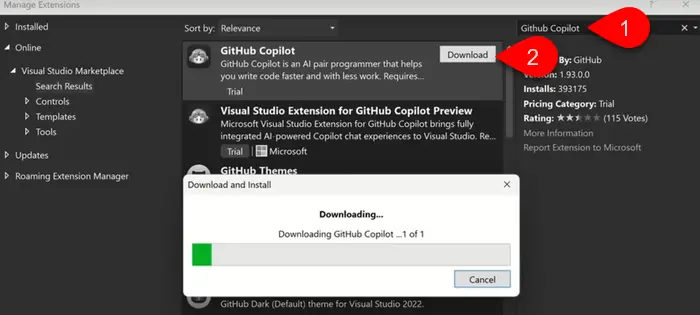
The next step is to install the GitHub Coplit extension in your Microsoft Visual Studio IDE. Click the Extensions menu on top and select Manage Extensions. Then type ‘github copilot’ in the Search box in the top-right corner of the Manage Extensions window.
GitHub Copilot will appear on top of the search results. Click the Download button next to the extension name. Wait till the download completes and then exit Visual Studio to apply the changes. Once you close the Visual Studio window, the VSIX installer will appear. It will prompt you to update your Visual Studio configuration. Click Modify to continue and finish the installation.
Read: Best ChatGPT extensions for VS Code
3] Authorize Copilot to access your Visual Studio

Reopen Visual Studio and launch a project you want to work on. Now if you have a GitHub Account already set, a prompt will appear asking you to authenticate to GitHub. When you click OK, a code will appear that you need to copy-paste into the GitHub page (whose URL will be provided within the prompt). Once you do this, you’ll see a Authorise GitHub CoPilot Plugin button. Click this button to authorize Copilot to access your Visual Studio.
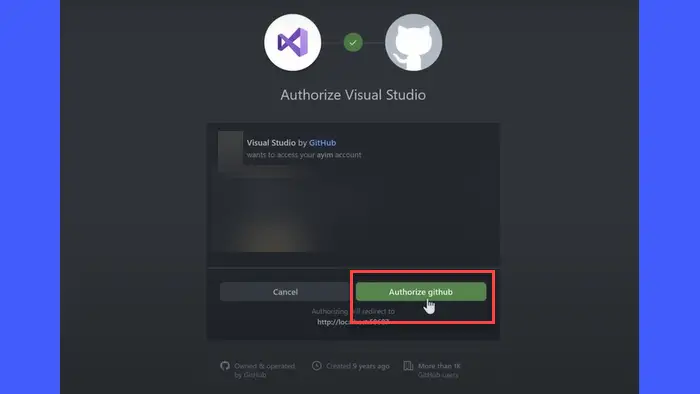
If you do not have a GitHib account already set, you’ll see a prompt on top of the main editor window. Click on the Add GitHub Account option. A window will appear. Within the window, select Add > GitHub. A new browser tab will open, allowing you to authorize Visual Studio to access your GitHub account. Click the Authorize github button to continue. Now you’re all set to use Copilot in Visual Studio using extension.
Read: How to use Copilot to Refractor Code?
4] Write code to access Copilot suggestions

Now as you start typing, GitHub Copliot will interpret your code context and offer suggestions and completions, typically within a tooltip or a suggestion box. You can press the Tab key to accept a suggestion. Once you press the Tab key, Copilot will automatically insert the entire code into your editor.
You can also view alternate suggestions (if available), by pressing ‘Alt+.‘.
If you want to give Copilot a command, you can simply type it as a comment. Copilot can also help you convert your natural language code comments into business logic and functions.
I hope you find this useful!
Related read: What is MaxAI.me extension and How to use it?


