How to reset Windows Security app in Windows 10
If Windows Security Center is crashing or not opening, you can reset and re-register the Windows Security app and hopefully get the issue fixed. In this post, we will show you the 3 quick and easy ways to reset Windows Security app in Windows 10.

Reset Windows Security app
You can perform this task in either of 3 ways;
- From Start Menu
- Via PowerShell
- Via Command Prompt
Let’s see description of the process involved in relation to each of the method.
1] Reset Windows Security App from Start Menu
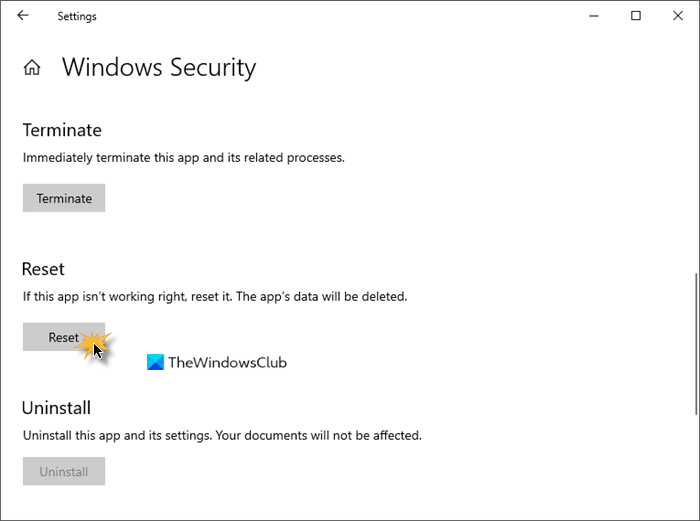
Do the following:
- Press the Windows key on the keyboard to open Start Menu.
- Right-click on Windows Security on the Start list
- Click on More, and click on App settings.
- Click on the Reset button in Settings.
- Click on Reset to confirm.
You can now exit Settings.
2] Reset Windows Security App in PowerShell
Do the following:
Get-AppxPackage *Microsoft.Windows.SecHealthUI* | Reset-AppxPackage
Once the command executes, you can exit the PowerShell console.
3] Reinstall and re-register Windows Security App in Command Prompt
Do the following:
- Press Windows key + R to invoke the Run dialog.
- In the Run dialog box, type
cmdand hit Enter to open Command Prompt. - In the command prompt window, type or copy and paste the command below and hit Enter.
PowerShell -ExecutionPolicy Unrestricted -Command "& {$manifest = (Get-AppxPackage *Microsoft.Windows.SecHealthUI*).InstallLocation + 'AppxManifest.xml' ; Add-AppxPackage -DisableDevelopmentMode -Register $manifest}"
That’s it!
Related post: Reset Windows Security settings to default values in Windows 10.