How to backup and restore GPU Preferences for Apps in Windows 10
Starting with Windows 10 build 17093, Microsoft introduced a new Graphics settings page for Multi-GPU systems that allows you to manage the graphics performance preference of your apps. In this post, we will show you how to backup and restore GPU Preferences for apps in Windows 10.
Preferences may provide better app performance or save battery life. Choices may not take effect until the next time the app launches.
Applications are always allowed to have the ultimate choice of which GPU to use, so you may see additional applications that do not follow the preferences you set. In that case, look for a setting within the application itself to choose a preference.
Backup and restore GPU Preferences for Apps
We will be breaking this task as follows-
- Backup GPU Preferences for Apps to REG file in Registry Editor
- Restore GPU Preferences for Apps from REG file
Let’s see a description of the process in relation to both task.
1] Backup GPU Preferences for Apps to REG file in Registry Editor

Since this is a registry operation, it is recommended that you back up the registry or create a system restore point as necessary precautionary measures. Once done, you can proceed as follows:
HKEY_CURRENT_USERSOFTWAREMicrosoftDirectXUserGpuPreferences
Note: This registry key will only be available if you had made any changes to your Graphics performance preference settings.
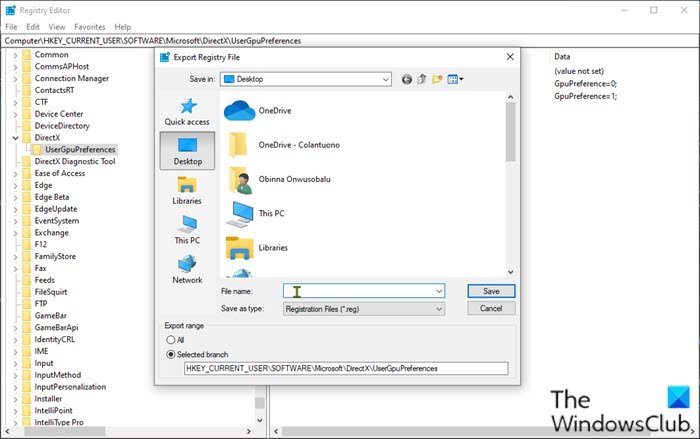
- At the location, on the left pane, right-click the UserGpuPreferences key, and click on Export.
- Navigate to the location (preferably desktop) to save/export this .reg file.
- Type a name for this .reg file.
- Click on Save.
2] Restore GPU Preferences for Apps from REG file
To restore GPU preferences for apps from reg file, do the following:
- Navigate to the location of the exported .reg file.
- Double-click on the reg file to merge it.
- If prompted by UAC, click on Yes to approve elevation.
- Click on Yes to confirm.
- Click on OK.
That’s it on how to backup and restore GPU Preferences for Apps in Windows 10!


