AWS 189-[JAWS]-Activity – Optimize Utilization
#AWS 189-[JAWS]-Activity – Optimize Utilization
Check out my GitHub Repository – https://github.com/MFMKURIA/More-AWS-reStart-Labs-for-AWS-Services
Portfolio
1. http://markfrancismk.sciawareness.com.s3-website-us-east-1.amazonaws.com/index.html#sec2
2. https://d2taxcp5hluc5o.cloudfront.net/
Here’s a detailed, step-by-step guide for optimizing AWS resources, specifically focusing on reducing costs by uninstalling a decommissioned local database and resizing an Amazon EC2 instance. This guide includes explanations for commands and potential challenges.
—
Lab Assignment: Optimize AWS Resource Utilization
Lab Overview
In this lab, you will optimize the AWS resources for the Café web application by:
1. Uninstalling a decommissioned local database to reduce storage needs.
2. Changing the instance type from `t3.small` to `t3.micro` to cut costs.
Activity Objectives
– Optimize an Amazon Elastic Compute Cloud (Amazon EC2) instance to reduce costs.
– Use the AWS Pricing Calculator to estimate AWS service costs.
Business Case Relevance
A new requirement for Café is to optimize AWS resources to reduce costs after migrating the local database to Amazon RDS.
Activity Steps
Duration: Approximately 50 minutes
—
Task 1: Optimize the Website to Reduce Costs
Objective: Reduce costs by uninstalling the local database and resizing the EC2 instance.
Task 1.1: Connect to the Café Instance using SSH
For Windows Users
1. Download the Key File
– Click the Details dropdown and choose “Show.”
– Click “Download PPK” to save the `labsuser.ppk` file.
2. Download and Configure PuTTY
– Download PuTTY from [PuTTY’s website](https://www.putty.org) if not already installed.
– Open `putty.exe`.
– Set “Seconds between keepalives” to 30 under Connection SSH.
3. Configure PuTTY Session
– Go to Session.
– Enter the public IP address of the CafeInstance from the AWS Management Console.
– Navigate to Connection SSH Auth, click “Browse,” and select `labsuser.ppk`.
– Click “Open” to connect.
4. Login
– When prompted, log in as `ec2-user`.
For macOS/Linux Users
1. Download the Key File
– Click the Details dropdown and choose “Show.”
– Click “Download PEM” to save the `labsuser.pem` file.
2. Set Permissions
– Open a terminal and run:
“`bash
chmod 400 labsuser.pem
“`
3. Connect Using SSH
– Find the public IP address of the CafeInstance in the AWS Management Console.
– Connect using:
“`bash
ssh -i labsuser.pem ec2-user@/public-ip
“`
– Replace `/public-ip` with the actual IP address.
Task 1.2: Connect to the CLI Host Instance
1. Open a New SSH Session
– Use the same process as above to connect to the CLI Host instance.
2. Configure AWS CLI on CLI Host
– Run:
“`bash
aws configure
“`
– Enter the credentials provided in the lab details.
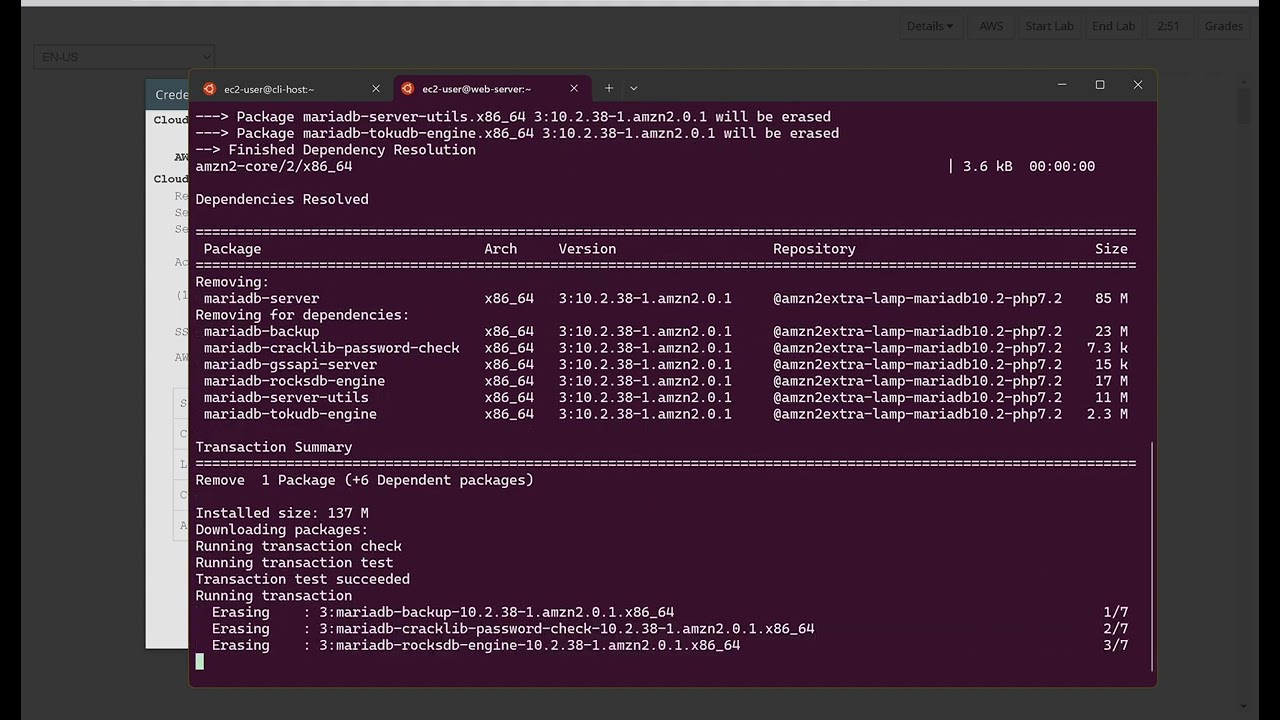
Task 1.3: Uninstall MariaDB and Resize the Instance
1. Stop and Uninstall MariaDB
– In the SSH session for CafeInstance, execute:
“`bash
sudo systemctl stop mariadb
sudo yum -y remove mariadb-server
“`
2. Determine the Instance ID
– In the SSH session for CLI Host, run:
“`bash
aws ec2 describe-instances
–filters “Name=tag:Name,Values= CafeInstance”
–query “Reservations[].Instances[].InstanceId”
“`
– Record the instance ID.
3. Stop the Café Instance
– Execute:
“`bash
aws ec2 stop-instances –instance-ids /CafeInstance Instance ID
“`
– Replace `/CafeInstance Instance ID` with the recorded value.
4. Change Instance Type
– Run:
“`bash
aws ec2 modify-instance-attribute
–instance-id /CafeInstance Instance ID
–instance-type “{“Value”: “t3.micro”}”
“`
– Replace `/CafeInstance Instance ID` with the recorded value.
5. Start the Café Instance
– Execute:
“`bash
aws ec2 start-instances –instance-ids /CafeInstance Instance ID
“`
6. Verify Instance Status
– Check the status with:
“`bash
aws ec2 describe-instances
–instance-ids /CafeInstance Instance ID
–query “Reservations[].Instances[].[InstanceType,PublicDnsName,PublicIpAddress,State.Name]”
“`
– Note the new Public DNS Name and Public IP Address.
7. Test the Café Website
– Open a browser and navigate to:
“`http
http:///Downsized CafeInstance Public DNS Name/cafe
“`
– Verify that the website functions correctly.
—
Task 2: Use the AWS Pricing Calculator to Estimate Costs
– Size: 40 GB
by Mark Mungai Kuria
windows server dns