Convert Dynamic Disk to Basic without losing data with NIUBI Partition Editor
In this post, we will show you how to convert Dynamic Disk to Basic without losing data using NIUBI Partition Editor. NIUBI Partition Editor is a partition management software that provides a range of features for managing disk partitions and volumes on a Windows 11/10 PC. It allows you to change the way the disk is structured and managed by the operating system directly from its interface, without the need for manual reconfiguration.

Is Dynamic Disk better than Basic?
Basic disks use traditional partitioning (primary and extended partitions), which is easier to set up and manage. In contrast, dynamic disks use a flexible volume-based system that can span multiple disks but is more complex to manage. While a basic disk is better suited for general use on most desktops and laptops, a dynamic disk is better for advanced storage needs and for creating high-performance, fault-tolerant storage configurations.
Convert Dynamic Disk to Basic without losing data
To convert a dynamic disk to a basic disk without losing data, you may use the free edition of NIUBI Partition Editor. The software offers a straightforward, step-by-step approach to disk conversion, making it easier to follow even for users who may not be familiar with disk management concepts. It also provides options to handle data safely during the conversion process, minimizing the risk of data loss.
Convert Dynamic Disk to Basic Using NIUBI Partition Editor
Download NIUBI Partition Editor Free Edition from the official website and install it on your Windows 11/10 PC.
Launch the software after installation. In the main interface, locate the dynamic disk you want to convert. Right-click on the disk and select ‘Convert to basic disk‘ from the context menu.

In the next window, confirm the prompt for the conversion process. NIUBI Partition Editor will take a moment to lock volume for conversion.

Next, click the Apply button at the top left corner of the application window.

Two prompts will appear, asking for confirmation to complete pending operations requiring a system reboot. Click OK, close all other applications on your system, and then click Confirm.

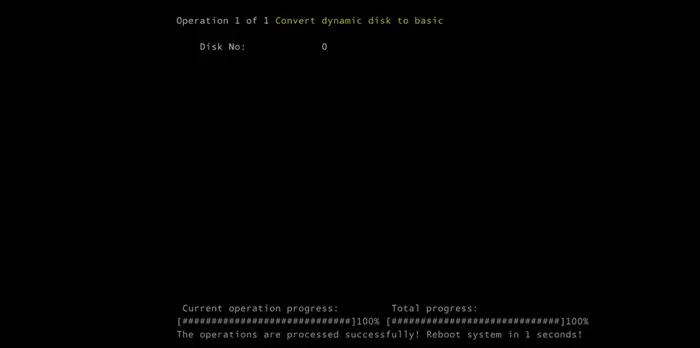
Your system will reboot to shift to the pre-OS environment, which resembles a black screen with minimal text or a basic user interface. Here, the conversion can be safely executed.

NIUBI Partition Editor will start converting your system disk from dynamic to basic. Ensure your system remains on and uninterrupted during the conversion process. This may take several seconds, after which, your computer will continue booting into the OS.
Once the computer starts, you may confirm that your dynamic disk has been converted to a basic disk either using NIUBI Partition Editor or the Windows built-in Disk Management tool.
Note:
- NIUBI Partition Editor supports Internal/External hard disk drive, Hyper-V, VMware virtual disk, all types of Hardware RAID arrays, and USB flash drives.
- NIUBI Partition Editor only converts Simple/Mirrored Volume. If you have volumes other than Simple or Mirrored on your dynamic disk, consider using a similar tool such as EaseUS Partition Master or AOMEI Partition Assistant.
- The free edition can only manage disks up to 16TB in size.
- After conversion, your partitions will be on a basic disk and you will no longer have access to dynamic disk features without reconfiguring the disk.
- Always ensure you have a complete data backup before attempting such conversions.
- To use 1-Second Rollback, which is a unique data protection technology of NIUBI Partition Editor, you need to switch to the Pro edition.
Other key features of NIUBI Partition Editor

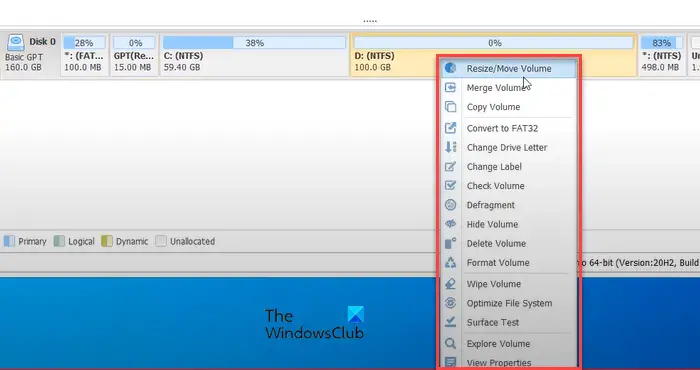
Apart from converting a dynamic disk to a basic disk, the NIUBI Partition Editor allows you to perform several other disk management tasks with ease, such as cloning a disk with the Clone Disk Wizard, creating new volumes from unallocated space, and wiping volumes to prevent data recovery. Here’s a brief description of the key features included in the free edition of NIUBI Partition Editor:
- Resize/Move Volume: allows you to shrink or extend the size of an allocated partition and move partitions to reorganize space through a drag-and-drop interface.
- Merge Volumes: allows you to combine two adjacent partitions into a single, larger partition without losing any data.
- Copy Volume: allows you to clone a single partition to another location, which is useful for data backup or migrating data to a larger disk.
- Delete Volume: allows you to remove an entire partition from the disk, freeing up its space to be reallocated or repurposed.
- Change Drive Letter: allows you to modify the drive letter of a partition (e.g., C, D, E).
- Convert to FAT32: allows you to convert NTFS partitions to FAT32.
- Hide Volume: makes a partition invisible in File Explorer, preventing unauthorized access to its data. The hidden volume remains intact and can be accessed again by un-hiding.
- Convert to Primary: changes a partition type from logical to primary, allowing it to be bootable and directly accessible by the operating system.
- Volume Defragment: optimizes the performance of a volume by reorganizing fragmented files so they are stored in contiguous blocks. This helps improve data access speed and overall system efficiency.
- Explore Volume: allows you to browse the contents of a partition (not specifically listed but inferred as part of standard management).
- Set Active: marks a partition as the one that the computer should boot from.
- Set Read-only Attribute: marks a partition as read-only to prevent unauthorized file changes.
- Initialize Disk: prepares a new or unrecognized hard drive by setting up a partition table, allowing it to be formatted and used by the operating system.
- Clone Disk Wizard: quickly clones an entire disk to migrate OS and data.
- Create Volume: allows you to set up a new storage partition on a disk, defining its size and file system.
- Format Volume: prepares an existing volume by erasing its data and setting up a file system, making it ready for storing files.
- Change Label: alters the name or label of a partition or volume for easier identification.
- Convert to GPT Disk: converts a disk from the Master Boot Record (MBR) partition scheme to the GUID Partition Table (GPT) scheme.
- Check Volume: scans a volume for errors and inconsistencies in the file system.
- Convert to Logical: allows you to change a Primary partition to a Logical partition (useful for bypassing the primary partition limit on MBR disks).
- Surface Test: examines the physical surface of a disk for bad sectors or errors.
- Wipe Volume: completely erases all data on a volume by overwriting it, ensuring that the data cannot be recovered.
- View Properties: displays detailed parameters of a disk or partition.
- Clean Up Disk: removes all partitions and un-initializes a disk to use as new.
I hope you find this useful.
Read: How to Convert MBR to GPT without Data Loss in Windows.
How to reactivate invalid dynamic disk without losing data?
Open Command Prompt as an administrator, type diskpart, and press Enter to start the DiskPart utility. Type list disk and press Enter to view all disks connected to your system. Identify the disk you need to reactivate from the list. Type select disk X (replace X with the disk number) and press Enter. Type online disk and press Enter to attempt to bring the disk online.
Read Next: How to convert Basic Disk to Dynamic Disk in Windows.


