Disable File History backup in Windows 10 using REGEDIT or GPEDIT
File History is a powerful tool developed by Microsoft that saves the user’s data on an external drive automatically. To use this tool you just have to connect an external hard drive to your computer, add it to File History, and turn the File History ON; and it starts copying the entire data on your computer to the external drive automatically. You can easily enable and disable this tool from the Control Panel. What if you want to disable this tool permanently? In this article, we will show you how to disable File History in Windows 10 permanently.
How to disable File History backup in Windows 10 permanently

If you want to disable the File History tool in Windows 10 permanently, you have to change the Group Policy and Registry settings. We will describe the following methods one by one:
- Using the Local Group Policy Editor.
- Using the Registry Editor.
1] Using the Local Group Policy Editor
Windows 10 Home users can skip this method because Windows 10 Home edition does not contain the Local Group Policy Editor.

First, launch the Run dialog box by pressing Win + R keys, then type gpedit.msc. After that, press Enter.
Now, in the Local Group Policy Editor, you have to navigate to the following path:
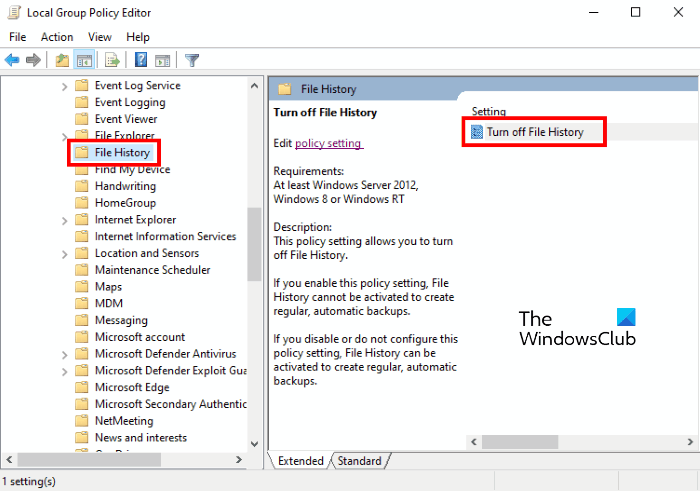
Computer Configuration Administrative Templates Windows Components File History
Select the File History from the left pane. You will see a setting, named Turn off File History on the right side. Double-click on it and it will open a new window.
In the Turn off File History window, select the Enabled option by clicking on the Radio button adjacent to it. After that, click Apply, then OK to save the changes that you have made.
This will disable the File History tool permanently and no user can use this feature from the Control Panel. If the changes do not take effect on your system, restart it.
To revert the changes back, repeat the above procedure again and select Disabled or Not Configured in the Turn off File History window.
Read: How to reset all Local Group Policy settings to default.
2] Using the Registry Editor
Let’s see how you can disable the File History tool in Windows 10 using Registry Editor. Before you proceed, it is recommended to create a backup of the Registry on a hard drive. This will let you restore the Registry in case any problem occurs.

The following steps will guide you on how to do this:
Launch the Run dialog box and type regedit in it. After that click OK. Click Yes in the UAC window.
In the Registry Editor, you have to go to the following path:
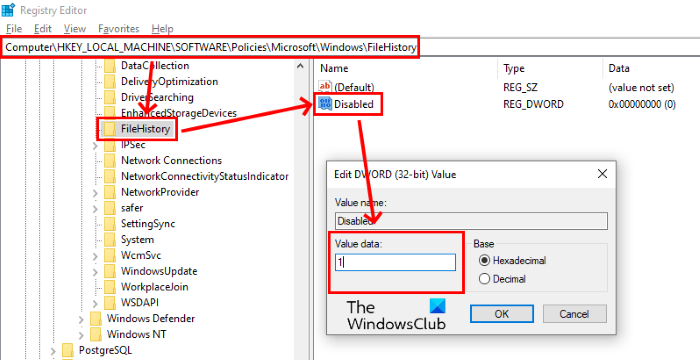
HKEY_LOCAL_MACHINESoftwarePoliciesMicrosoftWindows
Now, expand the Windows key and check whether it contains the FileHistory subkey or not. If not, create it. For this, right-click on the Windows key and select “New > Key.” This will create a new subkey with a default name. You have to change its name to FileHistory.
Select the FileHistory subkey and go to “New > DWORD (32-bit Value)” by right-clicking on the right side. Name this newly created value as Disabled.
Now, double-click on the Disabled value and change its value data from 0 to 1. After that, click OK to save the changes that you have made.
This will disable the FileHistory option permanently. You can check it in the Control Panel. If you do not see any changes, restart your computer.
If you want to use File History, you have to enable it again. To do so, you can either delete the Disabled value or change its value data from 1 to 0 in the Registry Editor.
Hope this helps.
Related posts:


