Enable or Disable Create Dev Drive in Windows 11
Dev Drive gives you more control over your file systems and allows you to optimize it. If you are a developer and want to manage your system’s workload, you should consider using Dev Drive. In this post, we will see how to enable or disable the Create Dev Drive option in Windows 11.

How to enable or disable the Create Dev Drive option
Dev Drive is a new storage volume designed for developers, based on Resilient File System (ReFS) technology. It controls storage settings and security features such as trust designation and antivirus configuration. The volume is optimized for hosting project source code, working folders, and package caches.
By default, Dev Drive grants trust automatically to optimize performance, activating real-time protection in a special “performance mode.” This mode balances threat protection and performance by deferring security scans until after file operations are completed, providing faster performance with better protection compared to other tuning methods.

If you want to create a Dev Drive in Windows 11, you need to open Settings, go to System > Storage > Advanced storage settings > Disks & volume, and click on Create Dev Drive.
The option to create a Dev Drive should not be accessible to all the users connected to your computer. That is why, Microsoft has provided users with an option to enable or Disable Create Dev Drive. You can follow one of the solutions mentioned below to do the same.
- Turn on or off the Create Dev Drive option from the Command Prompt
- Turn on or off the Create Dev Drive option from the Group Policy Editor
- Turn on or off the Create Dev Drive option from the Registry Editor
Let us discuss them in detail.
1] Turn on or off the Create Dev Drive option from the Command Prompt
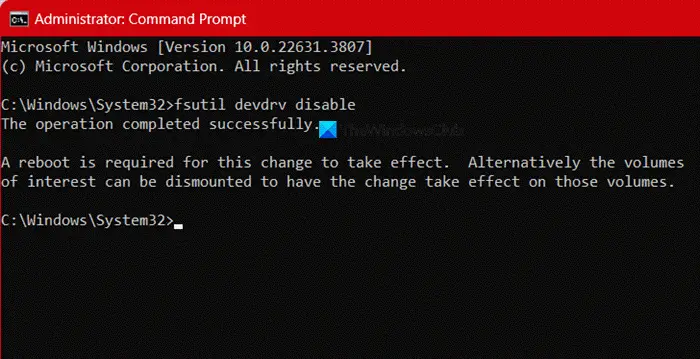
First of all, we will be using the Command Prompt to disable the Create Dev Drive option. To do the same, open Run by Win + R, type “cmd”, and hit Ctrl + Shift + Enter. Click Yes when the UAC prompt appears. Then, run the following command.
Enable Create Dev Drive
fsutil devdrv enable
Disable Create Dev Drive
fsutil devdrv disable
After executing the command, you will be required to reboot. Once done, the feature will be disabled or enabled depending on the command that you have run.
2] Turn on or off the Create Dev Drive option from the Group Policy Editor
The Group Policy Editor is a Windows administration tool that enables users to configure many important settings on their computers or networks. We can configure a policy to control the Create Dev Drive option. The best part about the Group Policy Editor is that it can be used to deploy the configuration for all the users connected to the network.
You can follow the steps mentioned below to configure the Create Dev Drive option from the Group Policy Editor.
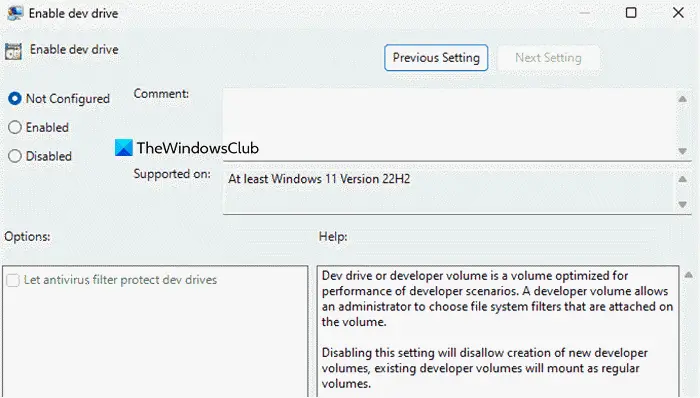
- Open Run, type “gpedit.msc”, and hit Enter.
- Now, you need to navigate to Computer Configuration > Administrative Templates > System > Filesystem.
- Inside the Filesystem folder, you will see Enable dev drive policy, double-click on it to configure.
- To disable Create Dev Drive: Click on Disabled and then on Apply > Ok.
- To enable Create Dev Drive: Either select Not configured or Enabled and click on Apply > Ok.
Now, reboot your computer and you will be good to go.
3] Turn on or off the Create Dev Drive option from the Registry Editor
If you are a Windows 11 Home user, you won’t have the Group Policy Editor installed on your computer. That is why, we recommend you use the Registry Editor tool, that’s preinstalled on your computer to configure this feature. To do the same, we will create a few scripts and run it. However, before making any changes to your device’s registry, it is recommended to create a backup of your registries.
So, for that, open Notepad on your computer, and paste the following lines of codes to enable Dev Drive.
Windows Registry Editor Version 5.00

[HKEY_LOCAL_MACHINESYSTEMCurrentControlSetPolicies]
"FsEnableDevDrive"=-
"FltmgrDevDriveAllowAntivirusFilter"=-
Save the file with any name but add .reg extension, for example, enableDevDrive.reg.
To disable Dev Drive, use the following script.
Windows Registry Editor Version 5.00

[HKEY_LOCAL_MACHINESYSTEMCurrentControlSetPolicies]
"FsEnableDevDrive"=dword:00000000
"FltmgrDevDriveAllowAntivirusFilter"=dword:00000000
After creating the registry file, you can just double-click on it to run. You will get a UAC prompt, click Yes to continue, and your new registry settings will be updated.
That’s it!
Read: How to set Dev Drive as Trusted or Untrusted in Windows 11
What is dev drive protection in Windows 11?
Dev Drive Protection was created to protect the Dev Drive by gifting it an antivirus. It has a Performance mode, which, when disabled, scans are synchronous, and real-time protection is triggered when a file is opened. If Performance Mode Start is enabled, scans are asynchronous and not initiated immediately upon opening a file. You should probe more and see how to enable or disable dev drive protection in Windows 11.
Read: How to use Dev Home in Windows 11?
What is the dev drive in Windows 11 23H2?
Dev Drive is a new feature, introduced in Windows 11 23H2. It is a ReFS-based drive designed for developers and IT professionals, offering enhanced control over volume settings and file system filters. If you are a developer, you must look to enable and configure Dev Drive.
Also Read: Enable or Disable Device Portal in Windows 11.