Enable or Disable Hyper-V for Standard Users in Windows 11
Hyper-V is a perfect hypervisor software for Windows users that is built into the operating system. But when it is enabled on the administrator account, only the users with admin privileges can access it. However, if you want other users to access the hypervisor, you need to enable or disable Hyper-V for Standard users in Windows 11. In this post, we will discuss how to do the same.
How to enable or disable Hyper-V for Standard Users in Windows 11?
To enable or disable Hyper-V for Standard users in Windows 11, you can use one of the following methods.
- Configure Hyper-V access for Standard users using Local Users and Groups
- Configure Hyper-V access for Standard users using Microsoft PowerShell
- Configure Hyper-V access for Standard users using Command Prompt
Let us discuss them in detail.
1] Configure Hyper-V access for Standard users using Local Users and Groups

Local Users and Groups allow you to manage users and groups on Windows. You can create and modify local user accounts, user profiles, and local groups using this utility, and we are going to use it to give access to connected user accounts to access Hyper-V.
Follow the steps mentioned below to do the same.
- Open Local Users and Groups on the administrator device.
- Then, click on Groups from the left panel of the interface.
- Now, look for Hyper-V Administrators and double-click on it.
- Then, click on Add.
- Look for the Advanced button, and click on it.
- Click on Find Now.
- Look for the users that you want to give access to or just click on Local accounts, which includes all the standard users.
- Click on Ok.
- The user or collection that you selected will be reflected in Enter the objects names to select field, click on Ok afterwards.
- Now, again click on Ok.

This will give the user account the privilege to access and open Hyper-V. They can either find the Hyper-V Manager on their computer, but if it is not there, they can enable Hyper-V on their computer.
Since Local users and Group policy utility allows you to configure user access, you can also revoke the access to Hyper-V when required. For that, you can follow the steps mentioned below
- Launch Local Users and Groups.
- Navigate to Groups > Hyper-V Administrators.
- Click on the user you want to revoke the access of and click on Remove.
- Finally, click on Ok to confirm your actions.
This will remove the user from the group that includes accounts that can access Hyper-V.
2] Configure Hyper-V access for Standard users using Microsoft PowerShell
Microsoft PowerShell is a command-line utility in your operating system that allows you to configure and add users to the Hyper-V Administrators group, enabling them to access Hyper-V on their computer. We are going to use it to grant or remove Hyper-V access from standard users. So, open PowerShell as an administrator on your computer.
First of all, we need to find out what users are added to the Hyper-V Administrators group, for that, run the following command.
Get-LocalGroupMember -Group "Hyper-V Administrators"
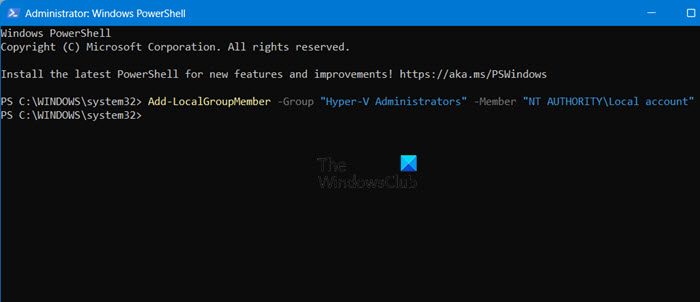
Now, in order to add all the users to the group and grant all of them access to Hyper-V, run the following command
Add-LocalGroupMember -Group "Hyper-V Administrators" -Member "NT AUTHORITYLocal account"
However, if you want to grant a particular user access to Hyper-V, execute the command mentioned below.
Add-LocalGroupMember -Group "Hyper-V Administrators" -Member "<username>"
In case, you want to remove all users from the Hyper-V admin group and remove their access, use the below command.
Remove-LocalGroupMember -Group "Hyper-V Administrators" -Member "NT AUTHORITYLocal account"
To remove a specific user from the group, the command mentioned below is what you need.
Remove-LocalGroupMember -Group "Hyper-V Administrators" -Member "<username>"
Note: Replace the variable <username> with the actual username of the user you want to configure.
3] Configure Hyper-V access for Standard users using Command Prompt
If you are not a fan of PowerShell, configure Hyper-V access using the tried and tested command-line utility, the Command Prompt. First of all, open Run by Win + R, type “cmd”, then hit Ctrl + Shift + Enter or user some other method to run Command Prompt as an administrator. Then, execute the following command based on your requirements.
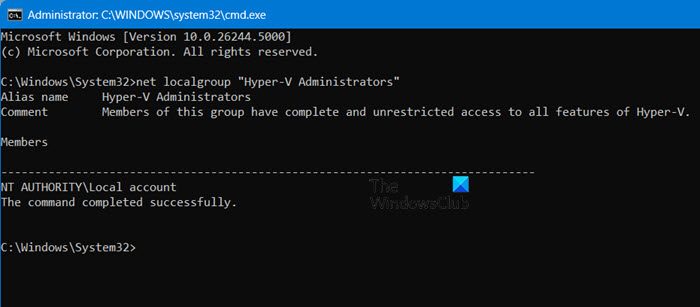
- To list existing users of Hyper-V administrators group
net localgroup "Hyper-V Administrators"
- Add all the local users to admin group of Hyper-V.
net localgroup "Hyper-V Administrators" "NT AUTHORITYLocal account" /add
- Enable Hyper-V access for a particular user
net localgroup "Hyper-V Administrators" "<username>" /add
- To turn off Hyper-V access for all the user, run the following command.
net localgroup "Hyper-V Administrators" "NT AUTHORITYLocal account" /delete
- To revoke Hyper-V access of a particular user.
net localgroup "Hyper-V Administrators" "<username>" /delete
That’s how you can use the Command Prompt to remove or grant Hyper-V privileges to users.
Read: Enable, create, rename, delete, restore Checkpoints in Hyper-V
How do I enable and disable Hyper-V in Windows 11?
You need to enable or disable the Hyper-V feature from the Control Panel. So, open the Control Panel, click Programs > Turn Windows features on or off. Look for Hyper-V, and tick or untick the associated box to enable or disable the feature respectively.
Read: How to Rename, Upgrade or Delete Hyper-V Virtual Machine
Should I disable Hyper-V on Windows 11?
If you run any hypervisor platform but Hyper-V, it is a good option to disable the feature. Otherwise, you can run into some compatibility or performance issues. However, if you decide to use the Hyper-V Manager, you will have to turn on Hyper-V from the Control Panel.
Also Read: Enable or disable Nested Virtualization for VMs in Hyper-V.