Enable or Disable Recall Snapshots in Windows 11
Recall saves screen snapshots every five seconds to easily search and retrieve seen content using natural language. It excludes audio and continuous video recording. However, you can enable or disable Recall Snapshots in Windows 11 and in this post, we will see how to do the same using Windows Settings, Registry Editor, and Group Policy Editor.
How to enable or disable Recall Snapshots in Windows 11
The Recall feature is only available for Copilot+PC, as it allows the Recall to process your content locally on the computer and securely store it on your device locally. Snapshots are encrypted by Device Encryption or BitLocker, which are enabled by default on Windows 11. Due to this, your snapshots can not be viewed by any other user or by Microsoft.
You can use one of the following methods to enable or disable Recall Snapshots in Windows 11.
- Turn on or off Recall using Windows Settings
- Turn on or off Recall using Registry Editor
- Turn on or off Recall using Group Policy Editor
Let us discuss them in detail.
1] Turn on or off Recall using Windows Settings

Windows Settings is your one-stop shop to configure your operating system. And if you are not an admin, there is no need for you to use any method other than this one. To do the same, follow the steps mentioned below.
- Open Settings by Win + I.
- Then, navigate to Privacy & security.
- Now, look for Recall & snapshots and click on it.
- You can then use the toggle to disable Save Snapshots from the Snapshots section.
Once done, close Settings, and you will be good to go.
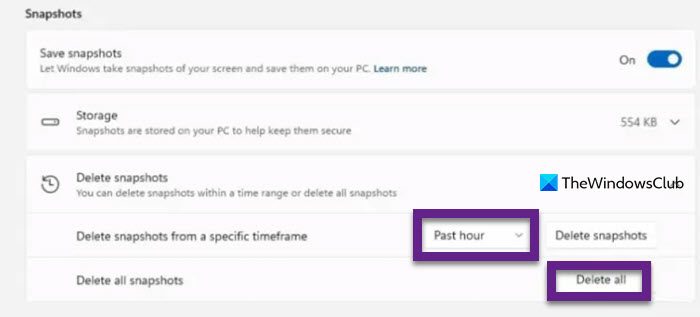
You can also, delete Snapshots, which is recommended if you remove the data collected so far. Just click on Delete Snapshots and you will get a wide range of options to choose from. You can delete Snapshots for a particular timeframe or just clean all of them.
You can configure additional Recall Snapshots options from there, including the amount of disk space that Recall is allowed to use for storing snapshots. The amount of disk space that users can allocate to Recall depends on how much space they actually have.
2] Turn on or off Recall using Registry Editor
You can turn off Recall Snapshots using the Registry Editor as well. Windows Registry is a hierarchical database that stores configuration settings for the operating system, hardware, and installed software. However, when making any changes to the registries one should be very cautious. That is why, we recommend you first take a backup of your registries before making any changes to the Registry Editor.
Once you have taken the backup, we can start configuring Recall Snapshots. So, first, open Notepad and then paste the following lines of code.
To enable Recall Snapshots
Windows Registry Editor Version 5.00
[HKEY_LOCAL_MACHINESOFTWAREMicrosoftPolicyManagerdefaultWindowsAIDisableAIDataAnalysis]
“value”=dword:00000000[HKEY_CURRENT_USERSoftwarePoliciesMicrosoftWindowsWindowsAI]
“DisableAIDataAnalysis”=-[HKEY_LOCAL_MACHINESOFTWAREPoliciesMicrosoftWindowsWindowsAI]
“DisableAIDataAnalysis”=-
OR
To disable Recall Snapshots
Windows Registry Editor Version 5.00
[HKEY_CURRENT_USERSoftwarePoliciesMicrosoftWindowsWindowsAI]
“DisableAIDataAnalysis”=dword:00000001[HKEY_LOCAL_MACHINESOFTWAREPoliciesMicrosoftWindowsWindowsAI]
“DisableAIDataAnalysis”=dword:00000001
You can name them anything, but just add a .reg extension. Do not copy them in a single file, as that won’t work.
Once you have created the file, all there is to do is run it with administrative privilege and your job will completed. Remember that the changes are applied to all users connected to your domain network.
3] Turn on or off Recall using Group Policy Editor
If you are using Pro or Enterprise Windows Operating Systems, use the Group Policy Editor instead of Registry Editor as it is a lot convenient option. To do the same, open Run, type gpedit.msc, and hit Enter.
Then, navigate to the following location.
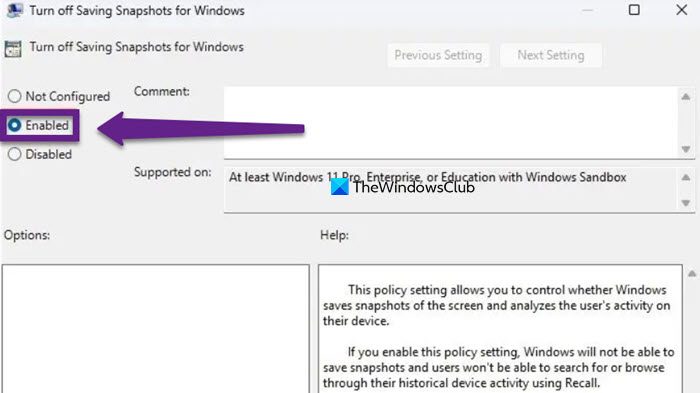
User Configuration > Administrative Templates > Windows Components > Windows AI
Then, look for Turn off Saving Snapshots for Windows policy. Double-click on the policy, and set it to Enabled to disable the Recall Snapshots and to Not Configured to keep it enabled. Finally, click on Apply > Ok.
The changes are applied to all the users if you are an admin of the network.
Hopefully, this guide has helped you configure the Recall Snapshots from Settings, Registry Editor, and Group Policy Editor.
Read: How to use Explain With Copilot in Notepad on Windows 11
How do I turn off Recall in Windows 11?
To turn off Recall in Windows 11, we need to disable Recall Snapshots. To do so, open Settings, and then go to Privacy & security. Look for Recall and open it. Then, disable the toggle for Save Snapshots to turn off this feature. If you want to delete all the snapshots taken to date, just click on Delete all, and right-click to Delete all snapshots.
Read: Best Microsoft Copilot alternative for Windows PC
Is Recall on Windows 11?
Yes, Recall will be introduced in Windows 11 24H2 and will be available for Windows 11 Copilot + PCs. As of now, users with Windows Insider Preview can access Recall to test its functionality.
Also Read: Can’t open Recall in Windows 11: Minimum Hardware Requirements.


