Error 1327 Invalid Drive when installing or uninstalling programs
If when you attempt to install or uninstall any program on your Windows 10 device, you receive the prompt indicating Error 1327 – Invalid Drive, then this post is intended to help you. Most users will encounter this error during Microsoft Office installation. In this post, we will identify the potential causes, as well as provide the most suitable solutions you can try to effectively resolve the issue.
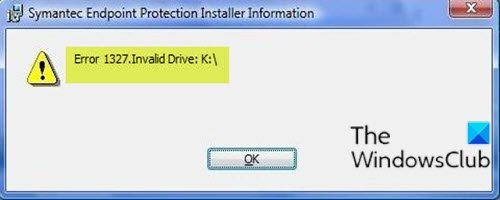
This error occurs due to the following reasons:
- When the drive being used for the installation of the program is not valid.
- The installer is trying to complete the operation on a network location that is not mapped.
Error 1327 – Invalid Drive
If you’re faced with this issue, you can try our recommended solutions below in no particular order and see if that helps to resolve the issue.
- Run third-party software uninstaller
- Substitute path of the problematic drive
- Modify the registry
- Disconnect network drive
- Map the unmapped network drive
- Sign into another user account
Let’s take a look at the description of the process involved concerning each of the listed solutions.
1] Run third-party software uninstaller
If this occurs when you are trying to install software that was previously removed, it’s likely some of the leftover/residual files of the old program might create a conflict. In this case, you should use a third-party software uninstaller to completely clean the system from old or unused software.
2] Substitute path of the problematic drive
This solution requires you to the SUBST command to substitute the path of the problematic drive and redirect to a correct drive. Here’s how:
- Press Windows key + R to invoke the Run dialog.
- In the Run dialog box, type
cmdand then press CTRL + SHIFT + ENTER to open Command Prompt in admin/elevated mode. - In the command prompt window, type the command below and hit Enter – where
Xis the placeholder for the non-existent drive (the drive letter shown on the error prompt) andYis the placeholder for your OS drive (where Windows 10 is installed; usuallyC).
subst X: Y:
- Once the command executes successfully, close the elevated CMD prompt and restart your computer.
On boot, repeat the task that was previously causing the problem and see if the problem is now resolved. If not, try the next solution.
3] Modify the registry
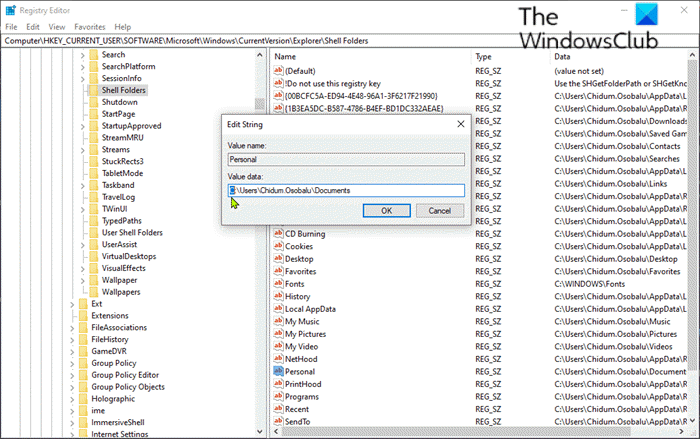
Since this is a registry operation, it is recommended that you back up the registry or create a system restore point as necessary precautionary measures. Once done, you can proceed as follows:
ComputerHKEY_CURRENT_USERSOFTWAREMicrosoftWindowsCurrentVersionExplorerShell Folders
- On the right pane, identify any entry that has the problematic drive letter shown on the error prompt (in this case
K) and change it to the OS drive (usuallyC). - Once done, click OK to save changes.
- Restart your computer. The issue should be resolved.
Now, if you’re encountering the problem with an older Microsoft Office installation or when trying to update your current Office installation to a newer version, the issue can also be caused by LocalCacheDrive registry entry that is invalid. In this case, you can fix the issue by modifying the LocalCacheDrive to a valid letter. Here’s how:
Take the necessary precautionary measure, then proceed as follows:
- In Registry Editor, navigate or jump to the registry key path below:
HKEY_LOCAL_MACHINESOFTWAREMicrosoftOffice
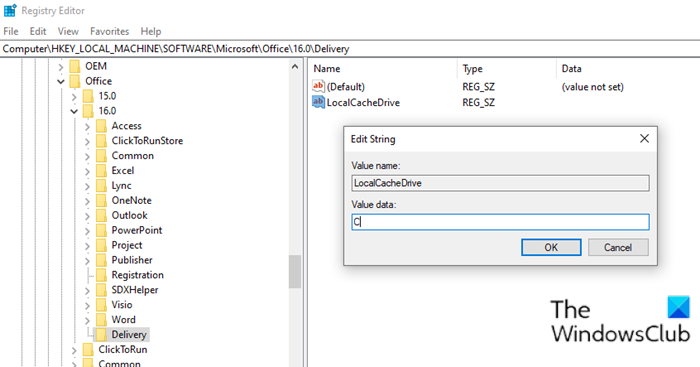
- At the location, on the left pane, click the subfolder associated with your Office installation. See table below to compare the first two digits with the corresponding Office suite version.
| First two digits | Office version |
|---|---|
| 11 | Microsoft Office 2003 |
| 12 | Microsoft Office 2007 |
| 14 | Microsoft Office 2010 |
| 15 | Microsoft Office 2013 |
| 16 | Microsoft Office 2016/19 |
- Select the Delivery key.
- On the right pane, double-click on LocalCacheDrive entry to edit its properties.
- In the properties window, set the Value Data to your OS drive (most commonly C).
- Click OK to save the changes.
- Restart your computer.
The issue should be resolved now. Otherwise, try the next solution.
4] Disconnect network drive
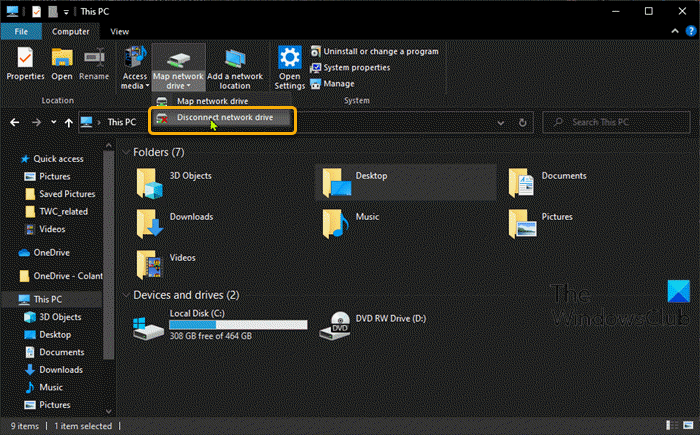
Disconnecting the network drive solution will work only if the network drive appears in This PC in File Explorer.
To disconnect the network drive, do the following:
- Press Windows key + E to open File Explorer.
- Click This PC.
- Press CTRL + F1 key to open ribbon with tools.
- Click Map network drive.
- Select Disconnect network drive from the drop-down.
Repeat the action that previously triggered the error and see if the issue has been resolved. If not, try the next solution.
5] Map the unmapped network drive
If the drive that’s indicated on the error prompt is not actually mapped, it’s very likely that you don’t have permission to install the application on the network drive. In this case, you can map the network drive and see if that helps.
5] Sign into another user account
You can also try to sign in to another user account, then try the install or uninstall of the app/program and see if the error still occurs. If you don’t have a secondary user account on your machine, you need to create a new account.
Hope this helps!


