Fix atibtmon.exe Runtime Error when disconnecting AC power cord
If when you disconnect or unplug the AC power cord from your Windows 10 device, it results in a runtime pop-up error related to atibtmon.exe, then this post is intended to help you. In this post, we will provide the most suitable solutions to this issue.
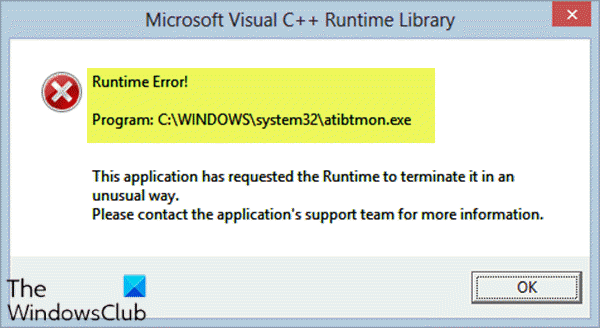
When you encounter this issue, you’ll receive the following full error message;
Microsoft Visual C++ Runtime Library
Runtime Error!
Program: C:WINDOWSsystem32atibtmon.exeThis application has requested the Runtime to terminate it in an unusual way.
Please contact the application’s support team for more information.
You may encounter this atibtmon.exe runtime error when you unplug the laptop from the AC power cord. This happens because atibtmon.exe is designed to switch your PC to power-saving mode when you unplug the power – to decrease screen display brightness and shut down some processes.
ATIBtMon stands for Array Technologies Inc. Brightness Monitor and it’s a software component of ATI Brightness Monitor produced by ATI. Atibtmon.exe is not an essential Windows process and can be disabled without it causing any significant effect on your PC.
Fix atibtmon.exe Runtime Error
If you’re faced with this issue, you can try our recommended solutions below in no particular order and see if that helps to resolve the issue.
- Connect laptop directly to the power supply
- Disable atibtmon.exe process via Task Manager
- Turn off Vari-Bright setting in Catalyst Control Center
- Install generic Display Driver
- Disable AMD External Events Service
- Change AMD Graphics Power Settings
- Rename / delete atibtmon.exe
Let’s take a look at the description of the process involved concerning each of the listed solutions.
1] Connect laptop directly to power supply
This is not ideal and it’s more of a workaround than it’s a solution. You can try to remove your laptop battery to circumvent this atibtmon.exe Runtime Error issue by connecting the laptop directly to the power supply.
2] Disable atibtmon.exe process via Task Manager
This solution requires you to disable the atibtmon.exe process via Task Manager. The implications of this, is that you have to forgo the power-saving option of your PC – your Windows 10 computer will not automatically switch to the power-saving option when you unplug the power.
To disable atibtmon.exe process via Task Manager, do the following:
- Press Ctrl + Shift + Esc keys to open Task Manager.
- If Task Manager opens in compact mode, click or tap on More details
- On the Processes tab, right-click on atibtmon.exe and select End Task.
Check if the issue is resolved. Otherwise, try the next solution.
3] Turn off Vari-Bright setting in Catalyst Control Center
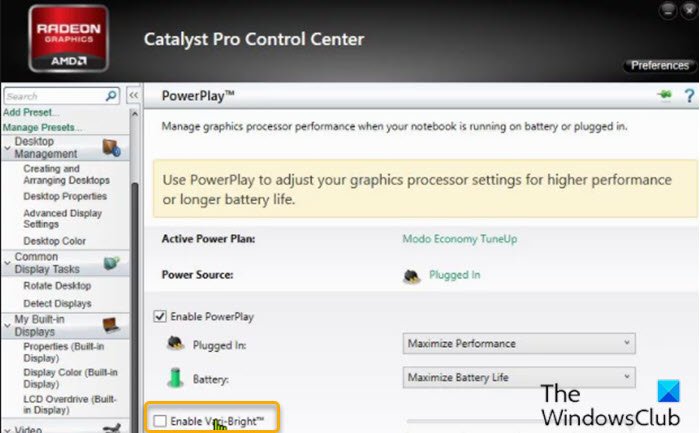
Atibtmon.exe is designed to work with ATI graphic cards. So, users that have ATI graphic cards installed on their PC are most likely to encounter this problem. In this case, turning off the Vari-Bright setting in Catalyst Control Center can fix the issue.
Do the following:
- Open Catalyst Control Center.
- On the left pane, scroll down and click on Power to expand the section.
- Click on PowerPlay.
- On the right pane, uncheck the Enable Vari-Bright option.
- Click Apply to save the setting.
If the issue is still unresolved, try the next solution.
4] Install generic Display Driver
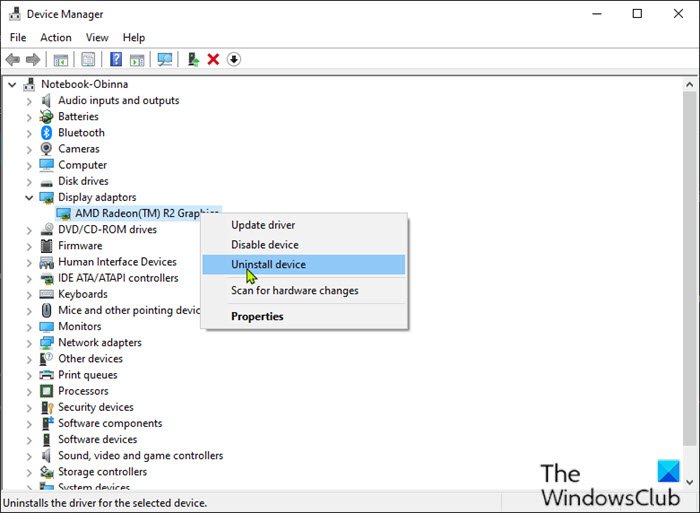
This error may occur due to problems with your display driver. However, you can simply fix this problem by installing the generic AMD display driver. Here’s how:
- Press Windows key + X to open the Power User Menu.
- Press M key on the keyboard to open Device Manager.
- Once you’re inside Device Manager, scroll down through the list of installed devices and expand the Display Adapters section.
- Next, right-click your display adapter and select Uninstall device from the menu.
- Check Delete the driver software for this device and then click Uninstall.
Once you remove the driver, restart your computer. On boot, Windows 10 will automatically install the generic driver for the graphics card.
Try the next solution if the issue is still unresolved.
5] Disable AMD External Events Utility Service
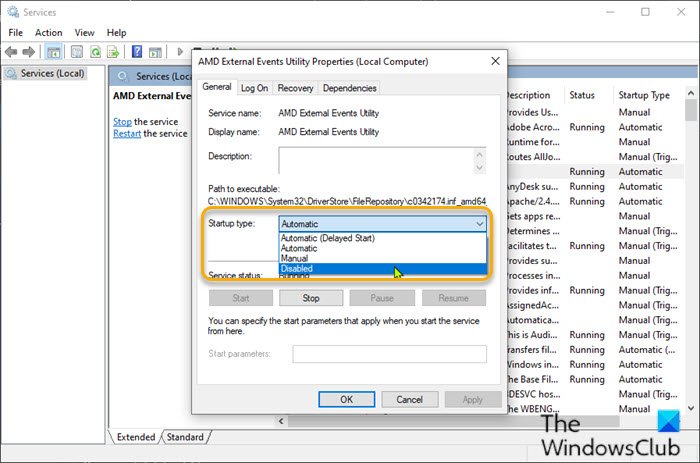
Do the following:
- Press Windows key + R to invoke the Run dialog.
- In the Run dialog box, type services.msc and hit Enter to open Services.
- In the Services window, scroll and locate the AMD External Events service.
- Double-click on the entry to edit its properties.
- In the properties window, click the drop-down on the Startup type and select Disabled.
- Next, click Stop under Service status to stop the service.
- Click Apply > OK to save changes.
Check if the issue is resolved. Otherwise, try the next solution.
6] Change AMD Graphics Power Settings
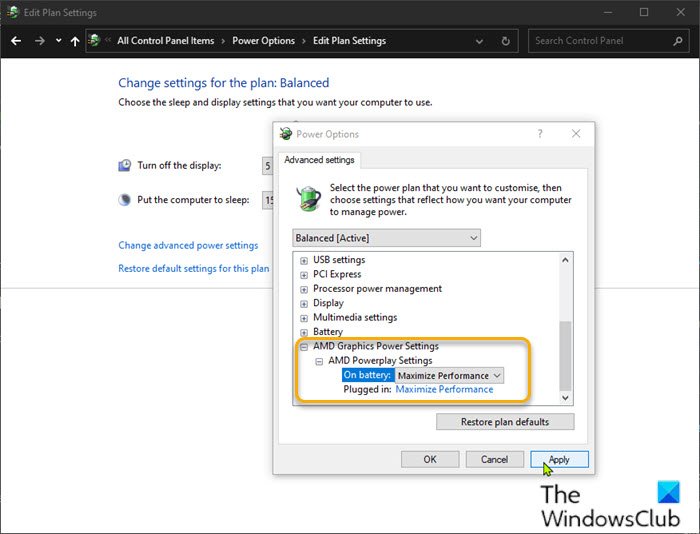
Do the following:
- Right-click the battery icon on the notification area on the right of the taskbar.
- Select Power Options from the context menu.
- Depending on your current Power Plan, click on Change plan settings link.
- In the Edit Plan Settings window, click on Change advanced power settings.
- In the Power Options window, scroll down and click AMD Graphics Power Settings to expand the section.
- Click on AMD Powerplay Settings, change all the options to Maximize Performance.
- Click Apply > OK to save your changes.
- Exit Control Panel.
Check if the issue is resolved. If not, proceed with the next solution.
7] Rename atibtmon.exe
If none of the above solutions worked for you, you can try renaming the atibtmon.exe file because deleting a system file may have consequences and stop some processes which are vital for the functioning of your computer.
To rename atibtmon.exe file, do the following:
C:WINDOWSsystem32atibtmon.exe
If you don’t see any files, click the View tab and check the Hidden Items box to show hidden files.
- Once you find the file, right-click on it and choose Rename.
- Rename the file as 2atibtmon.
- Exit File Explorer.
Hope this helps!
Related post: How to fix C++ Runtime Error in NVIDIA GeForce Experience.


