How to Back up, Move, or Delete PageFile.sys on shutdown in Windows 10
Your Windows system uses the Page file (pagefile.sys) for virtual memory. It works as an extra RAM of sorts. The paging file improves your system’s performance and speed, but some users prefer to modify how it works. This is because you can’t be sure of what data Windows saves in Pagefile.sys at any time. The paging file could hold sensitive data such as passwords, and it doesn’t get deleted from your system even after a restart.
The danger here is that any user can access this file by navigating to the C drive and gaining unrestricted access to it. Unauthorized users, other operating systems on your server, and other devices on your network can also copy it out to their storage device and analyze it.
The Windows system rightly protects the paging file because misconfiguring or deleting it can pose a greater risk. However, you have options for protecting your data on the paging file. We’ll explore these options in this guide.
Back up, Move, or Delete PageFile.sys on shutdown in Windows 10
Instead of explicitly deleting the paging file off your computer system, you can follow the course of action proffered on this page. Here are the phases we’ll cover in this guide:
- Preliminary phase: Back up your files.
- Delete the paging file from File Explorer.
- Alternative: Move the paging file to a different drive
- Recommended: Set your computer to delete Pagefile.sys on every shutdown
Some of these procedures should be handled only by experienced techies. However, I’ll break them down so that anyone can follow the guide, regardless of your technical experience.
1] Preliminary phase: Back up your files
The paging file is crucial and improves your system’s performance, but if you insist on deleting it, I advise that you back up your files first, so that you can easily restore your files if deleting the pagefile.sys causes issues.
There are several ways to back up your Windows computer. Connect an external storage media such as a hard disk or DVD and follow the quick method below.
Select the Start button and search for Control Panel. Open the Control Panel and go to System and Security > Backup and Restore. After this, follow one of the below steps:

- If you recently upgraded your Windows version or it’s your first time making a backup, click on Set up backup and follow the on-screen instructions in the wizard.
- If you’ve made a backup in the past, click the Back up now option.
- If it’s not your first backup, but you want to create a new backup, choose the Create new, full backup option and follow the on-screen steps in the wizard.
2] Delete the paging file from File Explorer
First, open File Explorer. You can do this quickly by pressing the Windows key + E.
Click on the View menu and go to Options.
Unmark the Hide protected operating system files (Recommended) checkbox.
Under Hidden files and folders, select the Show hidden files, folders, and drives option and hit the OK button.
The paging file is a protected system file. Hence, it’s hidden. The steps above enable you to view this file in Windows Explorer. Following that, you’re now ready to delete the file.
Navigate to This PC > Local Disk (C:).
You’ll find the pagefile.sys file here. Right-click on this file and hit Delete.
Due to the Page file’s size, it most likely wouldn’t go to the Recycle Bin but be deleted entirely. That’s why the backing up phase is important.
Notice that Windows classifies it as a System file. Meaning that it’s crucial to the smooth operation of your computer. Therefore, the system may not let you delete it.
You can view the paging file (pagefile.sys) in Windows Explorer, but if you try to delete it, the system may say that another program is using it.
2] Alternative: Move the paging file to a different drive
Instead of deleting the paging file from your system, you can set your computer to create a new pagefile.sys file in a new location. This solution is best suited for cases where you have a different drive that matches or tops the performance of your hard drive.
Press the Windows key + I combination to open Settings.
Here, go to System > About. Next, click on the System info link under the Related settings area.

Select the Advanced system settings option on the left-hand pane.
Switch to the Advanced tab and click on the Settings button under the Performance area.
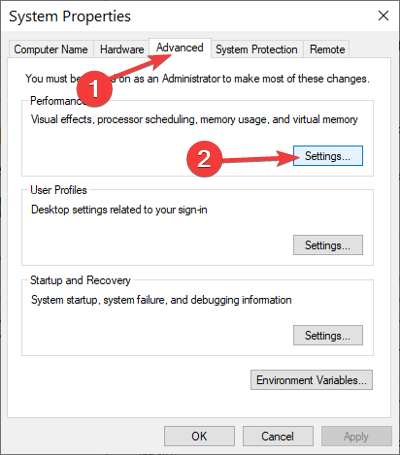
In the Performance Options window, click on the Advanced tab, and you’ll see the size of your paging file in the Virtual memory section. Hit the Change button here.
Unmark the checkbox for Automatically manage paging file size for all drives.
Click on the C: [System] drive, and with this selected, go down and choose the No paging file option. Hit the Set button.

Go back to the Drives and select the volume to which you want to store the paging file.
Scroll down, click on the System managed size for the drive, and hit the Set button. Finally, click on the Yes button on the prompt.
You have successfully disabled the paging file on your primary drive. However, I don’t advise that you do this because, with the paging file disabled, the system will no longer create crash dumps if there’s a system error.
The next step is to choose the drive on which you wish to store the paging file. From this same screen, click on this drive and select System managed size instead of No paging file as we did for drive C.
Hit the Set button and click Apply and Ok to close save your settings and close the window.
Finally, restart your machine.
Set your computer to delete Pagefile.sys on every shutdown
Knowing that the page file is vital to your machine, you don’t want to run your computer without it.
However, the paging file poses a security risk because it’s carried over even after you restart your machine. A better way is to set your computer system to delete the paging file whenever it shuts down.
With these methods, your computer deletes the paging file whenever you shut it down, and on each restart, Windows creates a fresh paging file.
NOTE: Deleting the paging file on every shutdown and creating a new one on startup will slow down your shutdown and booting times.
1] Ultimate Windows Tweaker

Download and use our freeware Ultimate Windows Tweaker to do so with a click. You will see the setting under Customization > File Explorer.
2] Using the Registry Editor

Press the Windows key + R to open the Run dialog box. In Run, type Regedit and click OK.
In the Registry Editor, navigate to the following folder:
HKEY_LOCAL_MACHINESYSTEMCurrentControlSetControlSession ManagerMemory Management
On the right-hand pane, double-click on the DWORD named ClearPageFileAtShutdown and change the Value data to 1. Hit the OK button to save the changes.
NOTE: If you don’t find this DWORD, right-click on the white space and create it from New > DWORD (32-bit) Value. Set the name to ClearPageFileAtShutdown and the Value data to 1.
Exit Registry Editor and restart your computer.
3] Using Group Policy Editor

Open the Run dialog box by pressing the Windows key + R combination.
Input gpedit.msc in the Run dialog box and hit ENTER.
In the Group Policy Editor, expand Computer Configuration on the left-hand pane.
Under Computer Configuration, go to Windows Settings > Security Settings > Local Policies > Security Options.
From the right-hand pane, right-click on Shutdown: Clear virtual memory pagefile and select Properties.
Choose Enabled from the new window and finally hit the Apply and OK buttons to save the configuration.
Again, I can’t overemphasize that deleting the paging file can be detrimental to your computer. However, if you have good reasons to do so, do it properly by following the above guide.


