How to change default Height and Width of Windows Terminal window
Those of you who use the Windows Terminal know how important and, oftentimes, how frequent its use can be. You may find yourself arranging the size of the default Windows Terminal window every time you use it. Maybe it is too small for you or the other way around. While it is rather easy to make that adjustment (you just have to drag your mouse around), it is better to pick your preferred dimensions so that it always opens that way. In this article, we will tell you how you can change the default height and width of Windows Terminal in Windows 11/10.
How to change default Height and Width of Windows Terminal
This option is found in the Startup settings and the changes made here extend to all your profiles i.e., PowerShell, WSL, Command Prompt, etc. There are two ways in which you can do that:
- Via the Terminal Settings
- Using the .JSON file
Change Windows Terminal default height & width using Terminal settings
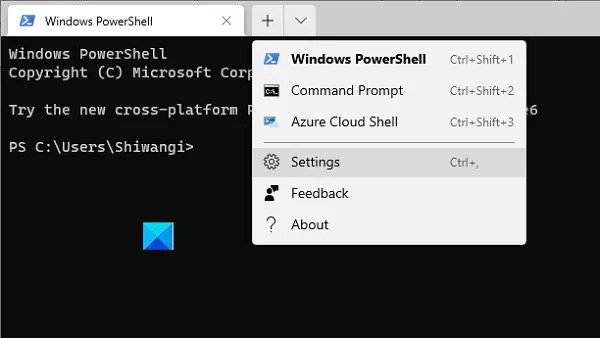
Open your Start menu and search the word terminal. You’ll see an option to run the Windows Terminal, click on it. The profile that you’ve selected to be your terminal will run, in this case, it is PowerShell. You’ll see a drop-down option next to the Terminal tab. Click on it and select Settings.

Here, click on the Startup tab from the options pane to your left. Scroll down and under the launch size head, you can adjust the size of the rows and columns of your terminal. Once done, click on save to implement this change. Relaunch your terminal and it will open in the newly saved dimensions.
Change Windows Terminal default height & width using .JSON file

An alternative method to change the terminal’s dimensions is to modify its.JSON file.
- Launch Windows Terminal from the Start Menu
- Open the drop-down next to the terminal tab and click on Settings
- The last option in the left side pane is to open the JSON file (the preferrable app to access it is an IDE)
- Type the following lines after the “Actions” bracket and save the changes
"initialCols": 108,

"initialRows": 25,
Relaunch the terminal and you’ll observe that the changes have been implemented.
If you do not use the Windows Terminal app and instead use your preferrable profile (CMD or PowerShell) directly, worry not since you can change their individual default sizes as well. We will demonstrate how you can do that with the Command Prompt but the process can be replicated with PowerShell by following the same steps.
- Search CMD on the Start menu and click to run it as the administrator
- Right-click on the top slab
- Open CMD’s properties
- Visit the layout tab and adjust the Window Size
- Click on Ok to save the changes and you’ll observe that your terminal’s window size has been adjusted
To make the same change with your PowerShell, search for that instead and follow the same steps and prescribed above.
Can I change font size and font weight for a Windows Terminal profile?
Windows Terminal also provides the feature to set font-weight. You will be able to set font-weight to Normal, Bold, Semi-Light, Thin, Extra-Light, Semi-Bold, Medium, Black, Extra-Black, Extra-Bold, or custom (between 0 to 1000).
How to reset Windows Terminal settings to default?
If you’re experiencing some unexpected problems after changing the settings or you’re not happy with the customizations, then resetting Windows Terminal settings to default might be helpful.
We hope that this was able to help you and that you are now able to use the Windows Terminal with even greater convenience.