How to change Mouse Settings in Windows 10
To modify how the mouse or touchpad works, you start by opening the Control Panel. The quickest way to get there is by pressing the Windows key and searching for Control Panel in the Start menu. Click on Control Panel from the results to launch it.
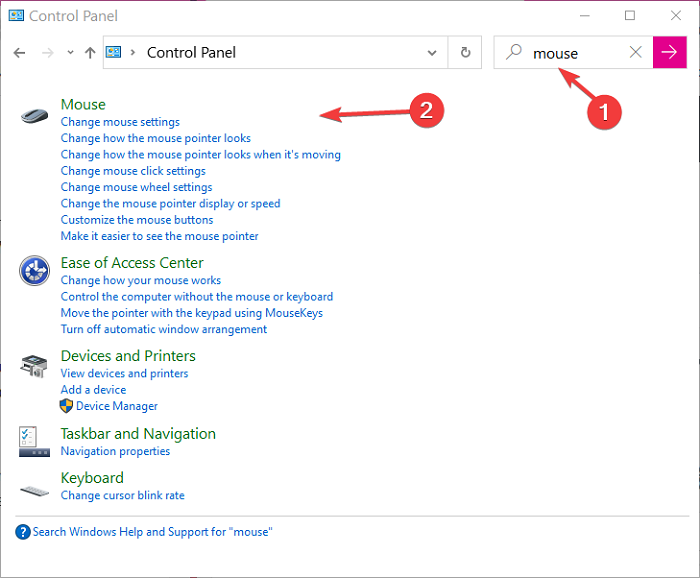
In the Control Panel applet, search for mouse in the box in the top right-hand corner of your screen and click on Mouse from the results. This takes you to the Mouse Properties window, where you make all the settings.
How to change Mouse Settings in Windows 10
The first mouse settings we’ll explore are regarding the buttons. In this section, I’ll show you how to modify the way the mouse buttons work. Below are the mouse button settings we’ll explore in this section:
- Switch the functionalities of the left and right mouse buttons.
- Change the double-click speed.
- Select or drag-and-drop items without holding the mouse button.
In the Mouse Properties window, switch to the Buttons tab and continue reading to learn how to go about the mouse button modifications listed above.
1] Switch the functionalities of the left and right mouse buttons

The left mouse button is primarily used to select items in the Windows system. Clicking once picks the item, and double-clicking opens it. The right mouse button brings up the context menu for items selected or clicked.
To attribute the left mouse button’s functions to the right mouse button and vice versa, navigate to the Mouse Properties window following the above steps.
In the Buttons tab, go to the Button configuration area, and mark the Switch primary and secondary buttons checkbox. Hit the OK button to save the modification.
2] Change the double-click speed

Double-clicking on an item on your computer opens it up. This applies to shortcuts, folders, files, etc. The default double-click speed in Windows is half a second (500 ms).
If this is too quick or slow for you, you can also modify the speed from the Mouse Properties screen. Here, go to the Double-click speed area and drag the slider to adjust the double-click speed.
3] Select or drag-and-drop items without holding the mouse button

To select or drag-and-drop icons and other items, you need to hold down the left mouse button. If that’s too much of an inconvenience, there’s a better way to do it using the ClickLock function.
With ClickLock, you only have to click the item(s) and hold it down for a few seconds. After this, you can let go of the item and select more or drag the item.
To enable ClickLock, navigate to the Mouse Properties window following the above guide and mark the Turn on ClickLock checkbox.
To reduce or increase the time you hold down the click, click on the Settings button, and move the slider to the left (reduce the speed) or right (increase the speed).

Hit the OK button to save the ClickLock settings, and click on the OK button to save and exit the Mouse Properties window.
Change how the mouse pointer works & looks
The mouse pointer is the primary pointing feature of your computer, and you may want to customize its looks or functionalities. We’ll explore the following settings in this section:
- Change the mouse pointer’s appearance.
- Adjust the speed and precision of the mouse pointer.
- Show mouse pointer trails.
- Hide the mouse pointer when typing
Navigate to the Mouse Properties window by following the steps above. Here, switch to the Pointers tab and use the guides below to tweak your mouse pointer.
1] Change the mouse pointer’s appearance

To change the look of the pointers, look through the Scheme dropdown list and pick a new one. We published a detailed guide on changing the mouse and pointer color scheme.
If you wish to change the look of the pointer in a specific scheme, select a scheme and select a figure you want to modify from the list under Customize, hit Browse and pick one.
Click on the OK button to save your changes.
2] Adjust the speed and precision of the mouse pointer
Navigate to the Pointer Options tab in the Mouse Properties window. You can increase the mouse pointer speed in the Motion area by dragging the slider to the right or left. Left reduces the speed and right increases it.
If the pointer speed is too fast or slow, it may be tough to point at items accurately. Mark the Enhance pointer precision checkbox to improve the pointer’s accuracy.
For even quicker mouse pointer action, go to the Snap To area and select the checkbox beside Automatically move pointer to the default button in a dialog box.
3] Show mouse pointer trails
You may experience the issue where your mouse pointer moves erratically slowly. Also, the pointer may be too fast and hard to locate when you move it. Having a trail behind the arrow helps in these situations.
Check the Display pointer trails checkbox, which is still under the Pointer Options tab of the Mouse Properties window.
Finally, Click on the OK button to finish. You may also want to adjust the length of the pointer trails. Do this by dragging the slider towards long or short.
4] Hide the mouse pointer when typing
The mouse pointer can obstruct your typing and block some texts. If you type a lot on your PC, you can hide the pointer from the Pointer Options tab. In the Visibility section, click on the checkbox for Hide pointer while typing and hit OK.
If you lose track of where your pointer is, you can always find it by pressing the CTRL key. For this, you must first enable the Show location of pointer when I press the CTRL key option.
Read: Useful Mouse Tricks for Windows 10 users.
Change how the mouse wheel works

The main function of the mouse wheel is to scroll up and down a page on your PC. It also acts as a third mouse button, but we’ll focus on the scrolling function here.
Here’s what I’ll show you:
- Adjust the number of lines per vertical scroll.
- Adjust the number of characters per horizontal scroll.
Similar to the above sections, you can find the mouse wheel settings on the Mouse Properties screen by going to Control Panel and searching for Mouse. Click on the Wheel tab and follow the guides below.
1] Adjust the number of lines per vertical scroll
On the Wheel tab, you’ll find the Vertical Scrolling settings. You can either set the wheel to scroll per line or go to the next screen with one scroll.
To scroll per line, click on the first option under Vertical Scrolling and select the number of lines.
Read: How to reverse Mouse and Touchpads scrolling direction.
2] Adjust the number of characters per horizontal scroll
Horizontal scrolling moves the cursor across characters on your screen, and it’s especially useful when you type. If your mouse doesn’t support horizontal scrolling, but you need this feature, here’s how to change the mouse wheel from scrolling vertically to horizontally.
Below the Vertical Scrolling settings is that for Horizontal Scrolling. It’s set to 3 characters by default, but you can change it to any number you want.
TIP: If you prefer to customize your mouse functionality using a third-party tool and get even more options, you can use WinMouse.