How to change the Background or Theme in Microsoft Planner
Creating a Plan in Microsoft Planner is one of the easiest things you can do. But you know what is just as easy, and maybe more so? Adding a new background or theme! Let’s face it; the default white background is boring; therefore, we suspect many users will want to change that.

Change Background in Microsoft Planner
So, is it possible to change the background or theme of a Plan? Yes, it is possible, and we’re going to discuss how to do it with this article. Now, bear in mind that Microsoft Planner is not a tool you can download onto your Windows 10 computer. Everything is done from within the web browser, or you can download the app from the Apple App Store or the Google Play Store for iOS and Android, respectively.
Here’s how to change the background in Microsoft Planner:
- Open Microsoft Planner website
- Open your Plan
- Navigate to Plan Settings
- Open the General tab
- Choose your preferred background.
Let us discuss this in a more detailed manner.
The first thing you should do is to open the Plan you want to have a different background. Do this by visiting tasks.office.com, then navigate to Planner Hub. Once that is done, you should see a list of all your created plans at the bottom of the screen.
Click on the Plan to have it opened and ready for editing.
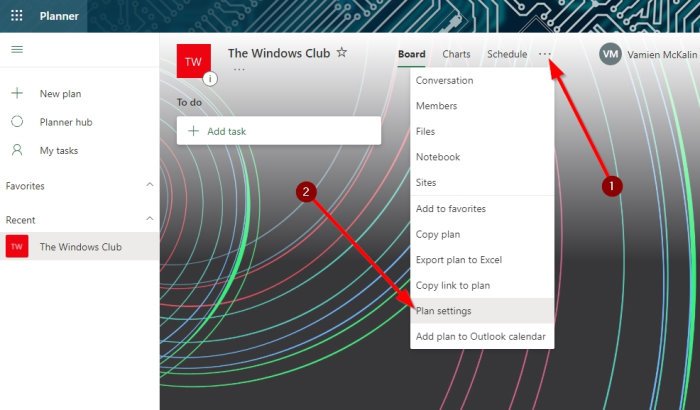
OK, so once your Plan is up, you must go on ahead and click on the three-dotted button at the top. Doing this should bring forth a drop-down menu. From that menu, please select Plan Settings in order to move on to the next step.
After opening Plan Settings, you should now be looking at a list of suggested backgrounds. Please choose the one that best fits your plan by clicking on it. Changes will be made in real-time.
How to see different backgrounds in Planner
Unfortunately, Microsoft Planner does not give users the ability to upload their own images for backgrounds. Furthermore, if the current list of options is not good enough, you can only see more by changing the name of your plan.
It’s not ideal, but at the moment, this is the best way to change the background of a plan in Microsoft Planner.
Change Theme in Planner
Okay, so when it comes down to enabling a new theme, you will want to open Planner from your Windows 10 computer and then click on the Settings icon.
From there, go to Themes and select from the visible list, or click on View All to gain access to more.
Take this information and go on ahead and transform Planner into something wonderful.
READ: How to use Microsoft Planner to keep track of tasks when working from home.


