How to compare two Word documents and highlight differences
Microsoft Word users can compare the different versions of their document by using the compare feature. You can use the Combine feature to combine revisions from different documents or revisions from other persons into a single document. The Compare feature will compare the difference between the two identical documents and review the changes made.
Compare two Word documents

The Compare feature compares two versions of a document to see the differences between them:
- Open Microsoft Word.
- Click the Review tab and select the Compare button in the Compare group.
- In the drop-down list, click the Compare feature.
- A Compare Documents dialog box will pop up.
Now, inside the Compare Document dialog box, you will select the Original document by clicking the drop-down arrow and click Browse or click the Folder to locate the document you want to compare in the Original Document section.
The Revised document is the document that is identical to the Original but has some changes.
Choose the Revised document from the Revised Document section by doing the same procedure and then click OK.
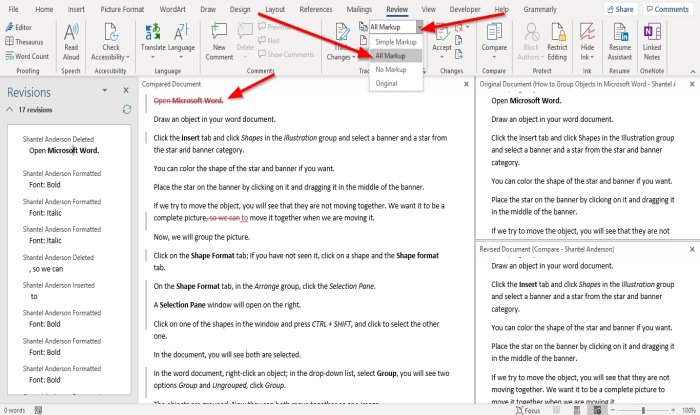
Microsoft Word will open the document in a comparative interface, and the interface is consists of four sections.
The first section is called Revisions. The Revision section shows the text list, which is deleted, inserted, or changed in the revised document.
The second section is called the Compared Document; this section highlights the area where changes are made in the Revised document.
The Revision section would be like a navigation bar for the Compared Document section.
Once you select a text or phrase from the revision section, it will automatically go to the location of the text you clicked.
In the Compared Document section, you will see a red line near some of the text.
To display what was added or deleted in the document.
Click the Review tab and the Display for Review button drop-down arrow, and select the All Markup option from the list.
The All Markup option will showcase all the changes made to the original document.
The All Markup feature identifies all the changes made with a red color.
You will see two interfaces cascading each other on the left, the Original Document and the Revision Document; once you try to scroll down, you can see the difference between both of them.
I hope this helps; if you have questions, please comment below.
Read next: How to display and work with multiple windows in Word


