How to create a Mouseover Text Effect in PowerPoint
Want to create a mouseover text effect in your PowerPoint presentations? This post will show you a simple tutorial to generate a mouseover text effect in Microsoft PowerPoint. A mouseover text effect is created to show related text and information when you place your mouse cursor on an object in a presentation. This is similar to how tooltips are displayed showing you a brief info regarding the tool.
If you add descriptions and a bit lengthy text to describe images, icons, shapes, figures, and other objects in separate text boxes within the PowerPoint slides, it would make your presentation look quite messy and unorganized. So, in that case, creating a mouseover text effect in your presentations will help you make your PPTs look sorted out and well organized. Now, how you can generate mouseover text effects in MS PowerPoint? Well, no worries. Here is a step-by-step procedure for you to create a mouseover text effect in your presentations. Let’s get started now!
How to create a Mouseover Text Effect in PowerPoint
Here are the main steps to create a mouseover text effect in your PowerPoint presentations:
- Launch Microsoft PowerPoint and open or create a presentation.
- Select an object for displaying as mouseover effect and insert a hyperlink to it.
- Go to the Place In This Document section.
- Choose the presentation slide to which you created the hyperlink.
- Open the Screen Tip Dialog Box and type the text to display on mouse hover event.
- Launch presentation in Slideshow mode and review the mouseover text effect.
- Save the final presentation with created mouseover text effect.
Let us now have a look at these steps in detail!

Firstly, open the Microsoft PowerPoint app and then import an existing presentation or create a new one with text, objects, images, and other content.
Now, in your presentation, select the object for which you want to generate a mouseover text effect. Then, right-click on the selected object, and from the context menu, click on the Link and then Insert Link option. This will open up an Insert Hyperlink dialog box. To quickly open up the Insert Hyperlink dialog, you can select the object and then press the Ctrl + K key combination.
Tip: How to link Elements, Content, or Objects to a PowerPoint slide
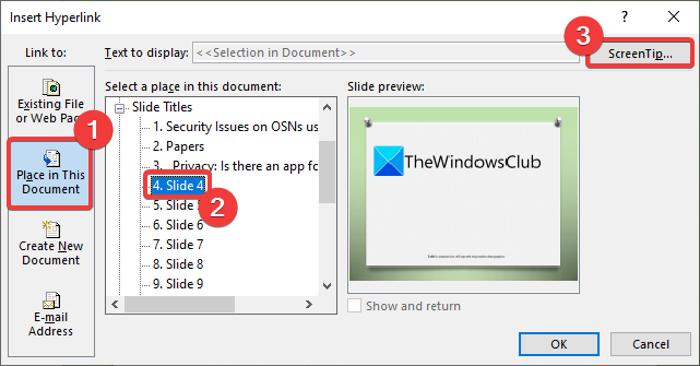
In the Insert Hyperlink dialog box, go to the Place In This Document section and select the slide on which you are generating the mouseover text effect. This step is done so that even if you accidentally click on the hyperlink while presenting the slide, you will remain on the same slide in your presentation.
Next, you need to click on the ScreenTip option which is present on the top-right corner of the Insert Hyperlink dialog box.
A Set Hyperlink Screen Tip box will open up where you need to type the text that you want to display as mouseover text. Enter the object description to show when the mouse cursor is placed on the object and tap on the OK button.

After that, press the OK button in the Insert Hyperlink dialog window to return to the main PowerPoint presentation window.
Read: How to Insert Drop-down menu in Powerpoint.
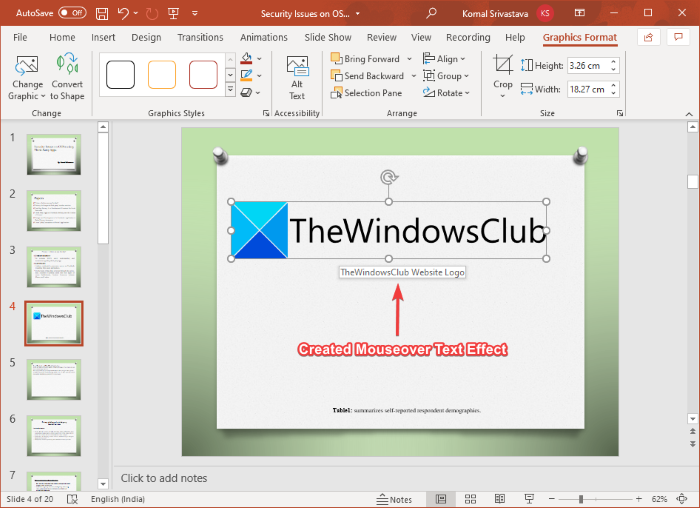
Now, hover the mouse on the object and you will see a mouseover text effect below it as displayed in the below screenshot. You can check the same in the Slideshow mode.
At last, you can save the PowerPoint presentation in PPT, PPTX, or any other supported format with created mouseover text effect.
In the same manner, you can generate mouseover text effects for other objects, images, and content in PowerPoint.
That’s it! Hope this helps!
Now read: PowerPoint Broadcast Slide Show feature lets you give presentations over the internet.