How to create a Report using Microsoft Access
A Report is a tool used to summarize and present data in an organized format, usually printed. Reports and Forms are similar, but Forms are used to view, input, and edit data and provide a detailed look at records and usually shown on screen. Reports are used to view information, summarize, and group data and be viewed on screen but generally printed.
Report Design Tools in Access
- Report: Create a basic Report of data in the current Query or Table that can add Groups or Total
- Report Design: Create a new Blank Report in Design View. You can make advanced design changes to the Report, such as adding custom control types and adding codes.
- Blank Report: Create a new Blank Report so that you can insert Fields and design the Report.
- Report Wizard: Displays the Report Wizard that helps you to create a simple customized Report.
- Labels: Display the Label Wizard to create standard or custom labels.
How do you create a Report using Microsoft Access
1] Create a Report using the Report Tool

Go to the Create tab in the Report Group, click the Report Group. A Report is created quickly. Unlike Form, Reports cannot be edited, but you can modify your Report by adjusting the column; by clicking on the column, a yellow border will appear, and you can drag the edge of the column to your preferred length.
To Delete a column or row, you do not want. Right Click the row or column and click Delete. The Report should be modified in the Layout View.
2] Create a Report using Report Design

In the Report Group, select Report Design; it will take you to the Design View display. The Design View is layered in sections such as Page Header, Details, and Page Footer.
To add data to the blank layout, click Property, then click the drop-down menu’s arrow on top of the Property Sheet, now select Report. Click Data. On the Record Source drop-down menu, select your Query or Table you want to use in your Report.
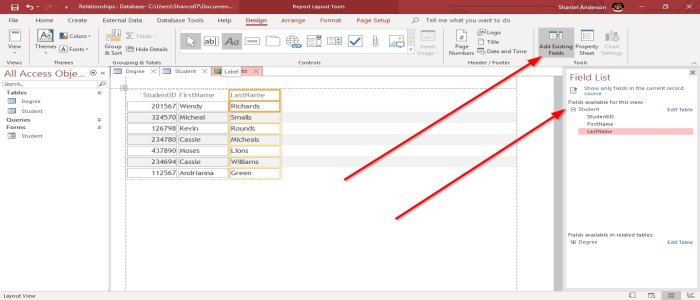
Click the Add Existing Fields. Click the Fields you want to add to the Report and drag them to the Detail Section.
Go to Print Preview. You will see your Report in printed view. On the bottom left of the Print View, there are Navigation Buttons that allow you to navigate through the Report.
To return to the Design View, close the Print Preview by clicking the Close the Print View button on the window’s top right.
3] Create a Report using a Blank Report

On the Create tab in the Reports Group, select the Blank Report Tool.
On the right of the Report Layout Tools Window, Select Add Existing Fields. There is a Field List; click the field and drag the field to the blank space. Then go to the Print Preview; you will see a printout of your Report.
4] Create a Report using Report Wizard

In the Report Group, select Report Wizard, a Report Wizard Dialog Box will appear.
In the Dialog Box, select the Table and Fields you desired to be in your Report. By pressing these buttons (>, >>, <, <<). Then click Next.
In the Wizard, a question will be asked ‘do you want to add any Grouping Levels ? Select the Grouping Level you need, then Next.
Choose the Sort Order you want your Report to be in by the drop-down menu and a button beside the drop-down menu where you can choose from Ascending or Descending order. Then Next.
You can choose how you want to layout your Report. You can select the options; Columnar, Tabular, and Justified, and you can select the Orientation of the layout, either Portrait or Landscape. Then Next
You can select the Title and Preview the Report or Modify the Report Design. Then Finish.
5] Create Labels

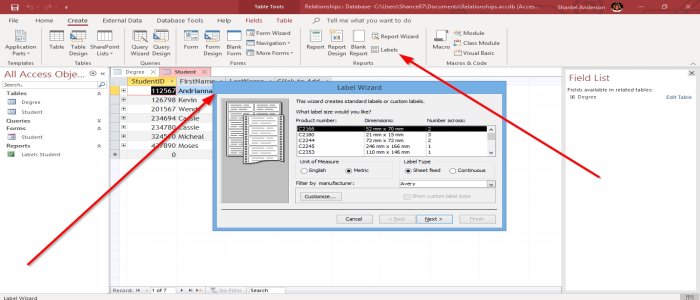
- Click Labels on the Report Group. A Dialog box will pop up.
- You can choose the size you want. The Unit of Measure, Label Type, and Filter of the Manufacturer then Next.
- Choose the Font Name, Font Size, Font Weight, and Text Color. Then Next.
- Select the Fields you want on your Mailing Label.
- Sort your Fields. Next.
- You can choose the Title and to Preview the Label or Modify the Label Design.
- Then click Finish. A Label is created.
- You can view your Labels in Print View.
That’s all.
Read next: How to create a Database in Microsoft Access.


