How to Create Storage Spaces for Storage Pool in Windows 10
With Storage Spaces, you can group two or more drives together in a storage pool and then utilize the capacity from that pool to create virtual drives called storage spaces – which typically store two copies of your data, so if one of your drives fails, you still have an intact copy of your data. In this post, we will show you how to create a Storage Spaces for Storage Pool in Windows 10.
Create a Storage Space for Storage Pool

We can create a Storage Space for Storage Pool in Windows 10 in 2 quick and easy ways. We’ll explore this topic under the methods outlined below in this section:
You must be signed in as an administrator to create storage space.
1] Using Settings app

To create a Storage Spaces for Storage Pool via Settings app in Windows 10, do the following:
- Press the Windows key + I to open Settings.
- Tap or click System.
- Click on Storage on the left pane.
- Next, scroll down and click/tap on the Manage Storage Spaces link on the right pane.
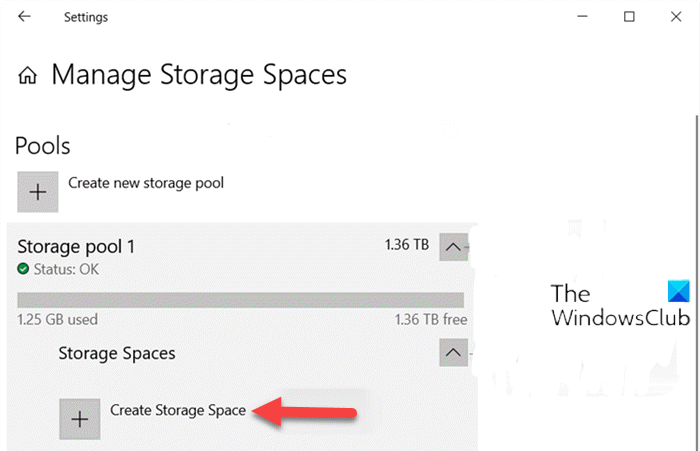
- In the Manage Storage Spaces page, click on the chevron to expand a storage pool you want to create a storage space for.
- Next, click on the chevron to expand the Storage Spaces for the storage pool.
- Now, click on Create Storage Space.
- Next, type a name you want to use for this Storage Space.
- Next, select and enter a maximum pool usage size you want to use from the available Pool capacity.
- Next, select a Simple, Two-way mirror, Three-way mirror, Parity, or Dual parity resiliency type you want to use for this storage space. (Details)
- Click the Create button.
- In the New volume dialog, type a name (This is the name that will be used to identify the virtual drive in File Explorer under This PC) you want to use for this volume.
- Select an available drive letter you want to be assigned to this volume.
- Select a file system you want for this storage space.
Note: The ReFS file system will only be available to select if enabled.
- Click the Format button.
- Once done, exit the Settings app.
This storage space (virtual drive) will now be available as a drive in This PC for users to use as any other drive on the computer.
Read: The New Storage Pool Wizard did not successfully complete.
2] Using Control Panel

To create a Storage Space for Storage Pool via Control Panel in Windows 10, do the following:
- Press Windows key + R to invoke the Run dialog.
- In the Run dialog box, type control and hit Enter to open Control Panel.
- From the top right corner of the window, set the View by option to Large icons or Small icons.
- Click Storage Spaces.
- Click the Change settings button, click on Yes if prompted by UAC.
- Click on the Create a storage space link for the storage pool you want.
- In the Create a storage space page, type a name for this storage space.
- Next, select a drive letter.
- Next, select a file system you want for this storage space
- Next, select a Simple, Two-way mirror, Three-way mirror, or Parity resiliency type you want for this storage space.
- Next, specify the maximum size for this storage space.
- Click on Create storage space button. The new storage space (virtual drive) will now be created for the storage pool.
- Exit Control Panel when done.
That’s it on the two ways to create a Storage Space for Storage Pool in Windows 10!
Read next: How to Change Storage Spaces in Storage Pool.