How to customize Access Denied error message on Windows 10
In Windows, every file has user permission, and if a user who doesn’t have access to it gets an Access denied message in Windows 10. The user gets a general error message, and it can be customized by the system administrator or an admin account on the computer. This post will guide you on how you can customize access denied message on Windows 10.
Customize Access Denied message on Windows 10
The standard access denied messages are of no help as they ask to contact the administrator. Instead, Windows offers a group policy and registry method, which can add sense to it, like allowing users to add a message, email folder owner, server admin, and so on.
- Using Group Policy
- Using Registry Editor
As an admin, make sure to configure it carefully, so it all makes sense when an admin or owner of the file receives the email.
Using Group Policy

Open Group Policy Editor by typing gpedit.msc in the Run prompt (Win +R) and pressing the Enter key. In the Group Policy console, navigate to the below-mentioned path and locate the policy—Customize message for Access Denied errors.
Computer Configuration Administrative Templates System Access-Denied Assistance
Double click to open, and configure the following:
- Display the following message to users who are denied access
- Enable users to request assistance
- Add the following text to the end of the email.
- Email recipients (folder owners and file server administrator)
- Additional recipients
- Email settings can also include device claims and user claims.
- You can also Log emails in the applications and services event log.
Using Registry Editor
The same can be configured on computers through the Registry Editor. This method is handy if the computer doesn’t have a group policy or plans to deploy this through a network computer registry file. Registry Hive allows you to connect to Network Registry, and that’s where it comes in handy.
ComputerHKEY_LOCAL_MACHINESOFTWAREPoliciesMicrosoftWindowsADRAccessDenied
- Right-click on the right panel, and create New > DWORD (32-bit Value) and name it as Enabled
- Double click to edit the Enabled DWORD and set it to 1
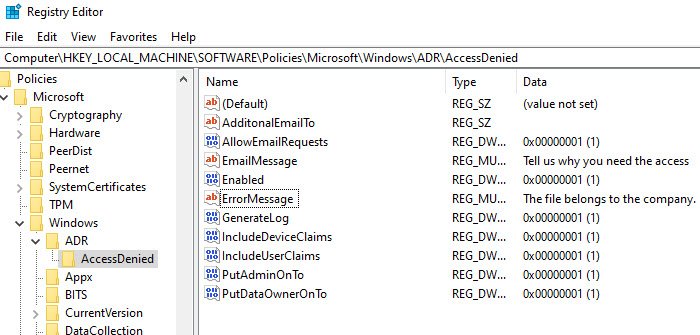
Next, create the following DWORD and Strings.
- AdditonalEmailTo — String – Blank
- AllowEmailRequests — Dword -1
- EmailMessage — Multi-String – Your personalized message
- Enabled — Dword – 1
- ErrorMessage — Multi-String – Your personalized message
- GenerateLog — Dword – 1
- IncludeDeviceClaims — Dword – 1
- IncludeUserClaims — Dword – 1
- PutAdminOnTo — Dword – 1
- PutDataOwnerOnTo — Dword – 1
Make sure to set the value according to what is shown in the screenshot.
You can customize the details for strings such as Email message, Error message, and Additional emails.
An easy way to do it is to enable Group Policy on a computer. It will create the respective registry keys, which you can export and then import into other computers.
I hope you were able to customize the Access denied message on Windows 10