How to Disable Laptop Keyboard on Windows 10
In order to make laptops lighter and easy to carry, manufacturers have made the keyboards smaller in them. This has made typing difficult on the laptops as compared to on the desktop with external keyboards. Now, if you want to disable the laptop keyboard and put an external keyboard on your Windows 10 PC, you can do so. Just follow the tip given in this post.
Though external keyboards create an inconvenience while carrying but it comes with other advantages like sturdy structure, better typing, easy replacement and cheaper as compared to the laptop.
How to Disable Laptop Keyboard on Windows 10
If you want, you can easily disable the laptop keyboard and use external keyboards with the same laptop. There are a variety of external keyboards available in the market with Bluetooth connectivity or USB cable. Let us know how to disable the laptop keyboard on Windows 10:
- Disable Laptop Keyboard via Device Manager
- Disable Laptop Keyboard via Group Policy
Let’s see both the methods in detail:
1] Using Device Manager
To disable the Laptop Keyboard, we recommend you to do using the Device Manager as this method is simple and straightforward. However, one thing you should know that this method doesn’t work on every laptop but you can give it a try, it will not take much of your time. The steps are as follows.
- Press Win+X and select Device Manager from the list.
- Find Keyboards and expand it.
- Right-click on the internal keyboard and click Disable.
- If there is no Disable option listed, click Uninstall.
- Your laptop’s internal keyboard should now be disabled.
This method is fine if you want to temporarily disable your laptop keyboard. If you select Uninstall instead of Disable, the keyboard will be automatically detected and re-installed if you ever have the Device Manager scan for new hardware for some reason.
2] Disable via Group Policy
If the above method doesn’t work on your Laptop, you can use the Group Policy Editor to enable the device installation restriction. This will prevent your Laptop keyboard from reinstalling when you start up your device. Before you go to the steps, kindly note that this method is only applicable on devices running Windows 10 Pro and Enterprise edition. So, if you want to continue, follow the below suggestions:
- First of all, open the Device Manager.
- Go through the list and expand the Keyboard section.
- Right-click on the driver you see there and then select Properties.
- Switch to the Details tab.
- Click on the Property drop-down menu and select Hardware Ids from the list.
- Under the Value section, right-click on the first option and select Copy.
- Now open Group Policy Editor.
- Then expand the left section as following: Computer Configuration > Administrative Templates > System > Device Installation > Device Installation Restrictions.
- Double click on the Prevent installation of devices that match any of these device instance IDs policy to modify it.
- Mark the checkbox next to the Enabled option.
- Go to the Options section and click on the Show button.
- Inside the Show contents box, under the Value column, double-click the space bar and paste the ID that you have copied in Step 6.
- Click the OK button, again click OK.
- Right-click on the Start menu and open Device Manager again.
- Expand the Keyboard section, right-click on the internal keyboard, and select Uninstall device from the context menu.
- If any prompts appear, allow it.
- Now close the Device Manager and restart the computer.
If you need, you can now see the above-mentioned steps in detail:
To get it started, open the Device Manager first. Simply right-click on Start and you can select Device Manager from the list.
Once you’re in the Device Manager window, expand the Keyboard section, right-click on the internal keyboard and then select Properties.

In the Properties window, go to the Details tab. Then click on the Property drop-down menu and change it from Device description to Hardware Ids.
On the same tab, you will see a Value section, right-click on the first option, and select Copy to copy the text.
Now press the Win+R keyboard shortcut to open the Run dialog box.
Inside the text field, type gpedit.msc and hit Enter to open Local Group Policy Editor.
Once you’re in the Local Group Policy Editor window, go to the following location:
Computer Configuration > Administrative Templates > System > Device Installation > Device Installation Restrictions
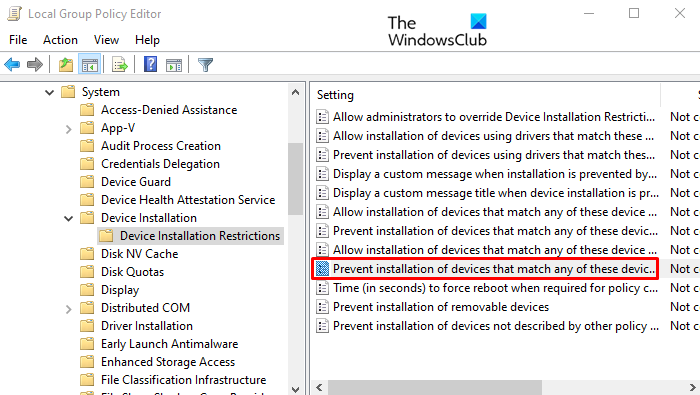
After that, move to the right page and search for Prevent installation of devices that match any of these device instance IDs.
Once you find it, double click on it, set it Enabled, and then under the Options section, click on the Show button to open the Show Contents window.
Under the Value column, double-click the space bar and paste the ID that you have copied in the Properties window of the internal keyboard.
Click the OK button, again click OK, and now you can close the Local Group Policy Editor window.
TIP: If your Windows 10 version does not ship with the Group Policy Editor, you can install it on your system.
The next step you need to uninstall the internal keyboard device.
To do so, right-click on the Start menu and open Device Manager. Expand the Keyboard section, right-click on the internal keyboard, and select the Uninstall device option. If a warning message prompts on the screen, click the Uninstall button to confirm.
Once you’re done, your laptop keyboard is disabled. So, close the Device Manager and restart the computer. When you start your computer again, you will see that the native keys of your device are not working anymore.
Hope it helps.
Related: Laptop keyboard not working.


