How to Disable or Enable Sleeping Tabs in Edge browser in Windows 10
This tutorial will show you how to enable or disable Sleeping Tabs in the Microsoft Edge browser. The feature has been designed to improve battery life and overall performance. Once you enable the feature, it will help you to save the resources by putting the background tab into sleep mode.
The Sleeping Tabs feature is currently disabled by default but you can activate it manually using a hidden experimental flag. It is currently available in the latest Edge Canary Build for Windows and macOS.
Enable Sleeping Tabs in Microsoft Edge

First of all, open the Microsoft Edge browser.
Go to the address bar, copy & paste the below text-line, and hit Enter.
edge://flags/#edge-sleeping-tabs
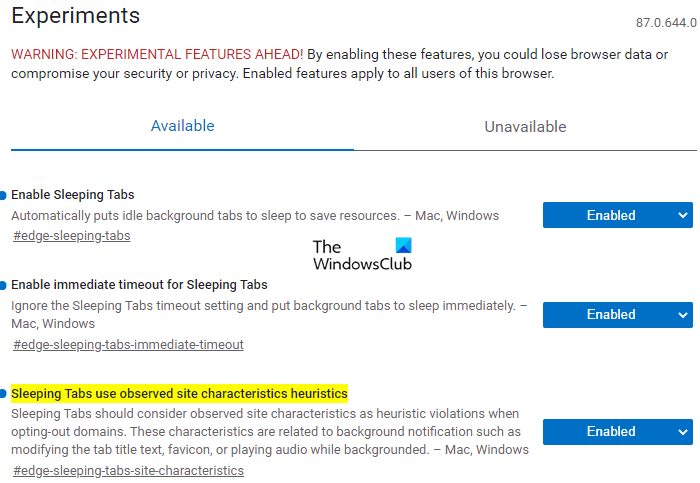
In the below section, you will see a highlighted flag entitled Enable Sleeping Tabs.
On the right of this flag, click on the drop-down menu and switch it to Enabled.
Similarly, go to the address bar and enable the followings flags one by one:
edge://flags/#edge-sleeping-tabs-immediate-timeout
edge://flags/#edge-sleeping-tabs-site-characteristics
Then click on the Restart button. This will take effect on the changes when you restart the browser.
After completing the above steps, the new feature will set the background tabs into the idle state automatically.
Disable Sleeping tabs in Edge browser

If you ever need to disable this feature, then open the Microsoft Edge browser.
Then go to the top-right corner of the page and hit Settings and more (three-dotted line) button.
Select Settings > System.
Now move to the right side and go to the Save resources section.
Next to the Save resources with sleeping tabs, click on the toggle button to turn it off.
Close the browser and you’re done.
Besides this, if you don’t want to put some sites into sleep mode, then you can prevent them.
Go to the Save resources section. Then add the site name under Never put these sites to sleep.
Let us know how you like this feature.


