How to enable or disable hardware buttons in Windows 10 Tablet PC
If you want to disable all the hardware buttons on your Windows 10 tablet PC, here is what you will have to do. You can turn off or disable all the OEM defined buttons with the help of Local Group Policy Editor and Registry Editor.
Tablet PCs are handy and portable devices, and they get your job done quickly. Almost all the Tablet PCs come with at least one hardware button that allows you to turn ON or OFF display and change the volume, etc. This can be useful if you want to disable those hardware buttons to check something or to test something specific.
Enable or disable hardware buttons on Tablet PC
To enable or disable hardware buttons in Windows 10 Tablet PC, follow these steps-
- Press Win+R to open the Run prompt.
- Type gpedit.msc and hit the Enter button.
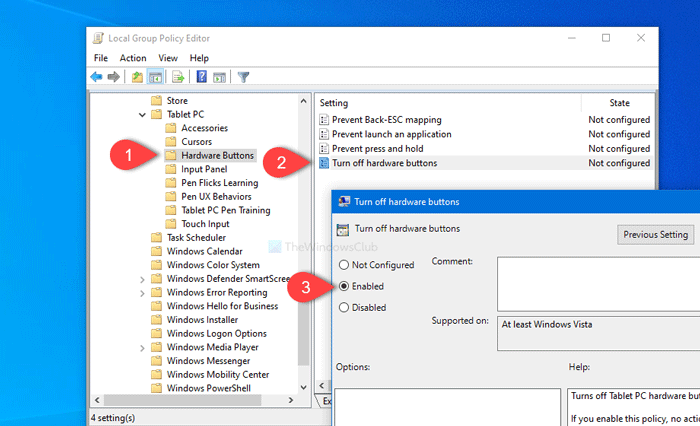
- Navigate to Hardware Buttons in User Configuration.
- Double-click on Turn off hardware buttons.
- Select the Enabled option.
- Click on Apply and OK.
You will have to open the Local Group Policy Editor. For that, press Win+R, type gpedit.msc and hit the Enter button.
After opening it, navigate to the following path-
User Configuration > Administrative Templates > Windows Components > Tablet PC > Hardware Buttons
In the Hardware Buttons folder, you will see a setting names Turn off hardware buttons. Double-click on it, and select the Enabled option.
Now, click the Apply and OK buttons, respectively. After that, your hardware buttons won’t work until you revert the change.
The second method is a Registry tweak. Therefore, it is recommended to backup Registry files and create a System Restore point to be in the safe side.
Turn on or off hardware buttons using Registry Editor
To turn off hardware buttons in Windows 10 Tablet PC using Registry Editor, follow these steps-
- Press Win+R to open the Run prompt.
- Type regedit and the Enter button.
- Click Yes in the UAC prompt.
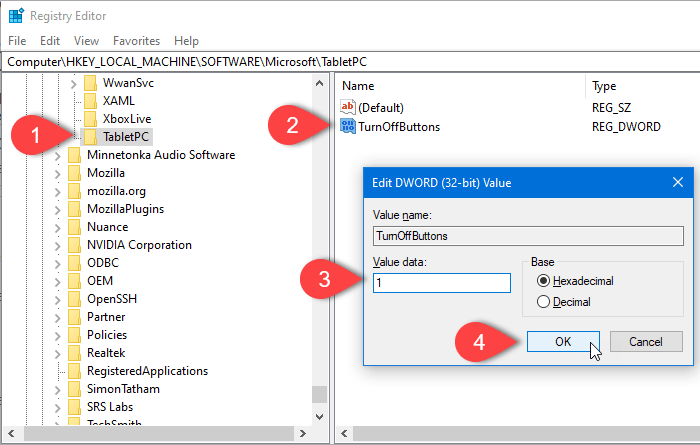
- Navigate to TabletPC in HKLM.
- Right-click on TabletPC > New > DWORD (32-bit) value.
- Name it as TurnOffButtons.
- Double-click on it and set the Value data as 1.
- Click the OK button.
Open the Registry Editor. For that, press Win+R, type regedit, and hit the Enter button. If the UAC prompt appears, click the Yes button. Now, navigate to the following path-
HKEY_LOCAL_MACHINESOFTWAREMicrosoftTabletPC
Right-click on TabletPC, and select New > DWORD (32-bit) value option. Following that, name it as TurnOffButtons. Now, double-click on TurnOffButtons, and set the Value data as 1.
At last, click the OK button to save changes.
That’s it!


