How to Enable System Protection in Windows 7
Follow this tutorial to learn how to enable system protection on your selected hard drive. Learn how to set the restore settings as well.
Don’t forget to check out our site http://howtech.tv/ for more free how-to videos!
http://youtube.com/ithowtovids – our feed
http://www.facebook.com/howtechtv – join us on facebook
https://plus.google.com/103440382717658277879 – our group in Google+
System protection is basically a feature of windows 7 which creates restore points of specific partitions in your hard drive. It is a feature that is enabled by default in windows.
If you want to turn on system protection for a specific partition or hard drive, follow this step by step tutorial. In this detailed guide, we will teach you how to enable system protection.
Step 1 — Go to System Protection
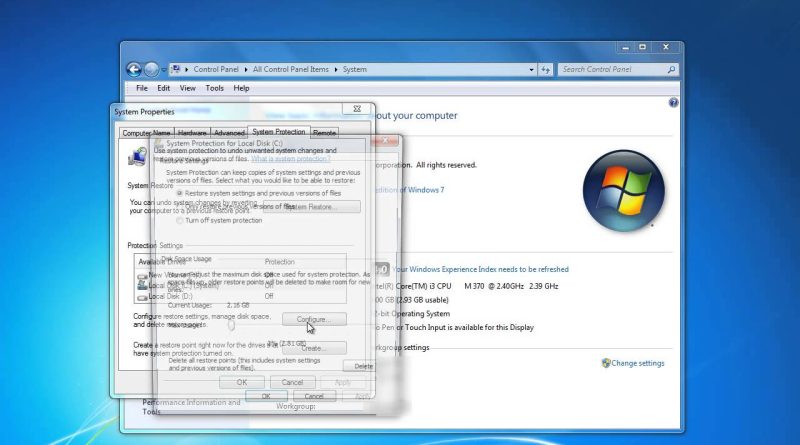
So let’s get started with our how to enable system protection tutorial. First of all, we will need to access the System window. You can do that via the control panel. You can also access it by going to the start menu, right clicking on computer and choosing the properties option.
Over there, click on the system protection option located in the panel towards the left side of the window.
Step 2 — Choose Hard Drive
This will open up the system properties window. Under the system protection tab, click on the partition or hard drive in which you want to turn on system protection. Once you’re done, click on the “Configure” button.
Step 3 — Set restore settings
In this window, you can configure the system protection options for the selected drive. For example, you can allow the feature to create restore points for both the system settings and previous versions of the files and directories.
You can also choose to restore only the previous versions of the files and directories or disable both the features.
With that taken care of, move the slider next to the “Max Usage” option to set the maximum disk space usage which will be used by system protection on the selected hard drive or partition.
With that done, simply click on “OK” and that’s it. System protection has now been enabled on the selected partition. You can do the same for other partitions and hard drives in your computer as well.
how to repair windows 7


I almost gave up on my disabled Snapchat account until I saw a comment hare hacker on Instagram named FREDRICHACKS22 I tried working with him and I couldn't believe he got my account back within 10 minute's he's a pro hacker
Thank you
My windows dont have system proyection??
No system protection option in the left pane
Thanks
I cant see the system protection tab
📱➖🔛📱🔜📱🔁💻🔜📱
hi how do i free up cdrive its at red all the time the bar i mean
is system protection can help for gaming?
Is there a way to have a network z drive backup onto either my c drive or onto a flash drive that i always have plugged into PC?
the network "z" drive is shared by others at office. and some files are deleted by accident. And I can no longer get them back from the "z" drive. Is there a solution or am I S.O.L.?
I cant see my system protection
But turn on open were not show
Call Microsoft Customer Care: 1-844-577-2999 ( Toll Free )
They will fix your Windows OS related problem.
is system protection only available in online operating systems? because its not showing system protection as an option in the left panel for me….and its a windows 7 laptop im trying to restore in safe mode…plzz help
thanks bro
how can I enable it if I cannot log on my computer?
i dont have a systeam protection button, AND IM TRYING TO FIX COMPUTER, AM I SUPPOSED TO GET A NEW ONE, ITS NOT EVEN MINE
thanks
This issue has been dogging me for years now, spent many hours searching for a solution. This worked. Score one for Howtech and youtube!
Another problem I have is windows backup and restore not working. Maybe that will work now, hope.
Thank you very much. This was a big help for studying for the A+ 802
why filled c disk himself ????
plase help me
l protected my hard drive D and C lol :Ob thank you dude
cant find hard drive.serching an serching and nothing
On stage 4, mine says windows cannot open because ecounted an error in the properties folder, .Which I cant find, which is normally a right click. Driving me nuts
thank you
Thank you so much! helped a lot