How to install Active Directory and add users
Active Directory (AD) is a directory service on Microsoft Windows Server. Its primary purpose is to facilitate administrators in the management of permissions and the regulation of access to network resources. In this post, we will learn how to install Active Directory and, add and configure users and groups.
Install Active Directory and add users to it

Since Active Directory is a core feature of Windows Server, we can install it from the Server Manager. So, to install Active Directory, follow the steps mentioned below.
- Open Server Manager on your computer.
- Now, click on Tools > Add Roles and Features.
- You then have to click on Next until you reach the Server Roles tab.
- Look for Active Directory Domain Service, select it, and click on Install.
- A pop window will ask you to install a feature, acknowledge it, and continue.
After installing the role, you can promote this Server to a Domain Controller (you will get a pop to do so).

Now, choose “Add a new forest” and enter ad.gpfs.net as the Root domain name. Click Next, then enter the Directory Services Restore Mode password. Use the default NetBIOS domain name, and click Next.
After installing Active Directory, let us learn how to configure users and groups.
Create and manage users in the Active Directory

If you are an IT administrator, you will have to deal with a user’s account most of the day. So, here are some useful tips to managing user accounts in Active Directory. First up, let us learn how to create a user in Active Directory.
- In Server Manager, go to Tools > Active Directory Users and Computers.
- Find your organizational unit, and then go to Users.
- Right-click on Users and click on New > User.
- You will see a pop-up to add the user object and enter the first and last name along with the login name.
- And then click on Next.
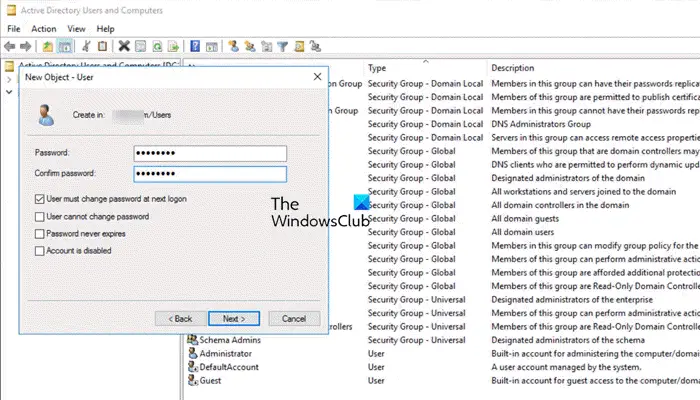
- Enter a password of your choice and then select the parameters as per your choice and click Next.
- Check the summary and click on Finish to complete the setting up your account.
That’s how you can create the account.
Now, you can alter the properties of this account by right-clicking on the account and selecting Properties.

If you want to restrict the login hours of the user we just created, go to the Accounts tab and click on Logon Hours. You can now see when and for how long the user has the privilege to log in. If want him to log in on a certain day, click and hold the highlighted boxes and then click on Logon Denied. You can similarly restrict their login timing and click on Ok once everything is done.
Sometimes, the user forgets the password to their account, by virtue of which, their account gets locked. Since it is a common practice, there is an option to quickly unlock the account. All you have to do is tick on the Unlock account checkbox under Account and click on Ok.
To delete an account, all you have to do is right-click on the account and click on Delete. You will get a confirmation box, click Ok to continue.
Create and manage Grop in Active Directory

To create a group in Active Directory, right-click on the object under which you want your group to be created and click on New > Group.
Make sure to enter your group name in the wizard. By default, the wizard will preselect Global under Group Scope and Security under Group Type. Please do not change the group type to Distribution, as that option creates distribution groups for Microsoft Exchange® and email.

If you want to add a user to your group using Group, follow the steps mentioned below.
- Go to the group, right-click on it, and click on Properties.
- Now, click on Members and then click on Add.
- Click on Advanced > Find Now.
- Select the user and click on Ok.
- Again click on Ok, and then click on Apply.
Alternatively, you can add a user to a group from the properties of that group. So, right-click on the user, click on Properties, go to Members, click on Add, click on Advanced > Find Now, select a group, and click on Ok. After applying these changes, your account will be added.
Read: Active Directory Users and Computers not responding
How do I install Active Directory and users?

If you want to install Active Directory and users to your Windows 11/10 computer, you can make use of PowerShell. First of all, open PowerShell as an administrator and run the following command.
Get-WindowsCapability -Name RSAT* -Online | Select-Object -Property DisplayName, Name, State
This will list all Name of all the RSAT services, we need to copy the one that starts with “Rsat.ActiveDirectory”. Once copied, run the following command.
Add-WindowsCapability -Online -Name Rsat.ActiveDirectory<copied-version-information>
Let the command run and install the feature.
Read: RSAT install failed on Windows 11
How do I add users in Active Directory?
To add a user in Active Directory, you need to go domain controller and open Active Directory Users and Computers. Navigate to your organizational unit, right-click on Users, and click on New > User. Enter the details and confirm.
Also Read: 10 free Microsoft Active Directory alternative software.


