How to install Windows server 2022 on VMware / PC.
Here are the steps on how to install Windows Server 2022 on VMware Workstation 17 Pro or directly on your PC:
Download the ISO file from the Microsoft Evaluation Center: https://www.microsoft.com/en-us/evalcenter/evaluate-windows-server-2022: https://www.microsoft.com/en-us/evalcenter/evaluate-windows-server-2022
VMware Workstation Pro 17 (or later): Download and install it from the VMware website if using: https://www.vmware.com/products/workstation-pro/workstation-pro-evaluation.html: https://www.vmware.com/products/workstation-pro/workstation-pro-evaluation.html
Launch VMware Workstation and click “Create a New Virtual Machine.”
Choose “Typically recommended configuration” and click “Next.”
Select “I will install the operating system later” and click “Next.”
Choose “Microsoft Windows” as the guest operating system and “Windows Server 2022” as the version. Click “Next.”
Name your virtual machine, select a location to save it, and click “Next.”
Specify the disk capacity (at least 60GB recommended) and click “Next.”
Click “Customize Hardware” to review hardware settings (optional).
Image of VMware Workstation create new virtual machine wizard opens in a new window
www.mssqltips.com
VMware Workstation creates a new virtual machine wizard
Customize Hardware (Optional):
Under “Memory,” allocate at least 4GB of RAM for Windows Server 2022.
Under “Processors,” assign at least 2 virtual CPUs.
Under “New CD/DVD (SATA),” ensure the Windows Server 2022 ISO is selected.
Under “Hard Disk (SATA),” click “Advanced” and enable “Secure Boot” for compatibility.
Image of VMware Workstation hardware customization window opens in a new window
VMware Workstation hardware customization window
Start the Installation:
Click “Finish” to create the virtual machine.
Power on the virtual machine and follow the on-screen instructions to install Windows Server 2022.
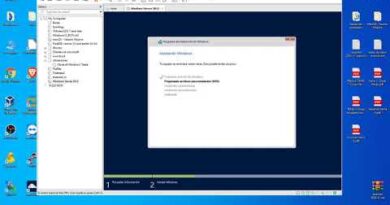
Image of VMware Workstation virtual machine booting Windows Server 2022 Opens in a new window
VMware Workstation virtual machine booting Windows Server 2022
Configure TPM and Secure Boot (If Needed):
If prompted, create a virtual TPM device: Right-click the virtual machine, select “Settings,” navigate to “Hardware,” add a “Trusted Platform Module” device, and follow the setup wizard.
Enable Secure Boot: In the virtual machine’s BIOS settings, navigate to the “Security” tab and enable “Secure Boot.”
Image of VMware Workstation virtual machine settings for TPM and Secure BootOpens in a new window
pureinfotech.com
VMware Workstation virtual machine settings for TPM and Secure Boot
Complete Windows Server 2022 Setup:
Proceed with the installation as you would on a physical computer.
Once complete, install VMware Tools for enhanced performance and features.
Installing Directly on PC:
Create a Bootable USB:
Download a tool like Rufus or BalenaEtcher.
Insert a USB drive (at least 8GB).
Use the tool to create a bootable USB from the Windows Server 2022 ISO.
Back-Up Your Data:
Create a backup of important files to prevent data loss during partitioning.
Boot from the USB:
Restart your PC and enter the boot menu (usually by pressing F12, F2, or Esc during startup).
Select the USB drive as the boot device.
Install Windows Server 2022:
Follow the on-screen instructions to install Windows Server 2022.
Choose the installation type (e.g., “Custom: Install Windows only (advanced)”).
Partition your disk if needed.
Finalize Installation:
Install VMware Tools (if using VMware).
Update Windows Server 2022 with the latest patches and security updates.
Configure roles and features as needed.
#windows #windowseat #windows10 #windowshopping #WindowsPhone #windowsill #windows8 #windowsxp #windowsanddoors #windowseatproject #Windows7 #windowsoftheworld #windowsphonephotography #windows95 #windowstothesoul #windows98 #windowsaroundtheworld #windowsdown #windowshot #windowshop #windows10mobile #windowswear #windowseatph #windowsofinstagram #windowsdisplay #windowshutters #windowshopper #windowsvista #windowstickers #windowsmixedreality
windows server