How to install wordpress in your linux server
Requirements:-
1. Instance Must be in started mode.
2. SSH connected.
3. Elastic IP
4. Download WordPress
5. Apache, Mysql, PHP installed.
6. Tcp port 80,22,3306,25 must be allowed in ec2 security group.
7. Create Databse
Steps:
1. Connect ssh to your Instance.
2. Go to the following location
cd /var/www/html
3. Download wordpress by executing the command
sudo wget http://wordpress.org/latest.tar.gz
4. Uncompress the file with the following command
sudo tar -zxvf latest.tar.gz
5. If you want to rename the directory wordpress then enter the following command
sudo mv wordpress myblog
6. Create databse for wordpress
ElasticIP/phpmyadmin
7. Now rename the wp-config-sample.php to wp-config.php with the following commands
cd myblog
sudo mv wp-config-sample.php wp-config.php
8. Modify wp-config.php file and add the following database parameters
define(‘DB_NAME’, ‘julfiblog’);
define(‘DB_USER’, ‘root’);
define(‘DB_PASSWORD’, ‘YOUR_PASSWORD’);
define(‘DB_HOST’, ‘localhost’);
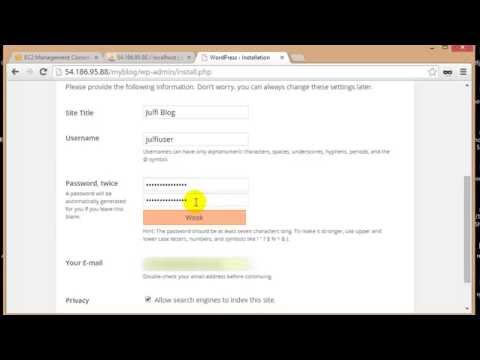
9. Now enter the public DNS or elastic IP followed by /myblog using browser.If you want your wordpress directly accessible by the public DNS, then you have to copy the files inside wordpress folder to www/html folder.
54.186.95.88/myblog
10. Now add your blog title, admin user name, password and your email id
11. Now login to the admin panel
Webpage link:
http://tut.julfi.com/install-wordpress-linux-server/
Follow Us:
Facebook:
https://www.facebook.com/pages/Julfi-Tutorials/360969907396820
Twitter:
Tweets by julfitut
Google+
https://plus.google.com/107219477749933510339
Pinterest:
by Julfi Tutorials
linux web server