How to lock a part of a Word document with a Password
In this post, we will show you how to lock and protect parts of a Word document to prevent it from editing and copying, using the in-built options. If you lock a part of the text, you and other users cannot change the formatting and edit the section without entering the passcode. Let’s check out the steps involved.

It is straightforward to set editing restrictions in Word and password protect Office documents. However, if you follow those guides, you might end up restricting the whole document. At times, you might need to allow users to edit, for example, the first page and prevent them from doing the same with the second page. If so, this tutorial will be handy for you.
Lock & prevent a specific part of a Word document
To lock a specific part of a document in Word, follow these steps-
- Open Microsoft Word and finish editing the document.
- Select the part that you want to lock.
- Go to the Layout tab.
- Click on Breaks.
- Select Continuous from the list.
- Go to Review tab > Restrict Editing.
- Tick the Limit formatting to a selection of styles checkbox.
- Make a tick in the Allow only this type of editing in the document checkbox.
- Select Filling in forms from the drop-down list.
- Click on Select sections and choose a section.
- Click the Yes, Start Enforcing Protection button.
- Enter a password twice.
- Click the OK button.
Let’s check out these steps in detail.
At first, you need to open Microsoft Word on your computer and finish editing the document. It doesn’t matter whether you want to create a new document or open an existing one – you must finish editing the document.
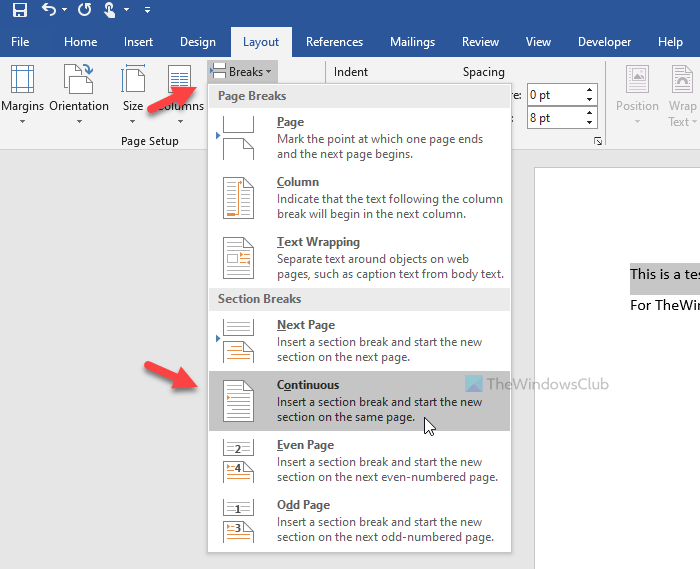
Now, you can enter a section break so that you can select which part or section you want to lock with a password. For that, select a part of your document, go to the Layout tab, click on Breaks, and select the Continuous option from the list.

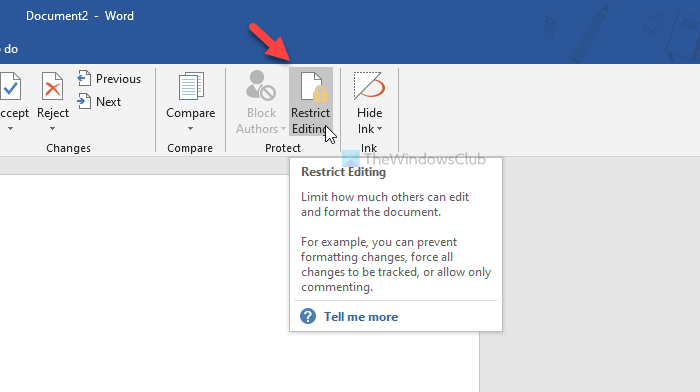
After that, go to the Review tab and click the Restrict Editing option.

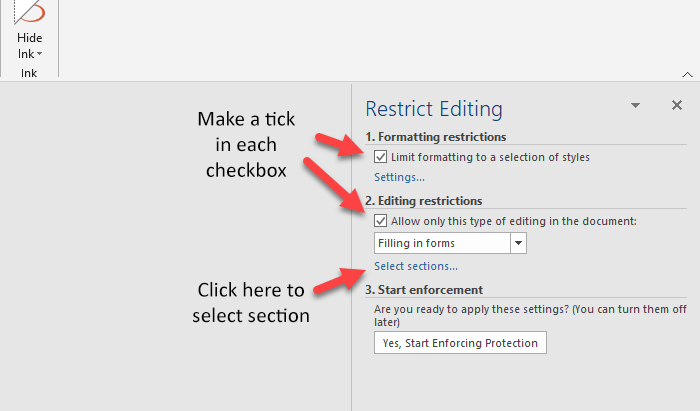
Now you can see a panel on your right-hand side. Here you can find two checkboxes-
- Limit formatting to a selection of styles
- Allow only this type of editing in the documents
You need to make a tick in each checkbox. If you click the Settings button under Formatting restrictions, you can see a few couples of options so that you can choose the type of formatting or styling. It is also possible to-
- Allow AutoFormat to override formatting restrictions
- Block Theme or Scheme switching
- Block Quick Style Set switching
All you have to do is to make a tick in the corresponding checkbox. After doing that, you need to head to the Editing restrictions part. Do select Filling in forms from the drop-down list and click on the Select sections button.

This is where the section break that you used earlier becomes handy as you can select a specific section to lock down with a password.
If you haven’t added a section break, this option is invisible to you. That said, select a section that you want to lock and click the OK button.
For your information, if you added multiple section breaks, you can see Section 3, Section 4, and Section 5, and the list goes on.
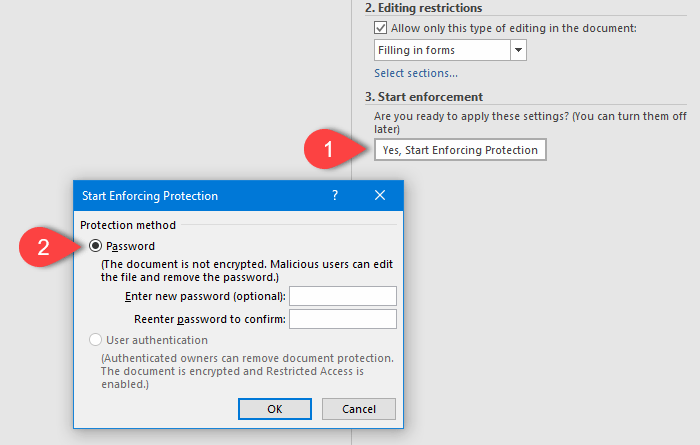
Now, click on the Yes, Start Enforcing Protection button in the Start enforcement section and enter a password twice to confirm.

After clicking the OK button, you cannot edit the locked part in your Word document.
For obvious reasons, it is possible to edit the non-protected part without any problem.
That’s all! Hope it helps.


