How to make files automatically copy to another folder in Windows
In this article, we will show you how to make files automatically copy to another folder on Windows 11/10. Creating a backup is necessary to avoid data loss. Data loss can occur due to many causes like hard disk corruption, malware attacks, etc. You can backup your data manually by using the copy-and-paste method or by using a third-party tool. Do you know you can automate data backup on your Windows computer? We will show you how to do that in this article.

How to make files automatically copy to another folder on Windows 11/10
You can make your files and folders automatically copy to another folder on Windows 11/10 by using the Task Scheduler. In this article, we will show you how to do that.
Follow the steps written below:
- Open Notepad
- Write a script to copy files from one folder to another folder
- Save the Notepad file as a batch file
- Call that batch file with the Task Scheduler
Let’s see how to do this.
Open Notepad and create a batch file
First, you have to create a script to copy files from the source folder to the destination folder. We will use the xcopy command for this. The syntax of the command will be as follows:
xcopy "path of the source folder" "path of the destination folder" /e /y
In the above command, the /e parameter is used to open all the subfolders inside the source folder. This parameter also copies the empty subfolders.
If Windows finds the same file(s) in the destination folder, it will show you a message in the Command Prompt window asking you whether you want to replace the file(s) or not. Hence, if there are a lot of the same files, you will get the overwrite confirmation prompt for each file. Therefore, we have used the /y parameter. The /y parameter suppresses the prompting to confirm that you want to overwrite an existing destination file(s).

Write the correct path of source and destination folders, otherwise, the command will not work. For example, if I want to automate the copy task from the source folder with the address “D:The Windows ClubNew folder” to the USB Flash drive E, the command will be:
xcopy "D:The Windows ClubNew folder" "E:" /e /y
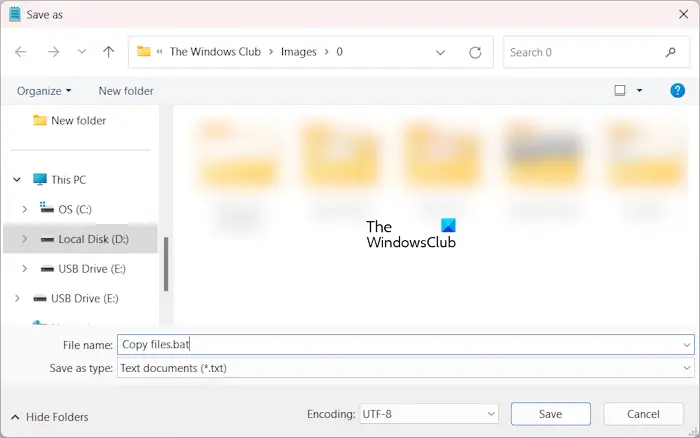
Now, go to File > Save As. Name the file to save it and write .bat at the end of the file name. When you are done, click Save.
Call the batch file with the Task Scheduler
Now, the next step is to call the batch file with Task Scheduler. The following instructions will guide you on this.

Open the Task Scheduler. Expand the Task Scheduler Library folder. Now, right-click on the Task Scheduler Library folder and select New folder. Name this folder Custom Tasks or give it a name as per your choice.
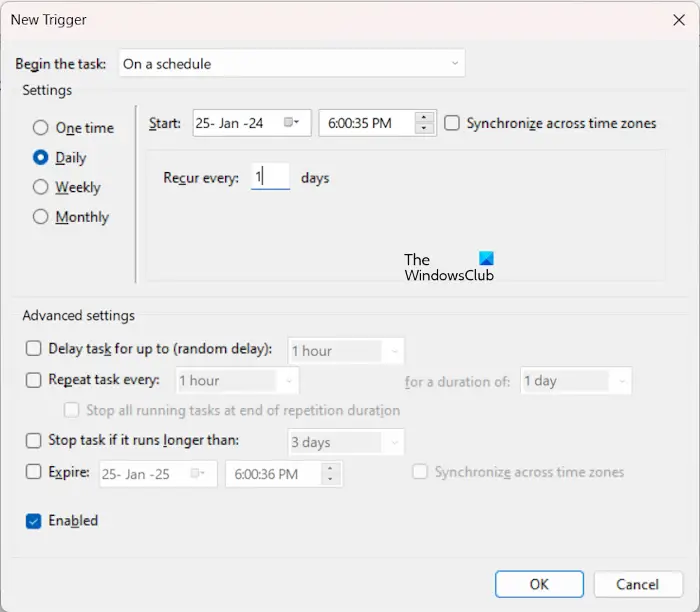
Now, right-click on the Custom Tasks folder or the folder that you have created and select Create Task. Give a name to your task, say Copy Files under the General tab. Now, select the Triggers folder and click New. Set the frequency of the task based on your requirements. For example, if you want to automatically copy your files daily, select Daily. When you are done, click OK.
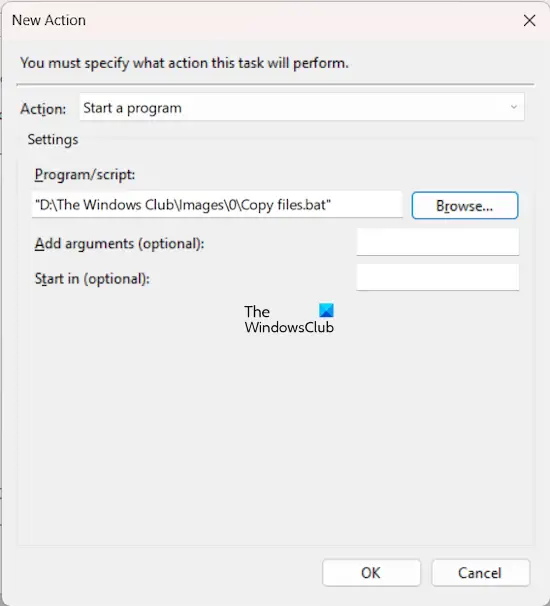
Now, go to the Actions tab and click New. Select Start a program in the Action drop-down. Click Browse and select the batch file from your computer. Click OK.
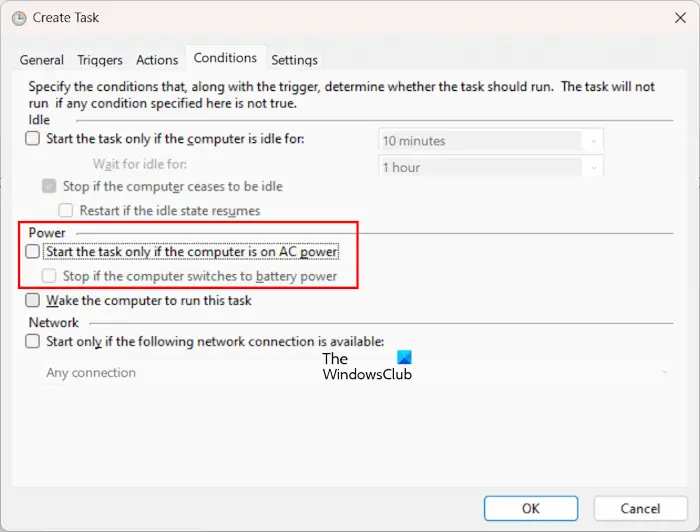
The automated task has been created to copy your files from the source folder to the destination folder. But if you are a laptop user, this automated task will run only when your laptop is connected to the charger. If your laptop is running on battery, the task will not run. To stop this from happening, go to the Conditions tab and uncheck the following checkboxes:
- Start the task only if the computer is on AC power
- Stop if the computer switches to battery power.
If your computer is in sleep mode, the task will not run. To make your computer wake from sleep mode and run the automated task, select the Wake the computer to run this task checkbox. Now, click OK.

After performing the above steps, the task will be added to the Custom Tasks folder in the Task Scheduler and you will see its status as Ready. If the status shows Disabled, right-click on it and select Enable. From now on, the task will run at the desired time.
Do note that if you have created a task to copy files automatically to the external hard disk, that hard disk should be connected to your computer.
That’s it.
How do I copy files to another folder in Windows 11?
The easiest way to copy files to another folder in Windows 11 is to use the copy-and-paste method. Select the files that you want to copy and then press the Ctrl + C keys. Now, open the folder to which you want to copy these files. After opening the folder, press the Ctrl + V keys.
How do I repeat a task every day in Task Scheduler?
To repeat a task in Task Scheduler every day, you have to create a Daily trigger. While creating this trigger, set the time at which you want to start the task. If you want to repeat the task on alternate days, after every 3 days, etc., you can also set this setting.
Read next: Schedule Shutdown or Restart using the Task Scheduler in Windows.
