How to manually install a Driver using a .INF File in Windows 11/10
Device drivers play a very important role in letting several hardware components on your computer function properly. Things like a video card or your motherboard require you to have updated drivers installed if you want them working well. Installing appropriate drivers can be a tough nut to crack for those who are inexperienced at it, but most of the time the files for these drivers come in the form of executable installers. You may have seen these, files with extensions like .exe and .msi.
You may, however, sometimes encounter a scenario where this device driver file is not in the form of a self-extractor but is rather a .zip file or a .inf file.

How to manually install a Driver using a .INF File
In this article, we will demonstrate how you can install a driver using a ‘.inf’ file in Windows 10. If you want to get walked through the steps quickly and not know exactly what goes on, here’s a small gist of the procedure:
- Open the Device Manager and click to update drivers for a device.
- Select to locate the drivers locally on your PC.
- Browse among your folders.
- Open and install the .inf file.
- Alternatively, right-click the INF file name and select Install from the context menu.
Obviously, it is necessary to ensure that you have a driver file on your PC downloaded before you begin following the steps below. If it is a zip file, unzip it and place it in a location you would remember, because that will come into use.
Open the Run dialog box by pressing the Windows and ‘R’ key combination. In the blank space, enter ‘devmgmt.msc’ and press enter. This will open your PC’s Device Manager.
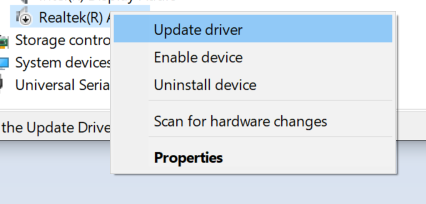
In the Device Manager, you will see settings for your hardware devices. Locate the device that you have downloaded the driver for and expand it. Right-click on the relevant device and click on ‘Update Driver’.

This will open a separate window that will present you with two options. You could, either, let Windows search your computer and the web for the latest driver for the device in question and install it and the second is for you to locate and install it manually. Since you have already downloaded the driver file, you click on the latter.

In the subsequent window, click on ‘Let me pick from a list of device drivers on my computer’ and further click on ‘Have Disk…’.
Click on ‘Browse..’ and locate the folder in which you have downloaded the relevant driver for the device. Once you have located the folder, open it and select the .inf file. Click on Open and follow the instructions that show up to install the file.

It’s possible that you are not able to locate any .inf files in the directory, in which case the driver pack isn’t downloaded on your PC and you have to download a fresh one. To let the changes take effect, reboot your PC.
Alternatively, you can simply right-click the INF file name and select Install from the context menu.
DriverStore folder
While scrolling through the folders looking for the appropriate .inf files, you may have stumbled upon a folder named DriverStore. DriverStore is a system folder that records all the device drivers that are installed on your computer via third-party sources. If you are adept with device drivers and feel the need to manage them, then you can do so using a freeware named DriveStore Explorer.
BONUS TIP:
You can also use the Command-Line or Batch File Install method.
To execute the DefaultInstall and DefaultInstall.Services sections of your INF file on the command line or by using a batch file installation, type the following command at the command prompt, or create and run a batch file that contains this command:
RUNDLL32.EXE SETUPAPI.DLL,InstallHinfSection DefaultInstall 132 path-to-infinfname.inf
Rundll32 and InstallHinfSection are described in the Tools and Setup and System Administration sections, respectively, of the Microsoft Windows SDK documentation.
We hope that you will now have no problem in install a device driver on your system using a .inf file..inf


