How to prevent users from installing Extensions in Google Chrome
If you want to prevent users from installing extensions in Google Chrome, this article will be handy for you. Whether you want to disable all currently installed extensions, new extension installation, or block others from enabling any extension in Google Chrome, this article will help you do that. It is also possible to prevent users from installing external extensions or a specific type such as themes, scripts, etc.
Prevent users from installing extensions in Chrome using Group Policy
To prevent users from installing extensions in Google Chrome using Group Policy, follow these steps-
- Press Win+R to open the Run prompt.
- Type gpedit.msc and hit the Enter button.
- Navigate to Extensions in Computer Configuration.
- Double-click on Configure extension installation blocklist setting.
- Choose the Enabled option.
- Click the Show button.
- Enter * as the Value.
- Click the OK button.
You need to first add the Group Policy template for Google Chrome to use the Local Group Policy method.
To get started, press Win+R to display the Run prompt on your screen. After that, type gpedit.msc and hit the Enter button to open Local Group Policy Editor on your PC. Then, navigate to the following path-
Computer Configuration > Administrative Templates > Class Administrative Templates > Google > Chrome > Extensions
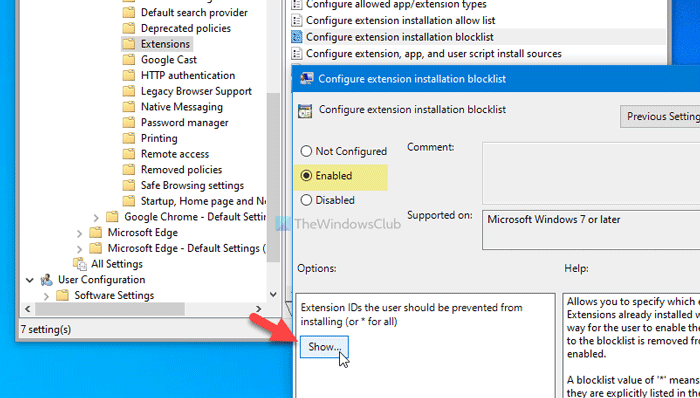
You can see a setting named Configure extension installation blocklist on your right-hand side. Double-click on it and select the Enabled option.

Then, click on the Show button, enter * as the Value, and click the OK button to save the change.
You might have to click the OK button once again.
Once done, all your existing extensions will be turned off, and users won’t be able to install any new extensions. Whenever someone tries to open the Chrome Web Store to install an extension, he/she will get Blocked by admin message.
Block users from installing extensions in Chrome using Registry
To block users from installing extensions in Google Chrome using Registry, follow these steps-
- Open the Run prompt by press Win+R.
- Type regedit and hit the Enter button.
- Click the Yes option.
- Navigate to Policies in HKEY_LOCAL_MACHINE.
- Right-click on Policies > New > Key.
- Name it as Google.
- Right-click on Google > New > Key.
- Name it as Chrome.
- Right-click on Chrome > New > Key.
- Name it as ExtensionInstallBlocklist.
- Right-click on ExtensionInstallBlocklist > New > String Value.
- Name it as 1.
- Double-click on it and enter * as the Value data.
- Click the OK button.
It is recommended to create a System Restore point before heading to the following steps.
To get started, you have to open the Run prompt by pressing Win+R. Then, type regedit hit the Enter button, and click on the Yes option to open Registry Editor. Once it is opened, navigate to this path-
HKEY_LOCAL_MACHINESOFTWAREPolicies
Then, follow these steps minutely to create all the keys and sub-keys. At first, right-click on Policies > New > Key and name it as Google. In case you can already see the Google key, you do not have to create it again.
Now, right-click on Google > New > Key, and name it as Chrome.
Right-click on Chrome > New > Key, and name it as ExtensionInstallBlocklist.
Right-click on ExtensionInstallBlocklist > New > String Value and name it as 1.
Double-click on 1, enter * as the Value data, and click the OK button.
It will block the extension installation in Google Chrome.
Read: Disable add-on installation in Firefox using Group Policy.
Allow specific extensions to be activated in Chrome
As I said earlier, if you enable these methods (Registry Editor and Local Group Policy Editor), all the existing extensions will be deactivated. However, you can bypass that and block users from installing only new extensions.
Group Policy users:
There is a setting called Configure extension installation allow list in the Local Group Policy Editor that you can find in the same location where you got the above-mentioned setting. Double-click on it, choose the Enabled option and click the Show button.
Now, open the extension download page on Chrome Web Store and note down the extension ID. The extension ID is mentioned in the URL. For instance, the URL of the Todoist Chrome extension is this:
https://chrome.google.com/webstore/detail/todoist-for-chrome/jldhpllghnbhlbpcmnajkpdmadaolakh
That means the extension ID is jldhpllghnbhlbpcmnajkpdmadaolakh.
You have to follow this method to get the extension ID and paste it in the Value box for each extension you want to allow.
At last, click the OK button to save the change.
Registry Editor users:
If you used the Registry Editor to prevent others from installing extensions in Chrome, you need to create a sub-key in Chrome. For that, right-click on Chrome > New > Key, and name it as ExtensionInstallAllowlist.
Right-click on ExtensionInstallAllowlist > New > String Value and name it as 1.
Double-click on 1 and enter the extension ID as the Value data.
Read: Disallow installation of Extensions in Microsoft Edge browser.
Allow specific extension type to be installed in Chrome
If you use the Group Policy method, open the Configure allowed app/extension types setting, select the Enabled option, click the Show button, and enter a value like this:
- * “extension”
- * “theme”
- * “user_script”
- * “hosted_app”
- * “legacy_packaged_app”
- * “platform_app”
On the other hand, if you use the Registry Editor, create a new sub-key in Chrome called ExtensionAllowedTypes. Then, right-click on ExtensionAllowedTypes > New > String Value and name it as 1.
After that, double-click on 1 and set the value data as said earlier.
Hope this guide helps.


