How to Rename WiFi Network Adapter on Windows 11
Most Network Adapter names are random and complicated. But Windows 11 allows you to easily rename the Network Adapter to a name that you can identify with. So, if you want to change the name of your WiFi network adapter on Windows 11 then this post will help you do so using the Settings app.
How to Rename Wi-Fi network adapter on Windows 11
To rename the Wi-Fi network adapter on your Windows 11 PC, use the below suggestions:
- First, launch the Windows Settings.
- Then click on the Network & internet tab.
- Scroll to the Advanced network settings option and then open it.
- Under the Network adapters section, click on the Wi-Fi category.
- Go to the Rename this adapter option and then click on Rename button.
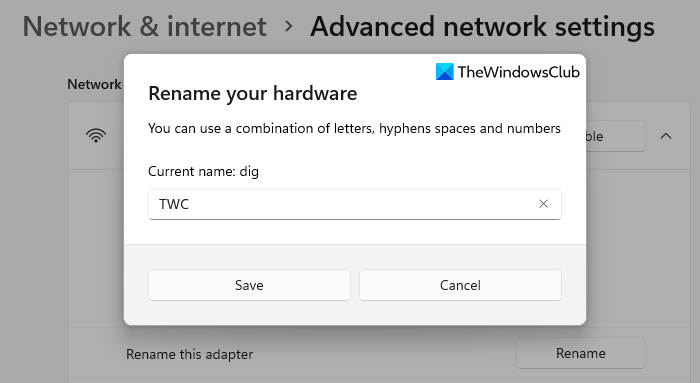
- Next, name your Wi-Fi network adapter and click the Save button.
Let’s now see the above steps in detail:
To rename the WiFi network adapter on your computer, open the Settings app first. For this, right click on the Start menu and select the Settings option from the menu list.
Inside the Settings app, click on the Network & internet menu from the left pane. Now move to the right, scroll down to the bottom and click on the Advanced network settings option.

Under the Network adapter section, click on your Wi-Fi network to expand it. Then click on the Rename button that is available next to the Rename this adapter segment.
On the next popup menu, you will see the current name of your adapter. To rename your hardware adapter, you can use a combination of letters from a to z, hyphens spaces, and numbers from 0 to 9 in the name.
Once you create the preferred name, click on the Save button to apply the changes you made here. This way you can easily rename the WiFi Network Adapter on your Windows 11 computer system.
That’s it. Hope it helps.
Read next: How to Reset Network Adapter on Windows 11.


