How to Setup Email Server Using Postfix Dovecot & Squirrelmail On Centos 7
in this Tutorial you will learn How to setup a local mail server using Postfix, Dovecot And Squirrelmail in CentOS 7. Please note that I said “local mail server”. This tutorial doesn’t help you if you want to send or receive mails to outside like Gmail or yahoo. However, if you want send/receive mails to outside, you should configure the mail server with a public IP, and request your ISP to configure the MX record of your mail server in their DNS server.
hostname -f
yum -y install postfix dovecot telnet squirrelmail openssl
mkdir /etc/postfix/ssl
cd /etc/postfix/ssl
openssl req -x509 -nodes -newkey rsa:2048 -keyout server.key -out server.crt -nodes -days 365
nano /etc/postfix/main.cf
myhostname = os.yourdomain.com
mydomain = yourdomain.com
myorigin = $mydomain
home_mailbox = mail/
mynetworks = 127.0.0.0/8
inet_interfaces = all
inet_protocols = all
inet_interfaces = localhost
mydestination = $myhostname, localhost.$mydomain, localhost, $mydomain
smtpd_sasl_type = dovecot
smtpd_sasl_path = private/auth
smtpd_sasl_local_domain =
smtpd_sasl_security_options = noanonymous
broken_sasl_auth_clients = yes
smtpd_sasl_auth_enable = yes
smtpd_recipient_restrictions = permit_sasl_authenticated,permit_mynetworks,reject_unauth_destination
smtp_tls_security_level = may
smtpd_tls_security_level = may
smtp_tls_note_starttls_offer = yes
smtpd_tls_loglevel = 1
smtpd_tls_key_file = /etc/postfix/ssl/server.key
smtpd_tls_cert_file = /etc/postfix/ssl/server.crt
smtpd_tls_received_header = yes
smtpd_tls_session_cache_timeout = 3600s
tls_random_source = dev:/dev/urandom
nano /etc/postfix/master.cf
submission inet n – n – – smtpd
-o syslog_name=postfix/submission
-o smtpd_sasl_auth_enable=yes
-o smtpd_recipient_restrictions=permit_sasl_authenticated,reject
-o milter_macro_daemon_name=ORIGINATING
smtps inet n – n – – smtpd
-o syslog_name=postfix/smtps
-o smtpd_sasl_auth_enable=yes
-o smtpd_recipient_restrictions=permit_sasl_authenticated,reject
-o milter_macro_daemon_name=ORIGINATING
nano /etc/dovecot/conf.d/10-master.conf
# Postfix smtp-auth
unix_listener /var/spool/postfix/private/auth {
mode = 0660
user = postfix
group = postfix
}
nano /etc/dovecot/conf.d/10-auth.conf
auth_mechanisms = plain login
nano /etc/dovecot/conf.d/10-mail.conf
mail_location = maildir:~/mail
nano /etc/dovecot/conf.d/20-pop3.conf
pop3_uidl_format = %08Xu%08Xv
systemctl restart postfix ; systemctl enable postfix ; systemctl restart dovecot ; systemctl enable dovecot
firewall-cmd –permanent –add-service=smtp
firewall-cmd –permanent –add-port=587/tcp
firewall-cmd –permanent –add-port=465/tcp
firewall-cmd –permanent –add-port=110/tcp
firewall-cmd –permanent –add-service=pop3s
firewall-cmd –permanent –add-port=143/tcp
firewall-cmd –permanent –add-service=imaps
firewall-cmd –permanent –add-service=http
firewall-cmd –reload
telnet os.yourdomain.com smtp or telnet localhost smtp
telnet os.yourdomain.com pop3 or telnet localhost pop3
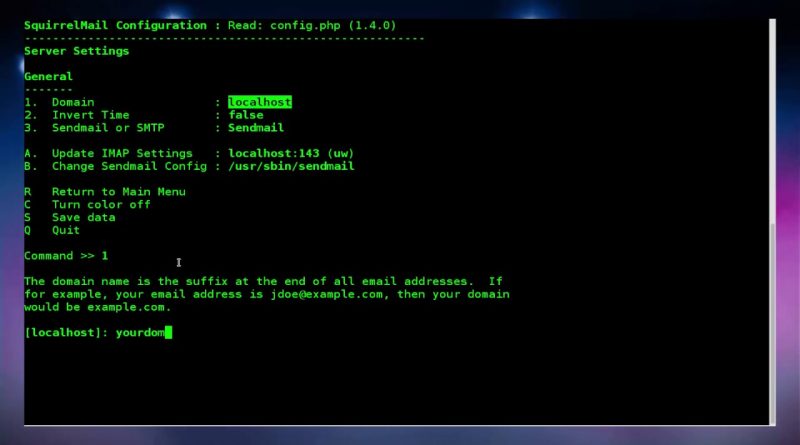
cd /usr/share/squirrelmail/config/
./conf.pl
Option 1 – option 2 –
systemctl start httpd ; systemctl enable httpd
useradd -m ojal -s /sbin/nologin
passwd ojal
systemctl restart dovecot.service postfix.service httpd.service
http://localhost/webmail
http://os.yourdomian.com/webmail
by Quick Notepad Tutorial
linux smtp client


