How to take a screenshot with Mouse Pointer and Cursor included
We use the Print Screen key or the Snipping tool to take screenshots on Windows 10, one thing that they all do apart from capturing screenshots is that they exclude the mouse cursor. Whenever we take a screenshot on Windows 10, we never see the mouse cursor in the screenshot.
What if, you want to take a screenshot with the mouse cursor included in it? Is it possible? The answer is Yes. You can capture great screenshots with the mouse cursor included in them with Steps Recorder, an in-built windows app, and many third-party apps. In any of the apps, capturing a screenshot with the mouse cursor included in it takes a few steps which a normal screenshot doesn’t need. Let’s see how we can capture screenshots with Problem Steps Recorder and IrfanView, a third-party application.
Take a screenshot with Mouse Pointer and Cursor included
1] Steps Recorder
Problem Steps Recorder is actually designed and included in Windows 10 for a reason. It helps you in capturing screenshots of processes you do and share them with Microsoft or any other technician to share a problem, (if any) your PC is facing. It captures screenshots with the mouse cursor in them and it can facilitate us to get screenshots we want with the mouse cursor included.
To capture screenshots in Steps Recorder:
- Click on Start and search for Steps Recorder and open it
- Click Start Record and open the window you want to screenshot with the cursor
- Now, click Stop Record to stop the recording
- Save the recording
- Unzip the saved recording and open the file
- Select the screenshot you want and right-click to save it.
Let’s deep dive into the details of the process.
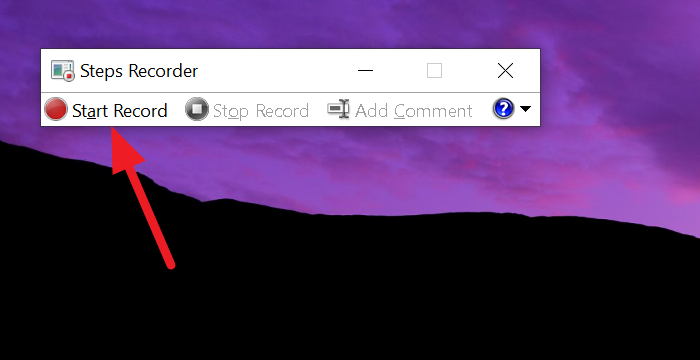
To get started, click on the Start button and search for Steps Recorder. Open it. You will see a tiny window of Steps Recorder. Click on Start Record to start capturing the screenshots.

Once you are done recording the screenshot you want, click on Stop Record.
You will see the list of screenshots as Recorded Steps. Click on the Save button and set the location to save them into a file.
The recorded steps or screenshots will now be saved as a zip folder in the location you chose. Unzip the folder and open the .mht file by double-clicking on it. The file will open in Internet explorer.
Go through the page, right-click on the screenshot you want, and select Save picture as, from the options. Chose the location where you want to save the file and save it.
The screenshot you want to capture with the mouse cursor included in it will be saved in the location you chose.
Steps Recorder actually does a pretty good job in capturing the screenshots or recording the steps. But, going through the process for a single screenshot might look waste of time. And also, you get the tiny Steps Recorder window in the screenshots.
To avoid these, opting for a third-party application is a good idea. Let’s see how we can capture the same screenshot in IrfanView, a third-party image viewer application.
2] IrfanView
IrfanView is a free image viewer application that is popular as an alternative to default image viewer on Windows. This application even allows you to capture screenshots, convert images, etc. Download the application from irfanview.com and install it on your PC.
After the installation, to capture a screenshot in the IrfanView application:
- Click on Options and select Capture/Screenshot
- Confirm if the option to include the mouse cursor is enabled
- Then, click Start to enable capture mode
- Use Ctrl+F11 to capture the screenshot
- Click on the Save button and save it
Getting into the details of the process, open the IrfanView application and click on Options in the menu, and select Capture/Screenshot. You can also press C on your keyboard as a shortcut.
A Capture Setup window will open. Check if the checkbox beside the Include mouse cursor option is checked to enable it. If not, enable it by checking the box.
Then, click on Start to enable capture mode.
IrfanView window will now minimize. Open the window you want to screenshot and use the Ctrl+F11 keyboard shortcut to capture the screenshot.
The screenshot you captured will now open in the IrfanView window. Click on the Save button to save the screenshot.
You can now set the location to save the screenshot and save it.
There are some more third-party applications that enable us to capture screenshots with the mouse cursor included in them like Greenshot, ShareX, etc. You can use any of them too.
Hope, this guide helps you in getting the screenshots with the mouse cursor included in them.
Read next: How to take a scrolling screenshot in Windows 10.


