PowerShell Get-Appxpackage Not working or Access Denied
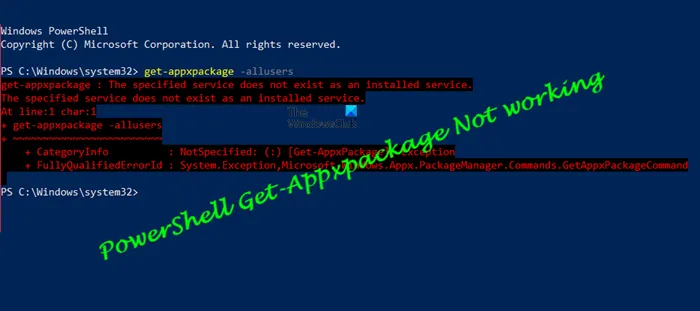
Get-Appxpackage is a PowerShell command that can display a list of the app packages that are installed in a user profile. It includes all the applications that are installed from the Microsoft Store or third-party apps. When using the command, if you receive an error— Powershell Get-Appxpackage Access Denied, Not Recognized or Not Working, then this post will help you resolve this.

The error message you could see may vary but typically, it would read:
Get-AppxPackage : The service cannot be started, either because it is disabled or because it has no enabled devices
associated with it. The service cannot be started, either because it is disabled or because it has no enabled devices associated with it.
PowerShell Get-Appxpackage Not working
It’s a permission issue that can be resolved by following some checks.
- Run PowerShell With Admin Permission
- Check Permission With Destination Directory
- Check AppX Deployment Service status.
When changing the permission of folders, make sure you do not remove any user account which is already available.
1] Run PowerShell With Admin Permission
Since the command needs to install on the application on a system level, it is important that you execute or run the command when it is launched with admin permission.
- Press the Start button, and type PowerShell
- When it appears on the list, right-click and choose to Run as Administrator
- Execute the command and it should work without error.
Apart from permission denied, you may also receive Not Recognized or Not Working as an error. While Not Recognized is related to admin permission, Not working is related to Services.
Go to Services Snap-in, and locate Client License Service (ClipSVC) and AppX Deployment Service (AppXSVC). Make sure they are available and running.
2] Check Permission With Destination Directory
If you are installing the application in a particular folder, then make sure you have complete permission to write the files inside it.
- Go to the Destination folder, right-click and select Properties
- Then switch to Security tab
- Check if your account is available, and it has full permission.
- You need to also check if the System user account is available and has full control
- If not, you can click on the Edit button, and add them along with the permission.
3] Check AppX Deployment Service status
In the PowerShell console, Run Get-Service "AppXSvc" and see.
The AppX Deployment Service (AppXSVC) Status should be Running.
If it shows Stopped, then open a command prompt as administrator and run:
net start AppXSvc
Alternatively, you could open Regedit and navigate to:
HKEY_LOCAL_MACHINESYSTEMCurrentControlSetServicesAppXSvc
Here set the value of “Start” to “3” and reboot.
Post these changes, you can execute the command, and the error should not occur anymore.
Read: How to change File and Folder permissions in Windows.
How Do I Enable AppxPackage?
The command and related files are already available with Windows, and you do not need to install anything special. However, make sure you execute it with admin permission else it will say the command is not recognized.
How to Restore Built-In Apps on Windows?
Open PowerShell with administrator rights, and execute the following command to restore all the Built-in apps in Windows.
Get-AppxPackage -AllUsers | For each app: Add-AppxPackage -DisableDevelopmentMode -Register "$($_InstallLocation)AppXManifest.xml
It will take some time to finish, and all the apps that are available when you set up Windows for the first time will be available.
I hope the post was easy to follow, and you clearly understand the reasons behind the error.


