SecurityHealthSystray.exe high CPU, Memory, Disk usage [Fix]
If your Windows 11/10 computer is slow or hangs or lags a lot because SecurityHealthSystray.exe is using high CPU, Disk or Memory, follow these solutions. You can find some working solutions to permanently fix this problem.

What is SecurityHealthSystray.exe?
SecurityHealthSystray.exe, or Security Health System Tray, is an executable service that displays information about your computer’s security, performance, and health in the system tray. If your system has issues with malware, adware, performance, anti-malware, adware removal tools, firewall, or any other security tool, SecurityHealthSystray.exe shows notifications in the system tray.
SecurityHealthSystray.exe high CPU, Disk or Memory usage in Windows 11/10
To fix the high CPU, Disk or and Memory usage by SecurityHealthSystray.exe in Windows 11/10, follow these instructions:
- Run Windows Defender Troubleshooter
- Restart Windows Defender Firewall service
- Restart Windows Defender Advanced Threat Protection Service
- Disable highest privileges for Windows Defender Scheduled Scan
- Disable/Remove third-party security software
To learn more about these solutions, continue reading.
1] Run Windows Defender Troubleshooter

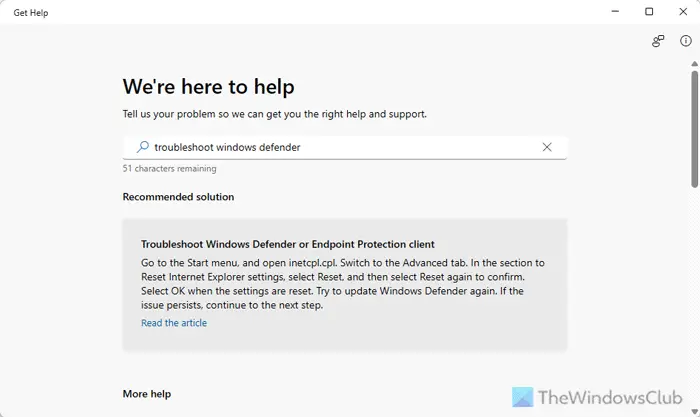
As the Windows Defender or Windows Security displays most of the security notifications, you should run the Windows Defender Troubleshooter once to check whether the problem belongs to the Windows Defender/Windows Security or not. For that, do the following:
- Open the Get Help app.
- Search for “troubleshoot windows defender”.
- Go through the screen instructions.
2] Restart Windows Defender Firewall service
Windows Defender Firewall displays some notifications about suspicious incoming and outgoing traffic. That is why it is suggested to restart the Windows Defender Firewall Service. For that, do the following:
- Press Win+R > type services.msc and hit Enter.
- Double-click on the Windows Defender Firewall service.
- Click the Stop button.
- Click the Start button.
- Click on Apply and OK.
3] Restart Windows Defender Advanced Threat Protection Service

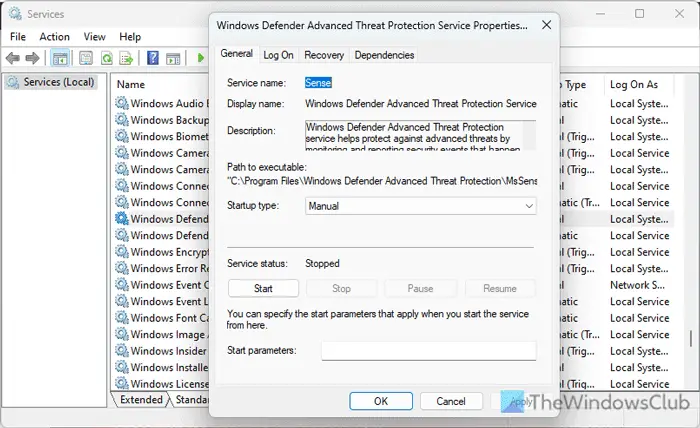
Windows Defender Advanced Threat Protection Service is one of the most important services that display a lot of notifications about your computer’s service. That is why we are suggesting you to restart this service too. To restart the Windows Defender Advanced Threat Protection Service, follow these steps:
- Open the Services panel.
- Double-click on the Windows Defender Advanced Threat Protection Service.
- Click the Stop button.
- Click on the Start button.
- Click on Apply and OK.
4] Disable highest privileges for Windows Defender Scheduled Scan

To disable the highest privileges for Windows Defender Scheduled Scan, follow these steps:
- Open the Task Scheduler.
- Go to Task Scheduler Library > Microsoft > Windows > Windows Defender.
- Double-click on the Windows Defender Scheduled Scan.
- Remove the tick from the Run with highest privileges.
- Go to the Conditions tab.
- Remove the tick from the Start the task only if the computer is on AC power checkbox.
- Click OK.
5] Disable/Remove third-party security software
If you use third-party security software to scan your PC and make it safer for kids or anybody, you should disable the tool temporarily. If it helps, you should consider using another tool instead of the existing one.
Read: SecurityHealthSystray.exe Bad Image; What is it?
How do I fix high RAM and CPU usage on Windows 11?
In most cases, high RAM, Disk and CPU usage problems can be fixed by removing startup, uninstalling unnecessary apps, terminating multiple heavy-weight apps, etc. However, if the problem still exists, you should run the Windows Memory Diagnostic tool, free up some disk space, etc. On the other hand, you can update your system since, at times, this problem can arise because of glitches.
How to fix Windows 11 Antimalware service executable high CPU usage?
To fix the Antimalware Service Executable or msmpeng.exe high CPU and Memory usage issue in Windows 11/10, you should turn off Cloud-delivered protection first. Then, you need to modify or change Windows Defender scheduling scans. Finally, you can run the System File Checker or perform a SFC scan.


