Unhide or Hide your Hard Drive Partition using Command Prompt
We all love to hide our personal data, and while you can lock folder and keep uploading to online storage, how about hiding the complete partition? While it may feel overkill, but if you have tons of files you don’t want anybody to access, then this is the best method to follow. In this post, we will show how you can show or hide drive partitions using Command Prompt.
Unhide or Hide Hard Drive Partition using Command Prompt
While there are multiple ways to hide drive partitions, in this post, we are specifically sharing how to do it from the Command Prompt. We are using the Diskpart tool, which also offers a command-line interface. Before going ahead, stay warned that Diskpart is a powerful tool that offers complete management of drive, and it includes the option to delete the partitions as well. While hiding doesn’t delete and you can always bring them back, use it carefully.
Basic Diskpart Command
- diskpart – Opens Diskpart console
- list volume – Displays all the volumes on the computer.
- select volume #number – Selects the partition you want to hide
- remove letter #driveletter – Removes drive letter of the selected volume
- assign letter #driveletter – Assigns drive letter to the selected volume
Follow the steps to hide or show drive partition.
Open Command Prompt with admin permissions. You can do so by typing CMD in the Run prompt (Win + R), followed by pressing Shift + Enter together. You will get the UAC prompt; make sure to choose yes from the pop-up window.

Type the following command, and press the Enter key to launch the Diskpart console.
Diskpart
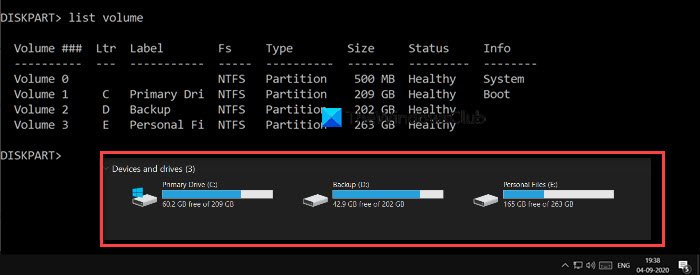
The text in the Command Prompt, which was displaying the path, will be replaced by “Diskpart>” Next, type the following to list all the partitions which you can see using File Explorer.
list volume
Open File Explorer, go to This PC and match it with what you see here. In the Diskpart tool result, the Lable column will match with the exact name you see on the computer. It might cut short the name because of the limit but gives you a fair idea. You can also identify the disk with the drive letter.

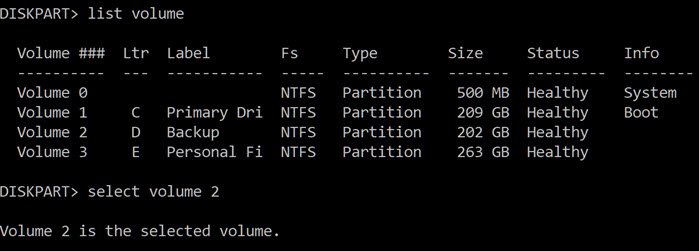
To do any operation on a particular drive, here we are going to hide it, you need to select the drive or partition. Let’s assume I want to hide the “D” partition with the label Backup. First, we will have to select the Volume and then operate on the drive. The backup partition has label Volume 2. Execute the following as per your computer to select the drive which you want to hide.
select volume 2

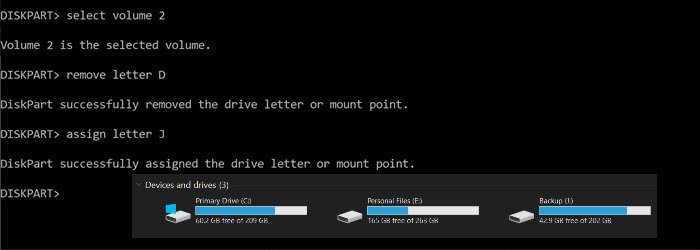
By design, if a partition doesn’t have a drive letter assigned, it will not be accessible. If you remember, when you format a drive, it is always assigned a drive letter at the end. Now you know the reason. Execute the command to remove the drive letter, which, in my case, is D.
remove letter D
Once the execution completes, you should receive a success message. Double-check with File Explorer, and it will not be available from anywhere. Technically, the partition has been dismounted.

To bring back the partition, you will need to mount it again and assign the drive letter again. You can always assign any drive letter which is not assigned to anyone else. If you are doing it after some time, then follow the complete list, else just the last one is enough.
list volume
select volume 2
assign letter J

To exit the diskpart tool, type exit, and you will get back to the command prompt as usual.
I hope the post helped you hide drive partitions using the command prompt.


