Enable or Disable Wi-Fi and Ethernet adapter on Windows 11
Windows 11 came with new settings. While Microsoft made everything easier for users, many would find it difficult to locate the new settings. The same is the case with Network Adapter settings. If you wish to enable or disable the Network Adapter in Windows 11, then please read through this article.
Enable and Disable Wi-Fi and Ethernet adapter on Windows 11
The various procedures to enable or disable the Network Adapter are as follows:
- Through Settings
- Through Control Panel
- Through Command Prompt
- Through Powershell
- Through Device Manager
1] Through Settings

Enabling or Disabling the Network Adapter through Settings in Windows 11 is the easiest method to follow:
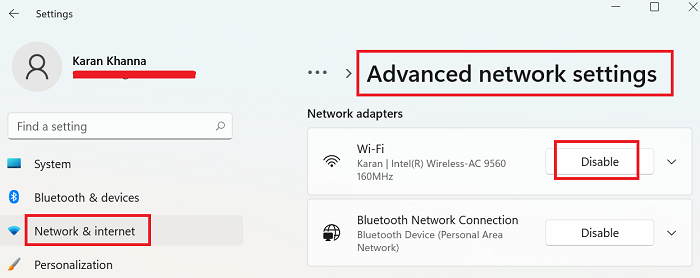
- Right-click on the Start button and select Settings.
- Go to the Network & internet tab.
- Scroll down to the last option Advanced network settings.
- Under the list of Network Adapters, you will find your Network Adapter and the option to Enable or Disable it.
- Use the option you need and reboot the system.
2] Through Control Panel

To enable and Disable Wi-Fi and Ethernet adapter on Windows 11 using Control Panel:
- Press Win+R to open the Run window and type the command ncpa.cpl.
- Hit Enter to open the Network Connections window.
- Right-click the adapter of your choice and select Enable or Disable as per your needs.
Windows 11 has made it easier to Enable or Disable the network adapter by including the option in the Settings windows itself. Earlier, users would have to open the Control Panel menu through an option in the Settings window.
3] Through Command Prompt

To enable and Disable Wi-Fi and Ethernet adapter on Windows 11 using Command Prompt:
Search for “command prompt” in the Windows search bar and select Run as administrator corresponding to the Command Prompt application.
In the elevated Command Prompt window, type the following command to identify the name of the adapter:
netsh interface show interface
It should be noted that the name of the Network Adapter is not the same as the name of the network. It will be Ethernet01, Ethernet02, Wi-Fi, etc.
After identifying the name of the Network Adapter, type the following command in the elevated Command Prompt window to disable the Network Adapter:
netsh interface set interface <name of adapter> disable
You can type the following command to enable the Network Adapter:
netsh interface set interface <name of adapter> enable
where <name of adapter> is the name of the Network Adapter which you noted earlier.
4] Through Powershell

The procedure to disable the Network Adapter through Powershell is similar to that with Command Prompt.
Search for “powershell” in the Windows search bar.
Corresponding to the option for Windows Powershell, select Run as administrator.
In the elevated Windows Powershell window, type the following two commands hitting Enter after each one:
Get-NetAdapter | format-table

Disable-NetAdapter -Name <name of adapter> -Confirm:$false
The job should be done!
5] Through Device Manager

The Device Manager window has the list of the drivers. To disable the network Adapter driver through the Device Manager, the procedure is as follows:
- Press Win+R to open the Run window and type the command devmgmt.msc.
- Hit Enter to open the Device Manager window.
- Expand the list of Network Adapters
- Right-click on the Intel Wireless AC adapter.
- Select Disable/Enable device.
- Reboot the system.
Why would you need to disable the Network Adapter?
The Network Adapter is important for a system to connect to the internet. However, at times, if multiple adapters are present in the system, then they interfere with each other. In such a case, you might have to disable the redundant adapters.
We hope this post helps you.