Fix Invalid Recovery Area error on Windows 10 computer
If when you try to access the Windows Recovery Environment (WinRE) on your Windows 10 device, you encounter the error message Invalid Recovery Area on a blank screen, then this post will help you successfully resolve this issue.

The cause of this error is mainly that the recovery partition on your PC that houses the Windows RE is not intact, either because it has been deleted or just inaccessible due to some unknown reasons. Other reasons could be the following:
- The WinRE is disabled in Windows settings.
- The Boot Configuration Data Store (BCD) doesn’t contain entries to boot in recovery mode.
- The file winre.wim (WinRE environment image) is missing or moved.
- The WinRE configuration file ReAgent.xml is missing or contains incorrect settings.
Fix Invalid Recovery Area error
If you’re faced with this issue, you can try our recommended solutions below in no particular order and see if that helps to resolve the issue.
- Enable Windows RE
- Check BCD Entries for WinRE
- Reset WinRE settings in ReAgent.xml file
- Find and copy the Winre.wim file manually
- Perform Windows 10 In-Place Upgrade Repair
Let’s take a look at the description of the process involved concerning each of the listed solutions.
1] Enable Windows RE
If the Windows recovery environment is disabled, you’ll encounter the error. In this case, you can enable Windows RE. Here’s how:
First you need to check the status of WinRE.
- Press Windows key + R to invoke the Run dialog.
- In the Run dialog box, type cmd and then press CTRL + SHIFT + ENTER to open Command Prompt in admin/elevated mode.
- In the command prompt window, type the command below and hit Enter.
reagent /info
If the Windows RE status shows Disabled, input the command below and hit Enter to turn on the WinRE.
reagentc /enable
After enabling this option, and you still could not access the Recovery environment in Windows 10, try the next solution.
2] Check BCD Entries for WinRE
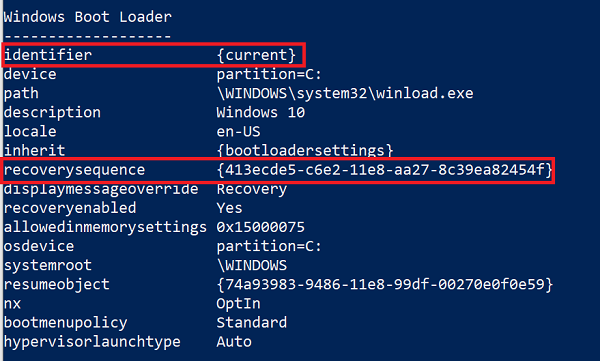
Windows Boot Loader determines if it has to load Windows RE. It is possible that the loader is pointing to an incorrect location.
Open PowerShell with admin privileges, and execute this command:
bcdedit /enum all
Look for an entry in Windows Boot Loader identifier set as Current.

In that section, find “recoverysequence” and note the GUID.
Again, in the result, search for Windows Boot Loader identifier set as the noted GUID.

Make sure that the device and osdevice items show the path for the Winre.wim file and they are the same. If not, we will have to point the current identifier to one which has the same.
Once you find the new GUID, run the command:
bcdedit /set {current} recoverysequence {GUID_which_has_same_path_of_device_and_device}
See if this resolves the issue.
3] Reset WinRE settings in ReAgent.xml file
This solution requires you to reset the recovery environment settings in ReAgent.xml file (backup this file in advance).
On Windows 10, just delete the ReAgent.xml file and it will be automatically created the next time you enable WinRE.
The ReAgent.xml file should be located in the dirctory path below – assuming C is the drive housing the Windows 10 installation.
C:RecoveryWindowsRE
Note: You may need to show hidden files and folders to find and delete the file.
4] Find and copy the Winre.wim file manually
Do the following:
- Open Command Prompt in admin mode.
- In the CMD prompt window, type the command below and hit Enter.
dir /a /s c:winre.wim
If you have found the file, copy it into a default location by running the commands below one after the other:
attrib -h -s c:Recovery3b09be7c-2b1f-11e0-b06a-be7a471d71d6winre.wim
xcopy /h c:Recovery3b09be7c-2b1f-11e0-b06a-be7a471d71d6winre.wim c:WindowsSystem32Recovery
If you couldn’t find the file on your local drive, you can copy it from a similar Windows 10 installation instance(the OS version and the system architecture must match), or from the install media/bootable USB flash drive.
To do it, open the sourcesinstall.wim (or install.esd) on the DVD/ ISO image using 7-Zip and extract the WindowsSystem32RecoveryWinre.wim and ReAgent.xml to the C:WindowsSystem32Recovery folder.
The original boot.sdi file must be copied from the WindowsBootDVD folder.
Once you have copied a healthy winre.wim file, try accessing the recovery environment and if the issue persists, try the next solution.
5] Perform Windows 10 In-Place Upgrade Repair
This solution requires you to perform a Windows 10 in-place upgrade repair. A repair upgrade is a process of installing Windows 10 over the existing installation of Windows 10 on your hard disk, using your installation DVD or ISO file.
Performing this can repair broken operating system files while preserving your personal files, settings, and installed applications.
Hope this helps!


