IPV6 addressing Practical and Ipv6 Static Routing |CCNA CCNP| Network zeal
IPv6 (Internet Protocol version 6) is the latest version of the Internet Protocol, which is used to identify and locate devices on a network. IPv6 was developed to address the limitations of its predecessor, IPv4, which was running out of available IP addresses due to the exponential growth of the internet. IPv6 provides a vastly larger address space, improved security features, and other enhancements compared to IPv4.
Here are some key aspects of IPv6 addressing:
1. Address Format: IPv6 addresses are 128 bits in length, compared to the 32-bit addresses of IPv4. This significantly increases the number of available addresses. IPv6 addresses are typically written in hexadecimal notation, separated by colons. For example, an IPv6 address might look like this: 2001:0db8:85a3:0000:0000:8a2e:0370:7334.
2. Address Types:
– Unicast Address: Used to identify a single network interface.
– Multicast Address: Used to send data to multiple recipients simultaneously.
– Anycast Address: Assigned to multiple devices, but data is sent to the nearest device in the group.
– Link-Local Address: Used for communication within a single network segment (similar to IPv4’s APIPA addresses).
– Global Unicast Address: Routable on the public internet.
3. Address Components:
– Network Prefix: Specifies the network portion of the address.
– Interface Identifier: Identifies a specific interface on the network.
4. Zero Compression: Leading zeros within each 16-bit segment of an IPv6 address can be omitted, and consecutive groups of zeros can be represented as a double colon (::) once in each address for brevity. For example, 2001:0db8::1 represents the address 2001:0db8:0000:0000:0000:0000:0000:0001.
5. Reserved Addresses: IPv6 reserves certain address ranges for special purposes, such as loopback (::1) and link-local addresses (fe80::/10).
6. DHCPv6 or Stateless Address Autoconfiguration (SLAAC): IPv6 allows for automatic address configuration using DHCPv6 or SLAAC. SLAAC is a method where devices generate their own addresses based on the network prefix and their MAC address or a random number.
7. IPv6 Subnetting: Like IPv4, IPv6 networks can be subdivided into smaller subnets to efficiently allocate address space and manage routing.
8. IPv6 Security: IPv6 includes built-in security features like IPsec (Internet Protocol Security) support, which enhances network security at the protocol level.
9. Transition Mechanisms: As the transition from IPv4 to IPv6 continues, various transition mechanisms and technologies have been developed to allow coexistence of both protocols, such as Dual-Stack (running both IPv4 and IPv6 simultaneously) and 6to4 tunneling.
IPv6 addressing is essential for the continued growth of the internet and the increasing number of devices connected to it.
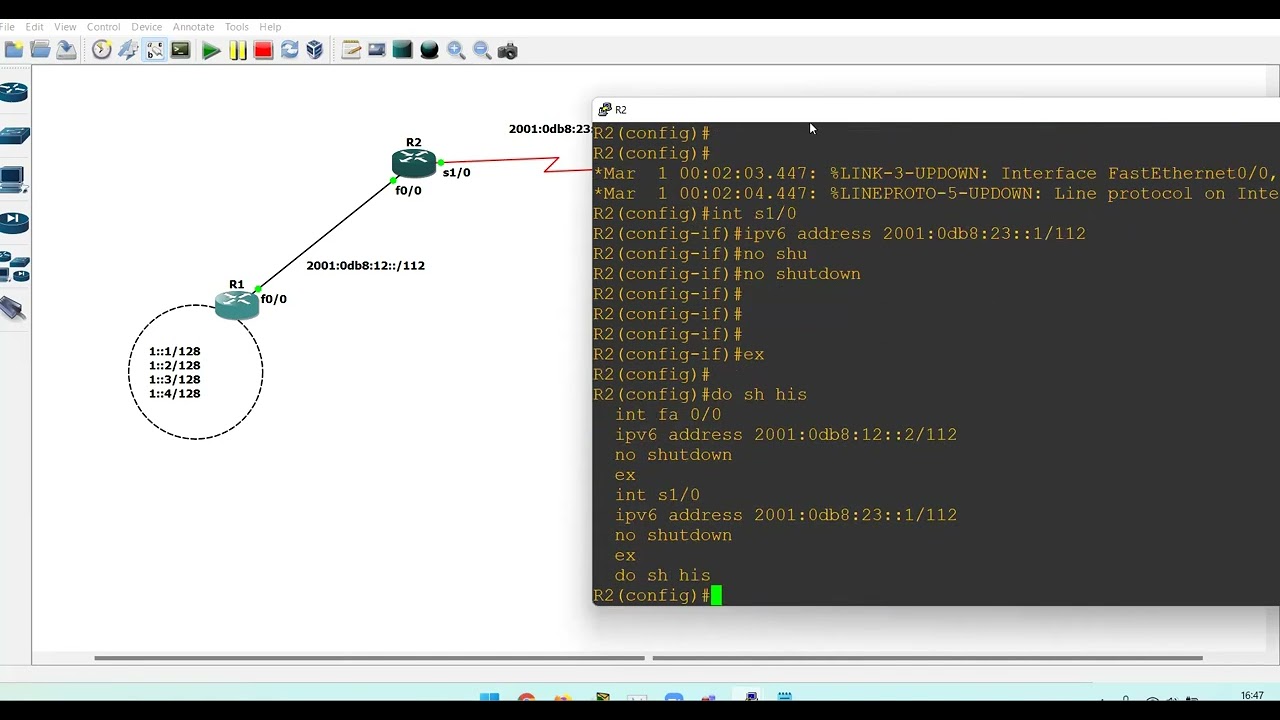
IPv6 static routing is a method of manually configuring static routes in an IPv6 network. Static routing is used to define specific paths for IPv6 packets to follow within a network. Unlike dynamic routing protocols such as OSPF or BGP, where routers exchange routing information and make routing decisions dynamically, static routing requires network administrators to manually configure the routes.
Here are the steps to configure IPv6 static routing:
1. Access Router Configuration:
You need access to the router or networking device where you want to configure static routes. This usually involves logging in to the router’s web-based interface or using a command-line interface (CLI) through Telnet or SSH.
2. Determine the Destination Network:
Identify the destination network or subnet for which you want to create a static route. You will need to know the IPv6 address or network prefix of the destination.
3. Determine the Next-Hop Gateway:
Identify the IPv6 address of the next-hop gateway or router that will be responsible for forwarding packets to the destination network. This should be a directly connected router interface or a router that is reachable via an existing route.
4. Configure the Static Route:
In most router configurations, you’ll use a command or interface to specify the static route. The syntax may vary depending on the router’s operating system.
“`
ipv6 route 2001:db8:1234::/64 2001:db8:5678::1
“
5. Verify the Configuration:
After configuring the static route, use the router’s command-line interface or tools like `ping` or `traceroute` to verify that traffic is being routed correctly to the destination network.
6. Save Configuration:
Depending on your router, you may need to save the configuration to ensure that the static route persists across reboots.
source
ipv4


