Unable to map Network drive in Windows 10
If you are unable to map a network drive, maybe, after updating Windows 10, then follow this troubleshooting guide. It is a common problem among people who recently installed a new feature update of Windows 10.
It is relatively straightforward to map a network drive. By mapping a network drive, a user can connect a local drive to shared storage on another PC in the same network.
Let’s assume that you used the network drive earlier on your older build of Windows 10. If after you installed a new feature update. it stopped working, you may be required to go through the same steps. But if it still does not works, then this registry fix may help you.
Before getting started, it is recommended to create a System Restore point.
Unable to map Network drive in Windows 10
To fix unable to map a network drive issue in Windows 10, follow these steps-
- Press Win+R to open the Run prompt.
- Type regedit and hit the Enter button.
- Click on the Yes button in the UAC prompt.
- Navigate to the network drive key in HKCU.
- Right-click and delete it.
- Navigate to Map Network Drive MRU in HKcu.
- Delete all entries for your drive.
- Reconnect your network drive.
- Navigate to the network drive key in HKCU.
- Right-click on it > New > DWORD (32-bit) Value.
- Name it as ProviderFlags.
- Double-click on it and set the Value data as 1.
- Click the OK button.
You will have to open the Registry Editor on your computer. For that, press Win+R, type regedit, and hit the Enter button. Once the UAC prompt appears, click the Yes button.
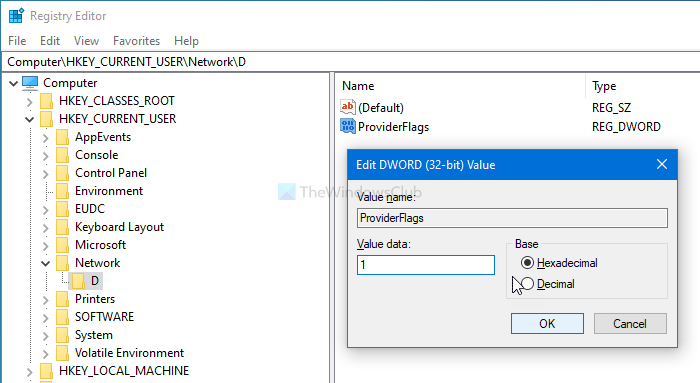
After that, navigate to this folder where D represents the network drive-
HKEY_CURRENT_USERNetworkD
Right-click on D, select the Delete option and click on OK to confirm.

Following that, navigate to this key-
HKEY_CURRENT_USERSOFTWAREMicrosoftWindowsCurrentVersionExplorerMap Network Drive MRU
Here you will see some entries with your previously selected drive. As it is different for each user, you will have to find out these entries and delete them accordingly. For that, right-click on it, select the Delete option and click the OK button.
Now, follow this detailed tutorial to map or add a network location or map FTP drive in Windows 10. After that, navigate to this path-
HKEY_CURRENT_USERNetworkD
Don’t forget to replace D with your drive letter. Right-click on D > New > DWORD (32-bit) Value, and name it as ProviderFlags.

Double-click on it to set the Value data as 1 and click the OK button to save the change.
That’s all! Now you won’t get the problem anymore.
Hope this post helps you.