Windows Update failed to install with Error Code 0x8024004a
There is a simple feature in Windows 10 that lets you check for updates, download them, and install them to keep your system updated. However, sometimes, many users face this problem that Windows Update failed to install with error 0x8024004a. This is an error code returned by the Windows Update Agent (WUA) API.
WU_E_SETUP_IN_PROGRESS – 0x8024004A – WUA operations are not available while operating system setup is running.
Windows Update Error Code 0x8024004a
Before you proceed, you would restart your computer once and try again. If that does not help, go through our entire list of suggestions and see which of them you would like to try, after creating a system restore point:
- Reset Windows Update Agent
- Using Windows Update Troubleshooter
- Reset Windows Update components
- Reset Windows Update Client
- Run DISM to repair broken Windows Update
- Download updates manually.
1] Reset Windows Update Agent

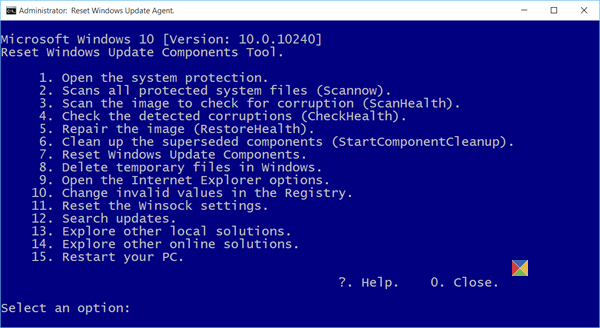
Reset Windows Update Agent to default in Windows 10 and see if that helps you. For that, you can download and run the Reset Windows Update Agent Tool from Microsoft. This tool will reset & repair all WU related components & registry keys, detect corruptions, replace corrupted system files, fix corrupted system image, Reset Winsock settings, and so on.
2] Run Windows Update Troubleshooter

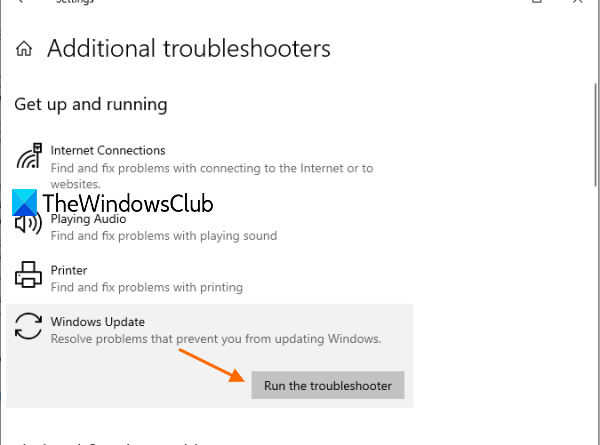
If something is preventing you from updating Windows, then this native feature of Windows 10 can also be used. Windows Update Troubleshooter searches for problems and fixes them automatically. These are the steps:
- Use Win+I to open the Settings app
- Press on Update & Security
- Select Troubleshoot visible on the left side
- Select Additional Troubleshooters on the right section
- Expand Windows Update section
- Hit on Run the troubleshooter button.
3] Reset Windows Update components
It is possible that the Windows Update troubleshooter would fail in fixing the Windows Update Agent. In such a case, try resetting all Windows Update components.
4] Reset Windows Update Client

This Reset Windows Update PowerShell script will completely reset the Windows Update client settings. It has been tested on Windows 7, 8, 10, and Server 2012 R2. It will configure the services and registry keys related to Windows Update for default settings. It will also clean up files related to Windows Update, in addition to BITS related data.
5] Run DISM to repair broken Windows Update
You can also fix corrupted Windows Update system files using DISM Tool. The Dism.exe tool can be used in different situations, and one of them is to repair a corrupted Windows Update files. Do note that you need to run a different command if you want to repair corrupted Windows Update System Files. If you run the usual /RestoreHealth command, it may not necessarily help.
DISM will replace potentially corrupted or missing system files with good ones. However, if your Windows Update client is already broken, you will be prompted to use a running Windows installation as the repair source or use a Windows side-by-side folder from a network share, as the source of the files.
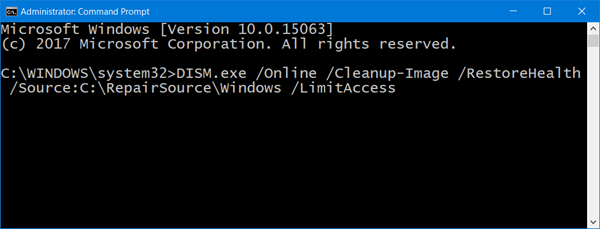
You will then be required to run the following command instead:
DISM.exe /Online /Cleanup-Image /RestoreHealth /Source:C:RepairSourceWindows /LimitAccess

Here you have to replace the C:RepairSourceWindows placeholder with the location of your repair source.
Once the process is complete, DISM will create a log file in %windir%/Logs/CBS/CBS.log and capture any issues that the tool finds or fixes.
These can help fix problems that might prevent Windows Updates from installing.
Read: Windows Update fails to install or will not download.
6] Download updates manually
If nothing works, then you need to download Windows updates manually from the official Microsoft website, and then install the downloaded updates. This will fix your problem.
Hope something from these will help.


